close

Home & Family

Home & FamilyPest

Box Elder Bugs- Identification, Behavior, and Control Methods

Box Elder Bugs Identification Behavior And Control Methods

Box elder bugs, identifiable by their black and red markings, are common nuisances in households and gardens. This guide covers their identification, life cycle, habitats, and behavior. Understanding their impact is crucial for effective management. We’ll explore various control methods, including eco-friendly solutions for sustainable pest management. Learn everything you need to know to keep box elder bugs at bay.

What are Box Elder Bugs?

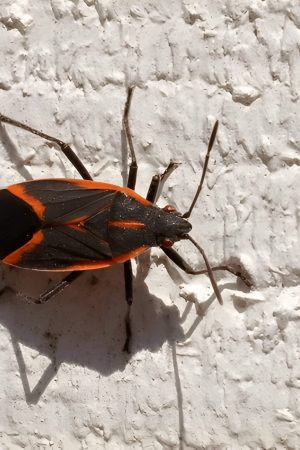
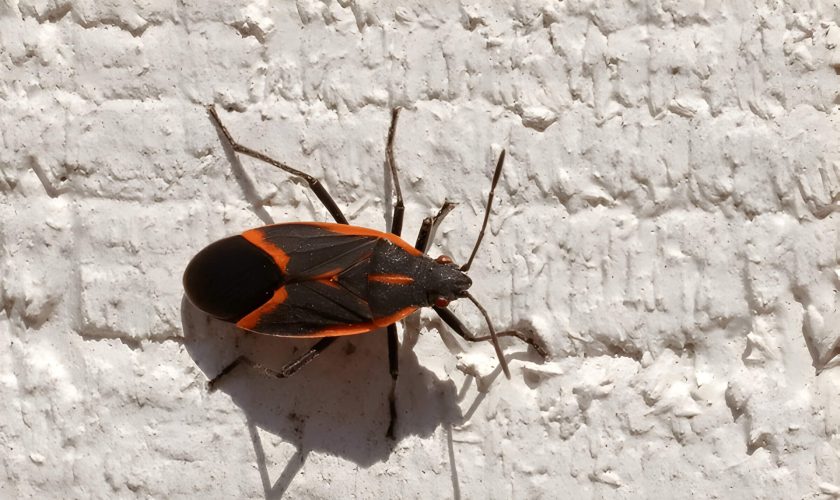
Box elder bugs, scientifically known as Boisea trivittata, are a common sight in North America, especially around box elder trees after which they are named. These insects can be identified by their distinct physical characteristics. Adult box elder bugs typically measure about half an inch in length and have a dark brown or black coloration with striking red or orange markings along their thorax and wings. Their elongated, oval-shaped bodies and six legs make them easily recognizable.

When it comes to box elder bug identification, it’s important to note that these bugs also possess prominent red eyes and two antennae. The nymphs, or immature stages of the bugs, are smaller in size but display bright red bodies which darken as they mature.

Understanding what box elder bugs look like is crucial for homeowners who may find these insects congregating on the sunny sides of buildings during cooler months. While generally harmless to humans and pets, their presence can be a nuisance due to their tendency to invade homes in large numbers seeking warmth. Recognizing these characteristics will help you manage and control any potential infestations effectively.

The Life Cycle of Box Elder Bugs

The Life Cycle Of Box Elder Bugs

The life cycle of box elder bugs is a fascinating process that consists of several distinct stages. Understanding these stages can help in managing and controlling their populations. The box elder bug life cycle begins with the egg stage. Female box elder bugs lay their eggs in crevices of tree bark, typically on box elder trees, maple trees, or ash trees. These eggs are reddish-brown and hatch within a few days to weeks, depending on environmental conditions.

Once hatched, the nymph stage begins. Nymphs are small and bright red with black markings and go through several molts as they grow. Each molt brings them closer to their adult form, gradually developing wings and darkening in color.

The final stage is adulthood. Adult box elder bugs are about half an inch long with distinctive black bodies marked by red lines along the thorax and wings. At this stage, they become more mobile and seek out food sources such as seeds from box elders or other trees.

As for longevity, how long do box elder bugs live? Typically, their lifespan ranges from a few months to a year depending on environmental factors like temperature and food availability.

Understanding the stages of the box elder bug life cycle can be crucial for effective pest management strategies. By targeting specific stages like eggs or nymphs, it’s possible to reduce their numbers before they reach adulthood and reproduce further.

Common Habitats and Behavior of Box Elder Bugs

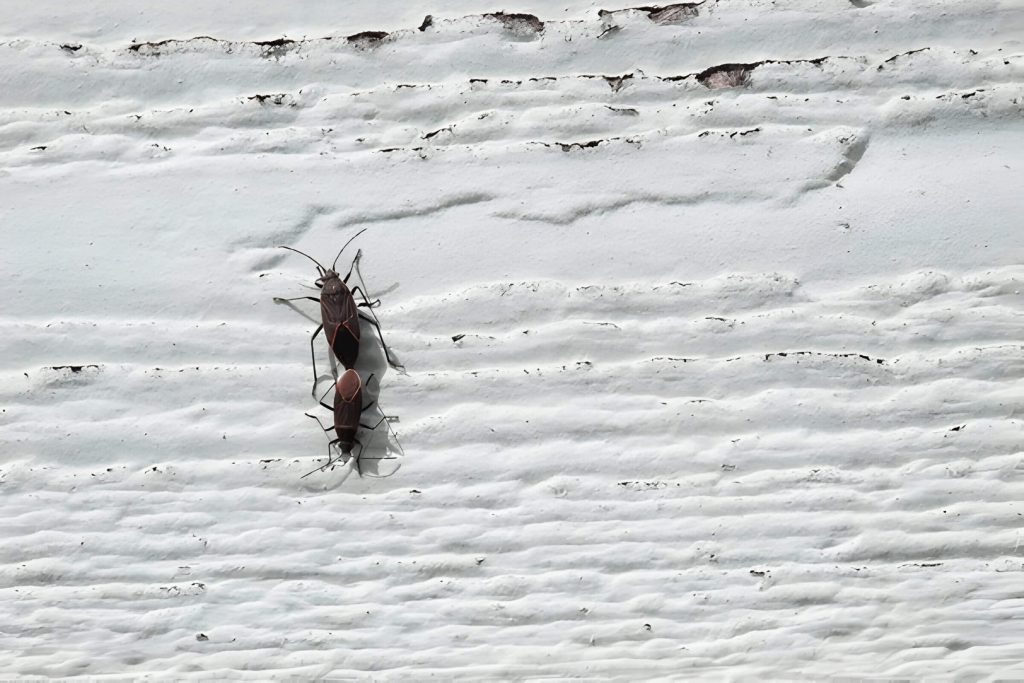
Box elder bugs are commonly found in regions where box elder trees, maple trees, and ash trees are prevalent. These insects thrive in areas with a moderate climate, making them widespread across the United States. The primary box elder bug habitat includes tree bark, leaves, and seeds of their preferred host plants. During the warmer months, they can often be seen congregating on the sunny sides of trees and buildings.

As for their behavior patterns, box elder bugs exhibit distinct seasonal habits. In spring and summer, they feed on the sap from leaves, flowers, and developing seeds of host trees. This feeding does not typically cause significant damage to healthy trees but can be a nuisance when populations are high. As temperatures drop in autumn, these bugs seek shelter to overwinter. They often find refuge in cracks and crevices of buildings or under loose bark.

Understanding where box elder bugs live and their behavior patterns is crucial for managing their presence around homes and gardens. By identifying potential habitats and seasonal behaviors, homeowners can take proactive measures to prevent infestations before they become problematic.

The Impact of Box Elder Bugs on Homes and Gardens

Box elder bugs, often found in large numbers, can become a significant nuisance for homeowners and gardeners alike. These insects are typically attracted to box elder trees, but they do not limit themselves to these alone; they also target maple and ash trees. The presence of box elder bugs in the house usually spikes during the fall when they seek warm places to overwinter.

In gardens, box elder bugs are considered pests primarily because of their feeding habits. They feed on the leaves, flowers, and seed pods of various plants. Although their feeding does not typically kill plants, it can cause noticeable damage such as leaf discoloration and deformities which can affect the overall aesthetic appeal of your garden.

When it comes to homes, while box elder bugs do not cause structural damage or pose health risks to humans or pets, their sheer numbers can be overwhelming. They tend to congregate in sunny areas on exterior walls before finding ways into homes through cracks and crevices. Once inside, they can be difficult to remove and may leave behind stains from their excrement on curtains and walls.

Understanding how these garden pests operate is crucial for effective management. Sealing entry points around your home and maintaining a clean garden by removing debris can significantly reduce their numbers. For severe infestations, professional pest control services may be necessary to manage the damage caused by box elder bugs effectively.

Effective Methods to Control and Prevent Box Elder Bug Infestations

Box elder bugs can be a nuisance, especially during the fall when they seek shelter inside homes to escape the cold. Understanding effective methods to control and prevent these pests is crucial for maintaining a bug-free environment.

One of the primary pest control methods for box elders involves sealing entry points. Inspect your home for cracks, gaps, and holes around windows, doors, and foundations. Use caulk or weatherstripping to seal these potential entryways. This preventive measure not only helps keep box elder bugs out but also improves overall energy efficiency.

Another effective strategy is to reduce their habitat by managing vegetation around your home. Box elder bugs are attracted to box elder trees and other seed-bearing plants. Consider removing female box elder trees from your property or at least trimming back branches that are close to your house.

For those wondering how to get rid of box elders bugs once they’ve entered the home, vacuuming is a practical solution. Use a vacuum cleaner with a hose attachment to suck up any visible bugs. Dispose of the vacuum bag immediately to prevent them from escaping back into your living space.

Insecticides can also be used as a last resort but should be applied with caution. Focus on exterior applications around windowsills, door frames, and other entry points where box elder bugs congregate.

By combining these preventive measures with timely interventions, you can effectively control and prevent box elder bug infestations in your home.

Naturally Deterring Box Elder Bugs

Box elder bugs, though relatively harmless, can become quite the nuisance when they invade homes and gardens in large numbers. Fortunately, there are several natural pest control methods for box elders that are both effective and eco-friendly. By adopting these organic solutions for pest management, you can maintain a healthy environment while keeping these pests at bay.

One of the most straightforward eco-friendly ways to deter pests like box elder bugs is to seal entry points around your home. Check for gaps around windows, doors, and foundations where these insects might enter. Using caulk or weather stripping can effectively block their access.

Another natural method involves using essential oils known for their insect-repelling properties. Spraying a mixture of water and essential oils such as tea tree oil or lavender around potential entry points can discourage box elder bugs from entering your space.

Maintaining a clean yard is also crucial in natural pest control for box elders. Regularly remove debris such as fallen leaves and branches where these bugs might congregate. Additionally, planting certain types of flowers like marigolds or chrysanthemums can naturally repel box elder bugs due to their strong scents.

Finally, consider introducing natural predators into your garden. Birds and beneficial insects like ladybugs feed on box elder bugs and help keep their population under control without the need for chemical interventions.

By utilizing these eco-friendly solutions, you not only manage the presence of box elder bugs but also contribute to a healthier ecosystem overall.

read more
Home & FamilyPets

Hookworms in Dogs (Causes, Signs, Treatment, and Prevention)

Hookworms In Dogs Causes Signs Treatment And Prevention

Hookworms are a serious parasitic threat to dogs, causing significant health issues if untreated. Understanding the causes, signs, treatment options, and prevention of hookworm infections is crucial for dog owners. This guide covers how these parasites infect dogs, symptoms to watch for, effective treatments, and preventive steps. Regular veterinary check-ups and proper hygiene ensure your dog’s healthier life.

Introduction to Hookworms in Dogs

Hookworms in dogs are a significant concern for pet owners and veterinarians alike. These parasitic worms, known scientifically as Ancylostoma caninum, reside in the intestines of infected dogs and can lead to severe health issues if left untreated. Canine hookworm infection is particularly prevalent in warm, humid environments where the larvae thrive.

The lifecycle of hookworms begins when the larvae penetrate a dog’s skin or are ingested through contaminated food or water. Once inside the host, they travel to the intestines, attach themselves to the intestinal lining, and feed on blood. This feeding behavior can cause anemia, weight loss, diarrhea, and lethargy in affected dogs.

Detecting hookworms early is crucial for effective treatment. Common symptoms include pale gums due to anemia, bloody stools, and general weakness. A veterinarian will typically diagnose hookworm infection through a fecal examination that identifies eggs present in the stool.

Treatment involves deworming medications that eliminate adult worms from the intestines. Preventative measures include regular veterinary check-ups and maintaining good hygiene practices to reduce exposure to contaminated environments.

Understanding hookworms in dogs is essential for ensuring your pet’s health and well-being. By staying informed about these parasitic worms and taking proactive steps towards prevention and treatment, you can help protect your furry friend from this common canine parasite.

Causes of Hookworm Infections in Dogs

Hookworm infections in dogs are a common concern for pet owners, and understanding the causes of these infections is crucial for prevention and treatment. The primary cause of hookworm infection in dogs is the ingestion or direct contact with hookworm larvae. These microscopic larvae can be found in contaminated soil and water, making outdoor environments a potential risk.

Dogs often get hookworms through various transmission routes. One common way is through ingestion when they lick or eat contaminated soil, feces, or water. Another significant transmission method is through skin penetration; hookworm larvae can burrow into a dog’s skin, typically through the paws or belly when they come into contact with infested ground.

Additionally, puppies are particularly vulnerable as they can acquire hookworms from their mother during nursing if she has an active infection. Understanding these transmission pathways helps pet owners take preventive measures such as maintaining clean living environments and regular veterinary check-ups to keep their furry friends safe from hookworm infections.

Recognizing the Signs and Symptoms of Hookworm Infections in Dogs

Hookworm infections are a common parasitic issue that can affect dogs of all ages. Being vigilant about the health of your pet is crucial, as early detection and treatment can significantly improve outcomes. Understanding the signs of hookworms in dogs is essential for any responsible pet owner.

One of the primary symptoms of canine hookworms is anemia, which occurs due to the blood-sucking nature of these parasites. You might notice your dog appearing lethargic or weak, which are telltale signs that something may be amiss. Pale gums are another indicator that your dog may be suffering from anemia caused by a hookworm infection.

Gastrointestinal distress is also a common symptom associated with hookworm infections. Look out for signs such as diarrhea, which may sometimes contain blood, and vomiting. These symptoms suggest that your dog’s digestive system is being compromised by parasitic activity.

In addition to these more obvious symptoms, weight loss and poor coat condition can also signal a hookworm infection. If you observe your dog losing weight despite maintaining its regular diet or if its coat appears dull and unhealthy, it’s advisable to consult your veterinarian for an evaluation.

Identifying parasitic infections in dogs early on can make a significant difference in their health and well-being. Regular veterinary check-ups and prompt attention to any unusual symptoms can help ensure your furry friend stays healthy and happy.

Treatment Options for Hookworm Infections in Dogs

Treatment Options For Hookworm Infections In Dogs

Hookworm infections in dogs can be a serious health concern, but fortunately, there are several effective treatment options available. Treating hookworms in dogs typically involves a multi-faceted approach that includes deworming treatments, medications, and ongoing veterinary care.

The first step in addressing hookworm infections is usually a deworming treatment for dogs. Dewormers are medications specifically designed to eliminate intestinal parasites. Commonly used dewormers include pyrantel pamoate, fenbendazole, and milbemycin oxime. These medications work by paralyzing or killing the worms so they can be expelled from the dog’s body through the digestive system.

In addition to deworming treatments, your veterinarian may prescribe specific medication for dog parasites to address any secondary issues caused by the infection. This could include antibiotics if there is an associated bacterial infection or iron supplements if the dog is suffering from anemia due to blood loss caused by the hookworms.

Veterinary treatment for dog worms also involves regular follow-up visits to ensure that the infection has been fully eradicated and that there are no lingering effects on your dog’s health. Your vet may recommend periodic fecal examinations to monitor for any signs of reinfection and adjust treatment plans as necessary.

Overall, prompt and thorough veterinary care is crucial when dealing with hookworm infections in dogs. By following your veterinarian’s recommendations and ensuring your pet receives appropriate deworming treatments and medications, you can effectively manage and prevent these parasitic infections.

Preventive Measures to Protect Your Dog from Hookworms

Preventing hookworm infections in dogs is crucial for maintaining your pet’s health and well-being. These parasitic worms can cause severe anemia, weight loss, and other health issues if not addressed promptly. Here are some essential dog parasite prevention tips to help keep your canine companion safe from hookworms.

Firstly, regular veterinary check-ups are vital. Your veterinarian can perform routine fecal examinations to detect any signs of hookworm infections early on. Early detection allows for prompt treatment, reducing the risk of severe complications.

Secondly, maintaining good hygiene practices is essential in preventing parasitic infections in pets. Ensure that your dog’s living area is clean and free from fecal matter. Regularly clean up after your dog during walks and dispose of waste properly to minimize the risk of contamination.

Another critical preventive measure is administering a veterinarian-recommended deworming schedule. Deworming medications effectively eliminate existing parasites and prevent future infestations. Consult with your vet to determine the most appropriate deworming regimen for your dog based on their age, lifestyle, and overall health.

Additionally, practicing proper canine hygiene plays a significant role in preventing hookworm infections. Regularly bathe your dog using a gentle shampoo to remove any potential parasites from their coat. Also, ensure that their bedding is clean and washed frequently.

Lastly, be mindful of where you take your dog for walks or playtime. Avoid areas known for high contamination levels or those frequented by stray animals that may carry parasites.

By following these preventive measures diligently, you can significantly reduce the risk of hookworm infections in dogs and ensure a healthier life for your furry friend.

The Importance of Regular Veterinary Check-ups for Your Dog’s Health

Regular veterinary check-ups are crucial for maintaining your dog’s overall health and well-being. These routine visits play a significant role in preventative care for pets, ensuring that any potential health issues are identified and addressed early on. By scheduling regular vet visits for dogs, pet owners can stay ahead of common ailments and provide comprehensive pet health care.

One of the primary benefits of routine vet check-ups is the early detection of diseases. Many conditions, such as dental disease, obesity, and heart problems, can develop slowly over time without obvious symptoms. Regular examinations allow veterinarians to perform thorough assessments and catch these issues before they become severe.

Additionally, preventative care for pets during these visits often includes vaccinations, parasite control, and nutritional advice tailored to your dog’s specific needs. This proactive approach helps in maintaining a strong immune system and preventing illnesses that could otherwise be costly or challenging to treat.

Moreover, routine vet check-ups foster a strong relationship between you, your dog, and the veterinarian. This trust is essential when it comes to managing chronic conditions or emergencies that may arise in the future. By prioritizing regular veterinary appointments, you ensure that your dog receives the best possible care throughout their life.

Conclusion (Keep Your Dog Safe from Hookworms with Proper Care and Preventive Practices)

Ensuring your dog remains free from hookworms requires a combination of vigilance, proper care, and preventive measures. Regular veterinary check-ups are crucial for early detection and treatment of hookworm infections. Administering prescribed deworming medications as recommended by your vet can significantly reduce the risk of infestation.

Maintaining good hygiene is another essential preventive practice. Clean up after your dog promptly to minimize the chances of hookworms spreading in the environment. Additionally, ensure that your dog’s living area is kept clean and free from fecal contamination.

Feeding your dog a balanced diet helps boost their immune system, making them less susceptible to infections. Also, avoid letting your dog roam in areas known to be contaminated with feces from other animals.

By adhering to these practices, you can protect your furry friend from the dangers of hookworms and ensure they lead a healthy, happy life.

read more
Home & FamilyPets

Can Dogs Eat Raw Chicken? Everything You Need to Know

Can Dogs Eat Raw Chicken Everything You Need To Know

As raw diets for dogs gain popularity, many pet owners wonder about the safety and benefits of feeding raw chicken. This guide covers the nutritional advantages and potential health risks, with insights from veterinary experts and tips on safe handling. Explore the pros, cons, expert opinions, and alternative dietary choices to make an informed decision for your dog’s nutrition.

Nutritional Benefits of Feeding Your Dog Raw Chicken

Feeding your dog raw chicken can offer a variety of nutritional benefits that contribute to overall canine health. One of the primary advantages is the high protein content found in raw chicken. Protein is essential for muscle development, repair, and maintaining a healthy coat and skin. Raw chicken also contains important nutrients such as vitamins B6 and B12, niacin, phosphorus, and selenium, all of which play crucial roles in supporting your dog’s metabolic functions and immune system.

The benefits of raw meat for dogs extend beyond just protein. Raw chicken provides natural sources of fats that are vital for energy production and nutrient absorption. Additionally, the bones in raw chicken can be beneficial for dental health by helping to keep teeth clean and gums strong through natural chewing processes.

Incorporating raw chicken into your dog’s diet can also enhance their overall digestive health. The enzymes present in raw meat aid in digestion and promote better nutrient absorption compared to some processed dog foods. However, it’s important to ensure that the raw chicken is fresh and handled properly to avoid any potential risks associated with bacterial contamination.

Overall, integrating raw chicken into your dog’s diet can significantly improve their nutrition by providing essential proteins, vitamins, minerals, and healthy fats necessary for optimal canine nutrition. Always consult with a veterinarian before making any significant changes to your pet’s diet to ensure it meets their specific needs.

Potential Risks and Safety Concerns of Feeding Dogs Raw Chicken

Potential Risks And Safety Concerns Of Feeding Dogs Raw Chicken

Feeding dogs raw chicken has become a trend among some pet owners, but it’s important to be aware of the potential risks and safety concerns associated with this practice. One of the primary dangers is bacterial infections from raw chicken. Raw meat can harbor harmful bacteria such as Salmonella and Campylobacter, which can lead to serious health issues in dogs.

The risks of salmonella in dogs are particularly concerning. Ingesting contaminated raw chicken can result in gastrointestinal distress, including symptoms like vomiting, diarrhea, and lethargy. In severe cases, it may even lead to more serious conditions such as septicemia or systemic infections that require immediate veterinary attention.

Safety concerns with raw meat for pets extend beyond just bacterial infections. Handling and storing raw chicken improperly can increase the likelihood of contamination not only for your pet but also for household surfaces and humans in the home. It’s crucial to practice strict hygiene measures if you choose to feed your dog a raw diet.

While feeding dogs raw chicken might seem like a natural choice, it’s essential to weigh these potential risks carefully. Consulting with a veterinarian before making any significant changes to your pet’s diet is always recommended to ensure their health and safety.

Tips and Guidelines to Safely Feed Your Dog Raw Chicken

Feeding your dog raw chicken can be a nutritious option, but it’s crucial to follow specific guidelines to ensure safety and hygiene. Proper handling of raw meat for dogs is essential to prevent any potential health risks for both your pet and household members.

Firstly, always source high-quality raw chicken from reputable suppliers. Freshness is key, so check the expiration date and avoid any meat that looks discolored or has an off smell. When preparing raw chicken for pets, use separate utensils and cutting boards dedicated solely to their food. This minimizes the risk of cross-contamination with human food.

Hygiene tips for feeding dogs raw food include thoroughly washing your hands before and after handling the meat. Clean all surfaces that come into contact with the raw chicken with hot, soapy water or a disinfectant. Store any unused portions in airtight containers in the refrigerator or freezer to maintain freshness.

By following these tips on safe handling of raw meat for dogs, you can confidently provide a balanced diet while keeping your pet healthy and happy.

What Do Experts Say About Dogs Eating Raw Chicken?

When it comes to feeding dogs raw chicken, veterinary opinions are notably varied. Many experts in the field of dog nutrition express concerns about the potential risks associated with raw diets. One of the primary issues highlighted by vets is the risk of bacterial contamination, such as Salmonella and E. coli, which can pose significant health threats not only to dogs but also to their owners.

On the other hand, some veterinarians advocate for raw diets under strict guidelines and proper handling procedures. They argue that a well-balanced raw diet can offer nutritional benefits that mimic a dog’s natural ancestral diet. Proponents suggest that raw food can lead to shinier coats, healthier skin, improved dental health, increased energy levels, and smaller stools.

However, it’s essential for pet owners to consult with their veterinarians before making any significant changes to their dog’s diet. Vet advice on feeding dogs raw food typically includes ensuring that meals are balanced and complete with all necessary nutrients. Moreover, experts recommend sourcing high-quality meat and practicing safe food handling techniques to minimize health risks.

While there are both proponents and opponents within veterinary circles regarding feeding dogs raw chicken or other raw foods, it is crucial for pet owners to seek professional guidance tailored to their specific pets’ needs before embarking on a raw diet regimen.

Exploring Other Dietary Options for Your Dog

When it comes to feeding your dog, the debate between cooked chicken and raw chicken is a common one among pet owners. While raw chicken is often touted for its natural enzymes and nutrients, it carries risks such as bacterial contamination. On the other hand, cooked chicken eliminates these risks but may lose some nutritional value during the cooking process. Given these considerations, exploring alternative proteins can be beneficial for ensuring a balanced diet for your canine companion.

Alternative proteins like turkey, beef, lamb, and fish can provide essential nutrients while diversifying your dog’s diet. These options can be found in both commercial dog foods and homemade dog meal recipes. Commercial dog foods often offer well-balanced formulations that cater to various dietary needs and preferences, making it easier to ensure your pet receives all necessary nutrients.

For those who prefer a more hands-on approach, homemade dog meal recipes allow you to control every ingredient that goes into your dog’s bowl. This method enables you to tailor meals specifically to your dog’s health requirements and taste preferences. Ingredients such as sweet potatoes, brown rice, carrots, and green beans can be combined with different protein sources to create nutritious meals.

Whether you choose cooked chicken or explore alternative proteins like turkey or fish, the key is maintaining a balanced diet that meets all of your dog’s nutritional needs. Consulting with a veterinarian can provide personalized guidance tailored to your pet’s specific health conditions and dietary requirements.

Weighing the Pros and Cons – Is a Raw Chicken Diet Right for Your Dog?

When considering a raw chicken diet for your dog, it’s essential to weigh both the benefits and potential risks. On the one hand, proponents argue that raw chicken can provide a more natural and biologically appropriate diet. This type of feeding can lead to improved coat condition, higher energy levels, and better dental health due to the mechanical action of chewing raw bones.

However, there are significant concerns to consider. Raw chicken poses a risk of bacterial contamination, such as Salmonella or E. coli, which can affect both your pet and household members. Additionally, an unbalanced raw diet may lead to nutritional deficiencies or imbalances over time if not properly managed.

Deciding whether a raw chicken diet is right for your dog requires careful consideration of these factors. Consulting with a veterinarian who understands canine nutrition is crucial in making an informed decision that prioritizes your dog’s health and well-being.

read more
Home & FamilyPest

DIY Pest Control (Keep Your Home Pest-Free Naturally)

Diy Pest Control Keep Your Home Pest Free Naturally

Keeping your home pest-free can be challenging, but with the right knowledge and tools, you can do it naturally and effectively. This guide covers DIY pest control essentials, including identifying common pests and using natural remedies. You’ll find step-by-step eco-friendly solutions and preventative measures for long-term protection. We also compare DIY methods to professional services to help you decide on the best approach. Discover how to safeguard your home using simple yet effective techniques.

Understanding the Basics of DIY Pest Control

DIY pest control has become an increasingly popular option for homeowners looking to manage pests without the need for professional services. Home pest control can be both effective and economical when approached with the right knowledge and tools. One of the key benefits of DIY pest control is the ability to tailor solutions specifically to your home’s unique needs, ensuring a targeted approach that can often be more effective than generalized treatments.

Natural pest control methods are particularly appealing for those who prefer environmentally friendly solutions. These methods often involve using common household items such as vinegar, essential oils, and diatomaceous earth to deter or eliminate pests. For instance, a mixture of water and peppermint oil can be sprayed around entry points to repel ants and spiders, while diatomaceous earth can be sprinkled in areas where insects are commonly seen.

DIY bug removal also includes preventive measures that help keep pests at bay in the first place. Simple steps like sealing cracks and crevices, maintaining cleanliness, and properly storing food can significantly reduce the likelihood of infestations. Additionally, understanding the specific habits and life cycles of different pests allows homeowners to implement more effective strategies tailored to each type.

In summary, DIY pest control offers a practical solution for managing home pest issues through natural methods and preventive practices. By educating yourself on these basics, you can maintain a safe and comfortable living environment while minimizing reliance on chemical treatments or professional services.

Common Household Pests and How to Identify Them

Common Household Pests And How To Identify Them

Identifying common household pests is crucial for maintaining a clean and healthy living environment. This pest identification guide will help you recognize some of the most frequent intruders in homes.

1. Ants: Often seen marching in lines, ants are one of the most common pests in homes. They are attracted to food, especially sugary substances. Look for small piles of dirt or sand indoors, which can indicate an ant nest nearby.

2. Cockroaches: These nocturnal insects are usually found in dark, damp areas like kitchens and bathrooms. Cockroaches have flat, oval-shaped bodies and long antennae. Spotting even one cockroach often means there are many more hidden nearby.

3. Termites: Known for causing significant structural damage, termites feed on wood and other cellulose materials. Signs of an infestation include discarded wings near windowsills or doors, mud tubes on exterior walls, and hollow-sounding wood.

4. Bed Bugs: These tiny pests hide in mattresses, bed frames, and furniture crevices during the day and come out at night to feed on human blood. Bed bugs leave behind small rust-colored stains on bedding from their excrement.

5. Spiders: While not all spiders are harmful, some can be dangerous if they bite humans. Common household spiders weave webs in undisturbed corners or basements to catch their prey.

6. Rodents (Mice & Rats): Rodents leave droppings along their paths as well as gnaw marks on food packaging or wiring materials around the house.

Recognizing these types of pests early can prevent larger infestations from developing over time by taking prompt action against them using appropriate measures such as traps or professional extermination services when necessary!

Natural Remedies for Effective DIY Pest Control

When it comes to managing pests in and around your home, natural remedies offer a safe and effective alternative to chemical-based solutions. Natural pest repellents are not only eco-friendly but also easy to prepare with common household ingredients. Here are some effective DIY pest control methods that you can try.

Homemade bug sprays are a popular choice for keeping insects at bay. A simple yet powerful recipe involves mixing water with essential oils such as peppermint, eucalyptus, or lavender. These oils have strong scents that repel many types of bugs, including mosquitoes and ants. Just combine 10-15 drops of your chosen essential oil with water in a spray bottle and apply it around your home.

Another organic pest control solution is using diatomaceous earth, a natural powder made from fossilized algae. This substance is harmless to humans but lethal to insects like cockroaches, bed bugs, and fleas. Sprinkle diatomaceous earth in areas where you suspect pest activity; the sharp particles will damage the exoskeletons of these pests, leading to their dehydration and death.

For those dealing with garden pests, neem oil is an excellent option. Extracted from the seeds of the neem tree, this oil has been used for centuries as a natural pesticide. It disrupts the life cycle of insects by inhibiting their ability to feed and reproduce. Simply mix neem oil with water and a few drops of dish soap (to help it adhere to plant leaves) and spray it on affected plants.

Eco-friendly pest control tips also include maintaining cleanliness in your living spaces. Regularly cleaning countertops, sweeping floors, and properly storing food can significantly reduce the likelihood of attracting pests in the first place.

By incorporating these natural remedies into your pest control routine, you can effectively manage unwanted guests while promoting a healthier environment for yourself and your family.

Step-by-Step Guide to Implementing DIY Pest Control Solutions

When it comes to maintaining a pest-free home, DIY pest control solutions can be both effective and economical. Here is a step-by-step guide to help you implement these strategies successfully.

Step 1. Identify the Pest

The first step in any diy pest control process is accurately identifying the type of pest you’re dealing with. Different pests require different approaches, so knowing what you’re up against will help tailor your strategy effectively.

Step 2. Inspect and Locate Entry Points

Once you’ve identified the pest, inspect your home to locate their entry points. Common areas include windows, doors, and cracks in walls or floors. Sealing these entry points can prevent further infestation.

Step 3. Choose Natural Remedies

For those wondering how to get rid of pests naturally, there are several home remedies for pests that are both safe and effective. For instance:

– Ants: A mixture of vinegar and water can disrupt their scent trails.

– Spiders: Essential oils like peppermint or eucalyptus can act as natural repellents.

– Cockroaches: Baking soda mixed with sugar attracts and kills cockroaches when ingested.

Step 4. Implement Preventative Measures

Preventative measures are crucial in any diy bug removal process. Keep your living spaces clean by regularly vacuuming, wiping down surfaces, and storing food in sealed containers. Removing clutter also reduces hiding spots for pests.

Step 5. Monitor Progress

After implementing your chosen diy pest control steps, keep an eye on the situation to ensure that the problem is resolving. If you notice persistent issues despite following these steps, it may be time to consult a professional for more comprehensive solutions.

By following this guide on diy pest control solutions, you can effectively manage minor infestations using natural methods while maintaining a safe environment for your family.

Preventative Measures to Keep Pests at Bay Permanently

Preventing future infestations requires a proactive approach and consistent effort. One of the most effective long-term pest prevention tips is to seal entry points for pests. Inspect your home thoroughly for any cracks, gaps, or holes in walls, windows, doors, and foundations. Use caulk or weather stripping to seal these potential entryways and prevent pests from finding their way inside.

Maintaining a pest-free home also involves regular cleaning and proper waste management. Ensure that food is stored in airtight containers and promptly dispose of garbage in sealed bins. Regularly vacuuming floors, wiping down surfaces, and decluttering can significantly reduce the chances of attracting pests.

Another crucial aspect is managing the exterior environment around your home. Trim back trees and shrubs that are too close to the house as they can serve as bridges for pests. Additionally, keep gutters clean and ensure there is no standing water around your property since stagnant water can become a breeding ground for insects.

By implementing these preventative measures consistently, you can effectively keep pests at bay permanently and enjoy a healthier living environment.

The Pros and Cons of DIY Pest Control vs. Professional Services

When it comes to managing pests, homeowners often face the dilemma of choosing between DIY pest control and hiring professional services. Understanding the pros and cons of each approach can help make an informed decision.

Benefits of DIY Pest Management

DIY pest control is generally more cost-effective. With a range of over-the-counter products available, homeowners can tackle minor infestations without breaking the bank. Additionally, DIY methods offer immediate action, there’s no need to wait for an appointment with a professional exterminator. This approach also gives homeowners a sense of control over their environment, allowing them to address issues on their own terms.

However, DIY solutions have their limitations. Many off-the-shelf products are not as potent as those used by professionals and may only provide temporary relief. Without proper knowledge and training, there’s also a risk of misapplication or overuse of chemicals, which could be harmful to both humans and pets.

When to Call a Professional Exterminator

Professional pest control services bring expertise and advanced solutions that are often necessary for severe or persistent infestations. Trained exterminators can accurately identify the type of pest and implement targeted treatments that are more effective in the long run. They also have access to specialized equipment and commercial-grade pesticides that are not available for public use.

The downside is the cost; professional services can be significantly more expensive than DIY methods. Additionally, scheduling appointments may require some flexibility on your part, which could be inconvenient if you need immediate action.

While DIY pest management offers affordability and quick fixes for minor issues, professional services provide comprehensive solutions for serious infestations. Knowing when to call a professional exterminator can save time, money, and ensure your home remains safe from pests in the long term.

Pitfalls and Common Mistakes in DIY Pest Control (and How to Avoid Them)

DIY pest control can be a cost-effective and satisfying way to manage unwanted pests in your home. However, there are several pitfalls and common mistakes that can undermine your efforts. Understanding these issues is crucial for effective pest management.

One of the most significant DIY pest control mistakes to avoid is misidentifying the pest. Each type of bug requires a specific approach, and using the wrong method can exacerbate the problem. For instance, treating ants with a general insecticide might not work if you’re dealing with carpenter ants, which require targeted treatments.

Another common pitfall in DIY bug removal is neglecting to find and eliminate the source of infestation. Killing visible pests may provide temporary relief, but without addressing their entry points or breeding grounds, they will likely return. Inspect your home thoroughly for cracks, leaks, or food sources that might attract pests.

Improper use of pesticides is also a frequent error. Over-application or incorrect mixtures can pose health risks to humans and pets while being ineffective against pests. Always read labels carefully and follow instructions precisely when using any chemical treatments.

To do DIY properly, it’s essential to combine preventative measures with targeted treatments. Seal gaps in windows and doors, maintain cleanliness to reduce food sources, and use traps or baits as needed based on proper identification of the pest species.

By avoiding these common pitfalls in DIY pest control and following best practices diligently, you can effectively manage pests without professional intervention while ensuring safety for your household members.

read more
HobbiesHome & Family

Care Guide for Oscar Fish- Everything You Need to Know

Care Guide For Oscar Fish Everything You Need To Know

Oscar fish captivate with their vibrant colors and engaging personalities. Native to the Amazon basin, these freshwater giants can grow up to 12-14 inches in captivity and require specific care. This guide covers everything from setting up the ideal tank and providing a balanced diet to understanding health issues.

Understanding the Oscar Fish

Oscar fish, a popular choice among aquarium enthusiasts, belong to the cichlid species and are known for their striking appearance and engaging behavior. Understanding oscar fish care is crucial for maintaining a healthy environment for these freshwater fish.

Oscar fish can grow up to 12-14 inches in length, requiring a spacious tank of at least 55 gallons to thrive. They are native to the slow-moving waters of South America, which means they prefer warm water temperatures between 74-81°F and slightly acidic to neutral pH levels ranging from 6.0 to 7.5.

When it comes to diet, oscars are omnivorous but have a particular fondness for protein-rich foods such as insects, small fish, and commercial cichlid pellets. It’s essential to provide them with a balanced diet to ensure their vibrant coloration and overall health.

One key aspect of oscar fish information is their social behavior; they can be territorial and aggressive towards other tank mates. Therefore, it’s advisable either to keep them with similarly sized or larger cichlids or house them alone if aggression becomes an issue.

Regular maintenance of water quality through frequent water changes and efficient filtration systems is vital in oscar fish care. By understanding these oscar fish basics, aquarists can create an optimal environment that allows these captivating creatures to flourish in home aquariums.

Setting Up the Ideal Tank Environment for Your Oscar Fish

Setting Up The Ideal Tank Environment For Your Oscar Fish

Setting up the ideal tank environment for your Oscar fish is crucial to ensuring their health and happiness. Oscars are known for their vibrant colors and engaging personalities, but they also have specific needs that must be met.

First and foremost, consider the aquarium size for Oscar fish. These fish can grow quite large, often reaching up to 12 inches in length. Therefore, a minimum tank size of 55 gallons is recommended for a single Oscar. If you plan to keep more than one, you’ll need an even larger tank to provide adequate space.

Next, think about the water parameters for Oscar fish. They thrive in water with a temperature between 74°F and 81°F (23°C – 27°C) and a pH level ranging from 6.0 to 8.0. It’s essential to maintain stable water conditions as fluctuations can stress your Oscars and make them susceptible to diseases.

When it comes to tank decorations for Oscars, choose items that are both functional and aesthetically pleasing. Large rocks, sturdy plants (either real or artificial), and driftwood can create hiding spots and territories which help reduce aggression among tank mates. Avoid sharp or small objects that could injure your Oscars or be swallowed by them.

Lastly, regular maintenance is key in an Oscar fish tank setup. Perform weekly water changes of about 20-30% of the tank volume to keep the environment clean and healthy. Use a good quality filter capable of handling the bioload produced by these large fish.

By carefully considering these aspects you’ll create an ideal habitat where your Oscar fish can thrive.

Feeding Your Oscar Fish Properly

Feeding your Oscar fish properly is crucial for their health and longevity. Understanding the nutritional needs of Oscars can help you provide a balanced diet that supports their growth and well-being.

Oscar fish are omnivores, meaning they consume both plant and animal matter. The best food for Oscar fish includes a variety of options to ensure they receive all necessary nutrients. High-quality commercial pellets should form the staple of their diet, as these are formulated to meet the specific nutritional needs of Oscars. Look for pellets that contain a good balance of protein, fats, vitamins, and minerals.

In addition to pellets, supplementing with live or frozen foods can enhance their diet. Options such as brine shrimp, bloodworms, and mealworms provide essential proteins and stimulate natural hunting behaviors. Additionally, incorporating vegetables like peas or spinach can offer vital fiber and other nutrients.

Feeding Oscars should be done in moderation; overfeeding can lead to obesity and water quality issues in your aquarium. Aim to feed them small portions two to three times a day rather than one large meal. Observing your Oscar’s eating habits will help you adjust quantities appropriately.

By understanding the oscar fish diet and feeding oscars with a variety of high-quality foods, you ensure they thrive in your care while maintaining optimal health.

Common Health Issues in Oscar Fish and How to Prevent Them

Oscar fish are popular among aquarium enthusiasts due to their vibrant colors and engaging personalities. However, like all pets, they are susceptible to various health issues. Understanding common health problems in Oscar fish and how to prevent them is crucial for maintaining their well-being.

One prevalent issue is Hole-in-the-Head disease, characterized by small pits or holes on the fish’s head and lateral line. This condition is often linked to poor water quality and a lack of essential nutrients. To prevent this, ensure your tank has clean water with stable parameters and provide a balanced diet rich in vitamins and minerals.

Another common ailment is Ich, or white spot disease, caused by a parasite that leads to small white spots on the fish’s body and fins. Stress from sudden temperature changes or poor water conditions can trigger Ich outbreaks. Maintaining consistent water temperatures and performing regular tank maintenance can help keep this parasite at bay.

Fin rot is also frequently seen in Oscar fish, where the fins become frayed or discolored due to bacterial infection. Overcrowded tanks and inadequate filtration often contribute to this problem. Ensuring proper tank size, efficient filtration systems, and regular water changes are effective preventive measures.

Preventive care for Oscars includes routine monitoring of water quality parameters such as pH levels, ammonia, nitrites, nitrates, and temperature. Additionally, providing a varied diet that includes high-quality pellets along with occasional treats like live or frozen foods will help bolster their immune system.

By staying vigilant about these common oscar fish diseases and implementing preventive care strategies diligently, you can significantly enhance the health and longevity of your Oscar fish companions.

Caring for Juvenile vs Adult Oscar Fish

Oscar fish, known for their vibrant colors and engaging personalities, require distinct care at different stages of their lives. Understanding the differences in juvenile oscar care versus adult oscar care is crucial to ensure their health and longevity.

Juvenile Oscar Care: During the early growing stages of oscar fish, juveniles are particularly delicate and require a more controlled environment. Water quality is paramount; frequent water changes and monitoring ammonia levels are essential to prevent stress and disease. Juvenile oscars also need a protein-rich diet to support rapid growth—high-quality pellets supplemented with live or frozen foods like brine shrimp or bloodworms work best.

Adult Oscar Care: As oscars mature, they become more resilient but still demand attentive care. The adult oscar care guide emphasizes maintaining stable water conditions with less frequent but still regular water changes. Their diet can be adjusted to include larger food items such as earthworms or feeder fish, in addition to pellets designed for cichlids. Tank size becomes increasingly important; while juveniles can thrive in smaller tanks, adults require spacious aquariums—at least 75 gallons—to accommodate their size and activity levels.

Understanding these key differences ensures that both juvenile and adult oscars receive the tailored care they need throughout their lives, promoting not only their well-being but also allowing hobbyists to enjoy these fascinating fish for many years.

Breeding Oscars (Tips and Tricks for a Successful Spawn)

Breeding oscar fish at home can be a rewarding experience for both novice and seasoned aquarists. To ensure a successful spawn, it’s essential to follow some key tips and tricks that cater specifically to the needs of these fascinating fish.

First, selecting a compatible breeding pair of oscars is crucial. Look for healthy, mature fish that exhibit vibrant colors and active behavior. It’s often beneficial to allow the oscars to choose their own mates by placing several potential pairs together in a spacious tank.

Next, setting up the breeding environment is vital. A separate breeding tank with at least 75 gallons of water is recommended. Maintain optimal water conditions with a pH level between 6.5 and 7.5, and keep the temperature steady around 78-82°F (25-28°C). Provide flat surfaces like slate or large rocks where the female can lay her eggs.

Once spawning begins, you may notice the female laying hundreds of eggs while the male fertilizes them. It’s important to monitor water quality closely during this time; frequent small water changes can help maintain ideal conditions without disturbing the nest.

After hatching, raising baby oscars requires careful attention to their diet and environment. Start feeding them infusoria or commercially available fry food until they are large enough to consume finely crushed flakes or brine shrimp.

By following these breeding pair setup tips and tricks for raising baby oscars, you increase your chances of achieving a successful spawn while enjoying the process of nurturing these captivating creatures from eggs to adulthood.

read more
Home & FamilyPets

Can Dogs Eat Carrots? A Guide for Pet Owners

Can Dogs Eat Carrots A Guide For Pet Owners

Ensuring your dog has a balanced diet is crucial for their health, and vegetables can help. However, not all are safe for dogs. This guide explores if carrots are nutritious and safe for your pet. We’ll examine the benefits of carrots, provide tips on introducing them safely, and discuss potential risks. Learn how carrots can boost your dog’s health and discover other healthy snack options.

Understanding Your Dog’s Diet and the Role of Vegetables

When it comes to your dog’s diet, understanding the nutritional needs and the role of various food groups is crucial for their overall health. One common question pet owners often ask is, “Can dogs eat carrots?” The answer is yes; carrots can be a healthy addition to your dog’s diet.

Carrots are low in calories and high in essential nutrients like vitamins A, K, and C, making them an excellent choice for dog nutrition. These crunchy vegetables are not only good for your dog’s eyesight but also support their immune system and promote healthy skin and coat.

Incorporating vegetables into your dog’s diet can provide numerous benefits. Vegetables like carrots offer fiber that aids in digestion and helps maintain a healthy weight by providing a feeling of fullness without adding excessive calories. However, it’s important to remember that while vegetables can complement a balanced dog diet, they should not replace meat or other primary protein sources.

Always introduce new foods gradually into your pet’s meals to monitor any adverse reactions or allergies. Consulting with a veterinarian before making significant changes to your dog’s nutrition plan ensures that you are meeting all their dietary needs effectively.

Adding vegetables such as carrots to your dog’s diet can enhance their overall health when done correctly. By understanding what constitutes proper dog nutrition, you can make informed choices that contribute positively to your furry friend’s well-being.

Nutritional Benefits of Carrots for Dogs

Nutritional Benefits Of Carrots For Dogs

Carrots are not only a crunchy and tasty treat for humans but also offer numerous nutritional benefits for our canine companions. Understanding the carrots nutrition facts can help pet owners make informed decisions about incorporating this vegetable into their dogs’ diets.

One of the primary health benefits of carrots for dogs is their rich vitamin content. Carrots are an excellent source of Vitamin A, which is crucial for maintaining healthy vision, skin, and immune function in dogs. Additionally, they contain significant amounts of Vitamin K and Vitamin C, both contributing to overall health by supporting blood clotting processes and boosting the immune system.

Another essential component found in carrots is dietary fiber. The fiber in carrots aids digestion by promoting regular bowel movements and helping to prevent constipation. This can be particularly beneficial for dogs with sensitive stomachs or those prone to digestive issues.

Moreover, carrots are low in calories and fat while being high in water content, making them an ideal snack for overweight dogs or those on a weight management plan. Their natural sweetness also makes them a palatable treat that most dogs will enjoy without adding unnecessary calories to their diet.

In summary, incorporating carrots into your dog’s diet can provide numerous health benefits due to their rich vitamin content and high fiber levels. Whether served raw as a crunchy snack or cooked as part of a balanced meal, carrots can be a nutritious addition to your furry friend’s diet.

How to Safely Introduce Carrots into Your Dog’s Diet

Introducing carrots into your dog’s diet can be a healthy and nutritious choice, but it’s important to do so safely and correctly. Carrots are rich in vitamins A, C, and K, as well as fiber, which can benefit your dog’s overall health. Here’s a guide on how to safely introduce carrots into your dog’s diet.

When feeding dogs carrots, you have the option of serving them raw or cooked. Raw carrots are crunchy and can help clean your dog’s teeth while providing a satisfying chew. However, some dogs may find raw carrots difficult to digest. In such cases, cooking the carrots may be a better option as it softens them and makes them easier to digest while still retaining most of their nutritional value.

The carrot serving size for dogs should be appropriate for their size and weight. As with any treat or supplement to their regular diet, moderation is key. Start by giving small pieces of carrot to see how your dog reacts. For smaller dogs, one or two baby carrots per day is sufficient; larger breeds may handle more but should still have limited quantities.

Preparing carrots for dogs is straightforward but crucial for safety reasons. Always wash the carrots thoroughly to remove any pesticides or dirt. If you choose to serve raw carrots, cut them into bite-sized pieces that are manageable for your dog based on its size (this helps prevent choking hazards). If cooking the carrots, steaming is an excellent method that preserves most nutrients; simply chop the carrot into small chunks before steaming until tender.

Puppies and Carrots (Is It Safe?)

When it comes to puppy nutrition, many pet owners find themselves questioning which human foods are safe for their furry friends. One common query is: can puppies eat carrots? The good news is, yes, puppies can safely enjoy carrots as part of their diet.

Carrots are an excellent source of vitamins and minerals that are beneficial for your puppy’s health. They are rich in beta-carotene, which the body converts into vitamin A—essential for vision, growth, and immune function. Additionally, the high fiber content in carrots aids in digestion and helps maintain a healthy weight.

However, it’s important to introduce any new food gradually into your puppy’s diet to monitor for any adverse reactions. Start by offering small pieces of raw or cooked carrots as a treat or mixed into their regular food. Always ensure that the carrots are cut into bite-sized pieces to prevent choking hazards.

While carrots are generally safe foods for puppies, they should be given in moderation. Overfeeding can lead to digestive issues such as gas or diarrhea. As with any dietary changes or additions, consulting with your veterinarian is always a wise step to ensure you’re meeting all of your puppy’s nutritional needs effectively.

Incorporating carrots into your puppy’s diet can offer numerous health benefits when done correctly. This simple addition can contribute positively to their overall well-being while adding variety to their meals.

Potential Risks and Precautions When Feeding Carrots to Dogs

Feeding carrots to dogs can be a healthy and nutritious treat, but it’s important to be aware of potential risks and take necessary precautions. While many dogs enjoy the crunchy texture and sweet taste of carrots, there are some dangers of feeding dogs carrots that pet owners should consider.

One potential risk is carrot allergies in dogs. Although rare, some dogs may have an allergic reaction to carrots, which can manifest as itching, swelling, or gastrointestinal upset. If you notice any unusual symptoms after your dog consumes carrots, it’s essential to consult with your veterinarian immediately.

Another concern is the choking hazards with carrots. Carrots can be quite hard and may pose a choking risk if not properly prepared. To mitigate this danger, always cut the carrots into small, bite-sized pieces that are appropriate for your dog’s size. Alternatively, you can cook or steam the carrots to soften them before offering them as a treat.

By being mindful of these risks and taking appropriate precautions, you can safely incorporate this nutritious vegetable into your dog’s diet while ensuring their well-being.

Alternative Healthy Treats for Dogs Besides Carrots

When it comes to rewarding your furry friend with a treat, it’s important to choose options that are both delicious and nutritious. While carrots are a popular choice, there are several other healthy dog treats that you can consider. Here are some alternative vegetables and fruits safe for dogs to eat:

1. Sweet Potatoes: These root vegetables are rich in vitamins A, B6, and C, as well as fiber. You can serve them cooked and cut into small pieces or dehydrated into chewy treats.

2. Blueberries: Packed with antioxidants and vitamins, blueberries make an excellent low-calorie treat for dogs. They can be given fresh or frozen for a refreshing snack.

3. Green Beans: Low in calories but high in fiber and essential nutrients like vitamins K and C, green beans can be served raw or steamed for an easy-to-digest treat.

4. Apples: Apples provide vitamin A, vitamin C, and fiber while being low in fat. Just make sure to remove the seeds and core before feeding them to your dog.

5. Pumpkin: Rich in fiber and beta-carotene (vitamin A), pumpkin is great for your dog’s digestive health. Serve it plain without any added sugars or spices.

6. Cucumbers: With their high water content, cucumbers are hydrating treats that also offer vitamins K, B1, C, potassium, copper, magnesium, and biotin.

7. Bananas: Bananas are a good source of potassium as well as vitamins B6 and C. However, due to their sugar content, they should be given in moderation.

By incorporating these healthy dog treats into your pet’s diet alongside carrots, you ensure they receive a variety of nutrients while enjoying tasty rewards that contribute positively to their overall health.

Can Dogs Eat Carrots? Final Thoughts and Recommendations

In conclusion, carrots can be a healthy and beneficial addition to your dog’s diet. Rich in vitamins, minerals, and fiber, they offer numerous health benefits such as improved vision, better digestion, and enhanced dental health. However, it is essential to introduce carrots gradually into your dog’s diet to monitor for any adverse reactions or allergies.

When feeding your dog carrots, ensure they are washed thoroughly and cut into appropriate sizes to prevent choking hazards. Both raw and cooked carrots can be given to dogs; however, steaming them may make them easier to digest for some pets.

Always consult with your veterinarian before making any significant changes to your dog’s diet. While carrots are generally safe for most dogs, individual dietary needs can vary significantly based on factors such as age, weight, breed, and overall health.

By incorporating carrots in moderation and following these guidelines, you can provide a nutritious treat that supports your dog’s well-being.

read more
Home & FamilyPets

Can Dogs Eat Avocado? A Comprehensive Guide for Pet Owners

Can Dogs Eat Avocado A Comprehensive Guide For Pet Owners

Avocados are nutritious for humans but need careful consideration for dogs. They provide beneficial vitamins and healthy fats but also contain harmful elements. This guide examines their nutritional value, potential dangers for dogs, and safer alternatives. Understanding the benefits and risks helps pet owners make informed decisions about including avocados in their dog’s diet responsibly.

Understanding the Nutritional Value of Avocado

Avocados have long been celebrated for their rich nutritional profile and versatility in various dishes. But when it comes to our furry friends, many pet owners find themselves asking, “Can dogs eat avocado?” Understanding the nutritional value of avocado is essential to answering this question and ensuring the health and safety of our pets.

Avocado nutrition is impressive; these fruits are packed with healthy fats, fiber, vitamins, and minerals. They contain high levels of monounsaturated fats, which are known to support heart health in humans. Additionally, avocados are a good source of vitamins C, E, K, and several B vitamins. Their potassium content surpasses that of bananas, making them a powerhouse for maintaining proper cellular function.

However, when considering dog-safe foods, it’s crucial to examine whether these benefits translate safely to canine consumption. While some parts of the avocado (such as the flesh) can be safe for dogs in small amounts due to their beneficial nutrients like healthy fats and fiber, other parts can pose risks. The pit and skin contain persin (a fungicidal toxin) that can cause adverse effects in dogs if ingested in large quantities.

While there are benefits of avocado for dogs when consumed responsibly and in moderation (mainly focusing on the flesh), it is always best to consult with a veterinarian before introducing any new food into your dog’s diet. By doing so, you ensure that you are providing healthy foods for dogs without inadvertently causing harm.

Is Avocado Safe for Dogs? Breaking Down the Risks and Benefits

Is Avocado Safe For Dogs Breaking Down The Risks And Benefits

When it comes to the safety of avocado for dogs, pet owners often find themselves navigating conflicting information. Understanding the health risks and benefits associated with this popular fruit is crucial for making informed decisions about your canine companion’s diet.

Avocado contains a substance called persin, which can be toxic to some animals. However, dogs are generally more resistant to persin compared to other pets like birds and rodents. The primary concern is the pit, skin, and leaves of the avocado, which contain higher concentrations of persin and pose a choking hazard or potential for intestinal blockage.

On the flip side, avocados offer several nutritional benefits that could be advantageous for dogs when given in moderation. Rich in healthy fats, vitamins A, B6, C, and E, as well as fiber and potassium, avocados can contribute positively to your dog’s overall health. These nutrients support a shiny coat, healthy skin, and improved digestion.

Despite these benefits, it’s essential to exercise caution. Always remove the pit and skin before offering avocado flesh to your dog. Moreover, consult your veterinarian before introducing any new food into your pet’s diet to ensure it aligns with their specific health needs.

In summary, while avocados can provide certain health advantages for dogs when prepared correctly and served in moderation, they also come with risks that should not be overlooked. Prioritizing pet safety with food choices will help ensure your furry friend’s well-being.

The Role of Persin in Avocados

Avocados are often praised for their nutritional benefits in human diets, but for dog owners, it’s crucial to be aware of the potential risks they pose to canine health. One of the primary concerns is a substance called persin. Persin is a fungicidal toxin found in avocados that can be harmful to dogs if ingested in significant quantities.

Persin toxicity in dogs can lead to various health issues, ranging from mild stomach upset to more severe symptoms such as vomiting, diarrhea, and even respiratory distress. While the flesh of the avocado contains lower levels of persin compared to other parts like the pit and skin, it is still advisable to keep avocados out of your dog’s reach altogether.

Understanding harmful substances to dogs is essential for responsible pet ownership. In addition to persin in avocados, dog owners should also be cautious about other common household items and foods that could pose risks. By staying informed about dog health and avocados specifically, you can ensure that your furry friend remains safe and healthy while enjoying a balanced diet free from potentially hazardous substances.

Symptoms of Avocado Poisoning in Dogs

Avocado poisoning in dogs is a serious concern that pet owners should be aware of. While avocados are nutritious for humans, they can pose significant health risks to our canine companions. Understanding the dog poisoning symptoms associated with avocado toxicity is crucial for ensuring your pet’s well-being.

One of the primary signs of avocado toxicity in dogs is gastrointestinal distress. This can manifest as vomiting or diarrhea, often accompanied by abdominal pain and discomfort. If you notice your dog exhibiting these symptoms after ingesting avocado, it’s important to monitor them closely.

Another key indicator is difficulty breathing or coughing, which may occur due to the high-fat content in avocados leading to pancreatitis or other respiratory issues. Additionally, lethargy and weakness are common emergency symptoms in pets suffering from avocado poisoning. These signs suggest that your dog’s body is struggling to cope with the toxic effects.

In more severe cases, dogs may experience fluid accumulation around the heart and lungs, known as myocardial damage or pericardial effusion. This condition can be life-threatening and requires immediate veterinary attention.

If you suspect your dog has consumed avocado and exhibits any of these symptoms, it’s imperative to seek veterinary care promptly. Early intervention can make a significant difference in preventing severe complications and ensuring a swift recovery for your furry friend. Always keep avocados and other potentially harmful foods out of reach to maintain a safe environment for your pet.

Safe Alternatives to Avocado for Your Dog’s Diet

Avocados are often touted as a superfood for humans, but they can pose health risks to our canine companions. Fortunately, there are numerous safe fruits and dog-friendly snacks that make excellent alternatives to avocados in your dog’s diet.

One great option is apples. Apples are rich in vitamins A and C, which support a healthy immune system and skin. Just be sure to remove the seeds and core before offering them to your pet.

Blueberries are another fantastic choice. These small berries are packed with antioxidants that help combat free radicals in your dog’s body, promoting overall health.

Bananas serve as a sweet treat that dogs typically love. They provide essential nutrients like potassium and vitamin B6, aiding muscle function and energy metabolism.

Strawberries also make the list of healthy alternatives to avocados for pets. They contain fiber and vitamin C, contributing to digestive health and boosting immunity.

Lastly, watermelon (without seeds or rind) is an excellent hydrating snack for dogs during hot weather. It’s low in calories but high in vitamins A, B6, and C.

Incorporating these safe fruits into your dog’s diet not only diversifies their nutritional intake but also ensures they enjoy tasty treats without the risks associated with avocados.

Making Informed Choices About Your Dog’s Diet and Health

When it comes to feeding your dog avocado, the answer is nuanced. While certain parts of the avocado, such as the flesh, are generally safe in small quantities, other parts like the pit, skin, and leaves contain persin (a toxin that can be harmful to dogs). Additionally, avocados are high in fat which could lead to gastrointestinal upset or pancreatitis if consumed in large amounts.

Making informed choices about your dog’s diet and health is crucial. Always consult with your veterinarian before introducing new foods into your pet’s diet. They can provide personalized advice based on your dog’s specific health needs and dietary requirements. Remember that while some human foods can be a healthy treat for dogs, others can pose serious risks.

By staying informed and cautious about what you feed your furry friend, you can ensure they lead a happy and healthy life.

read more
Home & FamilyHome Improvement

How to Unclog a Toilet (A Step-by-Step Guide for Homeowners)

How To Unclog A Toilet A Step By Step Guide For Homeowners

Understanding the importance of unclogging a toilet is essential for every homeowner. A clogged toilet is not just an inconvenience; it can lead to more severe plumbing issues if not addressed promptly. Knowing how to tackle common toilet problems can save you time, money, and the hassle of calling a plumber for minor issues.

One of the most frequent plumbing basics that every homeowner should familiarize themselves with is the process of unclogging a toilet. This skill is crucial because toilets can become clogged for various reasons, such as excessive toilet paper use or flushing non-flushable items. By learning how to handle these situations, you ensure that your household runs smoothly and avoid potential water damage from overflowing toilets.

Moreover, understanding these plumbing basics empowers homeowners to maintain their homes better. It allows them to identify when a problem requires professional intervention versus when it’s something they can handle on their own. In essence, knowing how to unclog a toilet equips homeowners with valuable knowledge that enhances their ability to manage and maintain their living spaces efficiently.

This guide covers plumbing basics, common clog causes, and necessary tools. Whether it’s a minor blockage or a stubborn clog, our step-by-step methods will restore your toilet’s functionality quickly and safely. Read on to master this common home maintenance task.

Identify the Cause of the Clog

Understanding what clogs toilets is essential for effectively addressing the issue. Toilet clogs can be caused by a variety of factors, and recognizing these common culprits can help in taking the right steps to resolve them.

One of the primary toilet clog causes is excessive toilet paper usage. While toilet paper is designed to dissolve in water, using too much at once can create blockages. Another frequent cause is flushing non-flushable items such as sanitary products, baby wipes, cotton balls, or even dental floss. These items do not break down easily and can obstruct the flow through pipes.

Initial checks for a clogged toilet should start with assessing what was recently flushed. If you suspect that an object other than waste or toilet paper has been flushed, it’s likely the source of your problem. Additionally, inspect whether multiple fixtures are draining slowly; this could indicate a more significant blockage in your main sewer line rather than just an isolated issue with your toilet.

By identifying these common clogging items and performing initial checks promptly, you can often prevent minor issues from escalating into more severe plumbing problems.

The Essential Tools You Need to Unclog a Toilet

The Essential Tools You Need To Unclog A Toilet

When faced with a clogged toilet, having the right tools on hand can make all the difference. Here’s a comprehensive list of essential plumbing tools that can help you tackle this common household issue effectively.

First and foremost, a reliable toilet plunger is indispensable. There are several types to consider, including the standard cup plunger and the flange plunger, which is specifically designed for toilets. The flange provides an extra seal to create more suction power, making it more effective at dislodging tough clogs.

Next on your plumbing tools list should be a plumbing snake or drain auger. This tool is particularly useful for breaking up and removing obstructions that are too stubborn for a plunger alone. A closet auger is another specialized type of snake designed specifically for toilets; its flexible cable can navigate through the bends in your toilet’s trap without causing damage.

Chemical drain cleaners are also an option but should be used with caution. While they can dissolve organic material blocking your pipes, they may also cause damage if overused or used improperly. Always follow the manufacturer’s instructions carefully when using these products.

By equipping yourself with these essential tools, you’ll be well-prepared to handle most toilet clogs efficiently and safely.

Step-by-Step Methods to Unclog Your Toilet Quickly and Safely

Unclogging a toilet can be a daunting task, but with the right methods, it can be done quickly and safely. Here’s a step-by-step guide to help you tackle this common household issue.

1. How to Use a Plunger Correctly

The plunger is often the first tool to reach for when dealing with a clogged toilet. To use it effectively, ensure you have the right type of plunger. A flange plunger is best suited for toilets. Place the rubber cup of the plunger into the toilet bowl, ensuring it covers the drain hole completely. Push down gently at first to get rid of any air trapped inside, then pump vigorously up and down while maintaining the seal. After several pumps, pull up sharply to break the seal and see if water starts draining. Repeat as necessary.

2. Unclogging with a Plumbing Snake

If plunging doesn’t do the trick, a plumbing snake (or auger) might be your next best option. Insert the end of the snake into the toilet drain and begin turning its handle clockwise to extend it through the pipe bends and obstructions. Continue turning until you feel resistance; this indicates that you’ve reached an obstruction. Push gently while rotating until you feel less resistance; this means you’ve broken through or hooked onto whatever is causing the clog. Slowly retract and remove debris before flushing to check if normal flow has been restored.

3. Using Chemical Drain Cleaners Safely

As a last resort, chemical drain cleaners can be effective but should be used cautiously due to their caustic nature which can damage pipes over time or cause harm if mishandled. Always read and follow manufacturer instructions carefully, typically, you’ll pour an appropriate amount into your toilet bowl and let it sit for 15-30 minutes before flushing with hot water (if recommended). Ensure good ventilation in your bathroom during this process.

By following these steps on how to use a plunger correctly, unclogging with a plumbing snake, or using chemical drain cleaners safely, you can efficiently address most toilet clogs without professional help.

What to Do If the Clog Won’t Budge

Encountering a stubborn clog can be frustrating, but there are several advanced unclogging techniques you can try before calling in professional help. Persistent clogs often require more than just basic plunging or over-the-counter solutions. Here’s what you can do:

1. Use a Plumbing Snake: A plumbing snake, or auger, is a flexible tool designed to navigate through pipes and break up blockages. Insert the snake into the drain and turn the handle to push it deeper until you feel resistance. Continue rotating the handle to dislodge the clog.

2. Try a Wet/Dry Vacuum: For more severe clogs, a wet/dry vacuum might be effective. Set it to liquid mode, create a tight seal over the drain with its hose, and let it suck out the blockage.

3. Chemical Drain Cleaners: Use chemical drain cleaners as a last resort due to their harshness on pipes and potential environmental impact. Follow manufacturer instructions carefully to avoid damage.

4. Hydro Jetting: This method involves using high-pressure water jets to clear out debris from your pipes. While highly effective for persistent clogs, hydro jetting typically requires specialized equipment handled by professionals.

If these methods fail or if you’re uncomfortable attempting them yourself, it’s time to consider when to call a plumber. Persistent clogs can sometimes indicate underlying issues such as pipe damage or deeper blockages that need expert attention.

How to Avoid Future Clogs in Your Toilet

Maintaining a clog-free toilet is essential for a smoothly functioning household. By following some simple toilet maintenance tips, you can prevent future clogs and avoid the inconvenience and expense of dealing with blockages.

First and foremost, understanding what items are flushable and non-flushable is crucial. Only human waste and toilet paper should be flushed down the toilet. Non-flushable items such as wet wipes, feminine hygiene products, cotton balls, dental floss, diapers, and paper towels should be disposed of in a trash bin. These items do not break down easily and can cause significant blockages in your plumbing system.

Another important tip is to use an appropriate amount of toilet paper. Excessive use of toilet paper can lead to clogs even though it is designed to be flushable. Opt for high-quality, septic-safe toilet paper that dissolves more easily in water.

Regularly checking for early signs of potential clogs can also help you avoid bigger issues down the line. If you notice that your toilet is flushing slower than usual or making gurgling sounds, it might be time to inspect your plumbing system or call a professional plumber for assistance.

Additionally, consider implementing routine maintenance practices such as using enzyme-based cleaners that help break down waste materials more effectively without harming your pipes or septic system.

By following these preventive measures and being mindful about what goes into your toilet, you can significantly reduce the risk of future clogs and ensure a hassle-free bathroom experience.

read more
Home & FamilyPets

Cephalexin for Dogs- Dosage and Uses

Cephalexin For Dogs Dosage And Uses

Cephalexin is a commonly prescribed antibiotic for dogs, effective against various bacterial infections. This guide offers essential information on its uses, dosage, and potential side effects.

Understanding Cephalexin and Its Importance in Veterinary Medicine

Cephalexin, a widely used antibiotic in veterinary medicine, plays a crucial role in treating bacterial infections in dogs. As a member of the cephalosporin class of antibiotics, cephalexin works by interfering with the formation of bacterial cell walls, ultimately leading to the destruction of the bacteria. This makes it an effective treatment option for various infections including skin infections, urinary tract infections, and respiratory infections.

Understanding the appropriate cephalexin dosage for dogs is essential for ensuring its effectiveness while minimizing potential side effects. The dosage can vary based on factors such as the dog’s weight, age, and severity of the infection. Typically, veterinarians prescribe cephalexin at a dosage range of 10-15 mg per pound of body weight administered every 8 to 12 hours. However, it is important to follow your veterinarian’s specific instructions regarding dosage and duration.

The uses of cephalexin in dogs extend beyond just treating common bacterial infections. It is often employed as a preventative measure post-surgery to ward off potential infections due to its broad-spectrum antibacterial properties. Moreover, its efficacy against both Gram-positive and Gram-negative bacteria makes it a versatile choice among veterinary antibiotics.

The importance of cephalexin in veterinary medicine cannot be overstated. Its ability to effectively combat various bacterial infections ensures that our canine companions can recover swiftly and maintain their health. Always consult with your veterinarian before starting any new medication regimen for your pet to ensure safety and efficacy.

Common Uses of Cephalexin in Dogs

Common Uses Of Cephalexin In Dogs

Cephalexin is a widely used antibiotic in veterinary medicine, particularly for treating infections in dogs. This broad-spectrum antibiotic falls under the cephalosporin class and is effective against a variety of bacterial infections. One of the most common uses of cephalexin in dogs is for treating skin infections, such as pyoderma. These skin conditions often arise due to bacteria entering through small cuts or abrasions, leading to inflammation and discomfort.

Another prevalent application of cephalexin is in the treatment of urinary tract infections (UTIs). Dogs suffering from UTIs may exhibit symptoms like frequent urination, blood in the urine, or straining while urinating. Cephalexin works by targeting and eliminating the bacteria responsible for these infections.

Additionally, cephalexin is frequently prescribed for respiratory tract infections. Conditions such as bronchitis or pneumonia can be effectively managed with this antibiotic, helping to alleviate symptoms like coughing and difficulty breathing.

Common treatments with cephalexin include addressing skin infections, urinary tract infections, and respiratory tract issues. By understanding the various uses of cephalexin in dogs, pet owners can better appreciate its role in maintaining their pets’ health and well-being. Always consult with a veterinarian before starting any new medication regimen for your dog to ensure proper dosage and effectiveness.

Determining the Correct Dosage of Cephalexin for Your Dog

When it comes to administering cephalexin to your pet, understanding the correct dosage is crucial for ensuring their safety and health. Cephalexin is an antibiotic commonly prescribed to treat bacterial infections in dogs, but like any medication, it must be given in the appropriate amount.

The cephalexin dosage for dogs by weight typically ranges from 10 to 15 mg per pound of body weight, administered every 8 to 12 hours. For instance, a dog weighing 20 pounds would require a dose between 200 mg and 300 mg. However, it’s essential to consult your veterinarian before starting any treatment, as they will provide the precise dosage based on your dog’s specific condition and medical history.

Administering cephalexin correctly ensures that your pet receives its full benefits without risking an overdose or underdose. Always follow the vet’s instructions closely and complete the entire course of antibiotics even if your dog appears to be feeling better. This practice helps prevent antibiotic resistance and ensures that the infection is fully eradicated.

Determining the safe dosage of cephalexin for canines involves careful consideration of their weight and health status. By working closely with your veterinarian, you can effectively manage your dog’s bacterial infections with this potent antibiotic while safeguarding their well-being.

Potential Side Effects and Risks Associated with Cephalexin Use in Dogs

Cephalexin is a commonly prescribed antibiotic for dogs, used to treat a variety of bacterial infections. While it is generally safe and effective, it is important for pet owners to be aware of the potential side effects and risks associated with its use.

One of the primary side effects of cephalexin in dogs is gastrointestinal upset. This can manifest as vomiting, diarrhea, or decreased appetite. In some cases, these symptoms may be mild and resolve on their own; however, if they persist or worsen, it is crucial to consult your veterinarian.

Another concern with the use of cephalexin and other canine antibiotics is the risk of allergic reactions. Signs of an allergic reaction can include itching, hives, swelling around the face or paws, and difficulty breathing. If any of these symptoms occur after administering cephalexin to your dog, seek veterinary care immediately.

Additionally, prolonged use or misuse of antibiotics can lead to antibiotic resistance. This means that bacteria can become resistant to treatment over time, making future infections harder to treat. It’s essential to follow your veterinarian’s dosage instructions precisely and complete the full course of medication even if your dog appears to be feeling better.

In rare cases, more severe adverse reactions to veterinary drugs like cephalexin may occur. These could include liver or kidney damage indicated by symptoms such as jaundice (yellowing of the skin or eyes), increased thirst and urination, lethargy, or changes in behavior.

Understanding these potential side effects and risks associated with cephalexin use in dogs helps ensure that pet owners can make informed decisions about their pet’s health care while minimizing any adverse outcomes. Always consult with a veterinarian before starting any new medication regimen for your pet.

Tips and Advice on Caring for Your Dog During Antibiotic Treatment

Administering antibiotics to your dog can be a crucial part of their recovery from an infection. However, it’s essential to follow the right steps to ensure the medication is effective and your pet remains comfortable throughout the treatment. Here are some informative tips for caring for a dog on antibiotics:

1. Follow Dosage Instructions: Always adhere to the veterinarian’s dosage instructions. Administering too much or too little can affect the efficacy of the treatment and could potentially harm your dog.

2. Monitor Your Dog on Medication: Keep a close eye on your dog’s behavior and health while they are on antibiotics. Look out for any side effects such as vomiting, diarrhea, or loss of appetite, and report these to your vet immediately.

3. Tips for Administering Pet Medication Effectively: If you find it challenging to give pills directly, consider hiding them in a small amount of food or using pill pockets designed specifically for pets. Ensure that they consume the entire dose.

4. Maintain Hydration: Antibiotics can sometimes lead to dehydration, so make sure your dog has access to fresh water at all times.

5. Complete the Full Course: Even if your dog appears better before finishing their prescribed course of antibiotics, it’s crucial to complete it entirely unless advised otherwise by your vet. Stopping early can lead to antibiotic resistance or recurrence of infection.

By following these guidelines and maintaining regular communication with your veterinarian, you can help ensure that caring for a dog on antibiotics is as smooth and effective as possible.

The Importance of Consulting Your Veterinarian Before Starting Cephalexin Treatment

When it comes to administering antibiotics like Cephalexin to your pets, consulting your veterinarian is crucial. Antibiotics play an essential role in treating bacterial infections, but improper use can lead to resistance and other health complications. Therefore, it’s vital to speak to your vet about antibiotics use before starting any treatment.

Veterinary consultation importance cannot be overstated. Veterinarians possess the expertise needed to diagnose the specific type of infection affecting your pet and determine whether Cephalexin is the appropriate medication. They will also provide professional guidance on dosing medications, ensuring that your pet receives the correct dosage based on their weight, age, and medical history.

By seeking a veterinary consultation before starting Cephalexin treatment, you not only safeguard your pet’s health but also contribute to the broader effort of combating antibiotic resistance. Always prioritize professional advice when it comes to medications for your furry friends.

Conclusion, Ensuring Safe and Effective Use of Cephalexin in Canine Care

Administering cephalexin to dogs requires a careful balance of proper dosage, timing, and monitoring. This antibiotic is commonly prescribed for a range of bacterial infections in canines, including skin infections, urinary tract infections, and respiratory issues. To ensure its safe and effective use, it is crucial to follow veterinary guidance meticulously.

Firstly, always adhere to the prescribed dosage and duration recommended by your veterinarian. Overdosing or underdosing can lead to ineffective treatment or potential side effects such as gastrointestinal upset or allergic reactions. It’s also important to complete the entire course of the medication even if your dog appears to be feeling better before finishing all doses.

Monitoring your dog for any adverse reactions during the course of treatment is essential. Common side effects may include vomiting, diarrhea, or loss of appetite. If any severe symptoms occur (such as difficulty breathing or swelling) seek immediate veterinary attention.

In addition to monitoring for side effects, ensure that cephalexin is stored correctly in a cool, dry place out of reach from pets and children. Proper storage helps maintain the medication’s efficacy throughout its use.

Finally, regular follow-up visits with your veterinarian will help track your dog’s progress and make any necessary adjustments to their treatment plan. By following these guidelines diligently, you can help ensure that cephalexin remains a safe and effective option in managing bacterial infections in your canine companion.

read more
Home & FamilyPets

Can Dogs Eat Shrimp? A Comprehensive Guide for Pet Owners

Can Dogs Eat Shrimp A Comprehensive Guide For Pet Owners

Shrimp can be a nutritious treat for your dog when prepared correctly. It offers high protein, vitamin B12, and antioxidants. However, be aware of potential risks like allergies and digestive issues. This guide covers safe preparation, appropriate serving sizes, and alternative seafood options to ensure your dog’s health while enjoying these treats.

Understanding the Basics of Feeding Dogs Seafood

Feeding dogs seafood, particularly shrimp, is a topic that often piques the curiosity of pet owners. Understanding the basics of incorporating seafood into your dog’s diet is essential for ensuring their health and well-being.

First and foremost, can dogs eat shrimp? The answer is yes, but with some important considerations. Shrimp can be a nutritious addition to your dog’s diet when prepared properly. It is rich in protein, low in fat, and contains essential nutrients like vitamins B12 and D, niacin, and omega-3 fatty acids. These nutrients support various aspects of your dog’s health including their skin, coat, and overall energy levels.

However, it’s crucial to ensure that the shrimp is thoroughly cooked before feeding it to your dog. Raw or undercooked shrimp can harbor harmful bacteria such as Salmonella or Listeria which could lead to foodborne illnesses in dogs. Additionally, avoid seasoning or adding any spices to the shrimp as these can be harmful to dogs.

When introducing shrimp for dogs into their diet for the first time, start with small quantities to monitor for any adverse reactions or allergies. It’s also wise to consult with your veterinarian before making any significant changes to your pet’s diet.

While feeding dogs seafood like shrimp can offer nutritional benefits when done correctly and safely, it’s important always to prioritize their health by following proper preparation guidelines and consulting professionals when needed.

Nutritional Benefits of Shrimp for Dogs

Nutritional Benefits Of Shrimp For Dogs

Shrimp can be a delightful and nutritious treat for your canine companion, offering a variety of health benefits. Rich in essential nutrients, shrimp provides an excellent source of protein, which is crucial for muscle development and repair in dogs. Additionally, shrimp contains several vital vitamins and minerals such as vitamin B12, niacin (vitamin B3), phosphorus, and iodine.

Vitamin B12 plays a significant role in maintaining a healthy nervous system and supporting metabolic processes. Niacin aids in energy production and enzyme function, ensuring that your dog remains active and healthy. Phosphorus is essential for strong bones and teeth, while iodine supports proper thyroid function.

One of the key health benefits of shrimp is its low fat content combined with high protein levels, making it an ideal snack for dogs that need to maintain or lose weight without sacrificing nutritional value. Moreover, the antioxidants found in shrimp can help reduce inflammation and support overall immune health.

However, it’s important to prepare shrimp properly before offering it to your dog. Ensure that the shrimp is fully cooked and free from any shells or seasoning that could be harmful. Moderation is also key; while shrimp nutrients are beneficial for dogs, overfeeding can lead to digestive issues.

In conclusion, when served correctly and in moderation, shrimp can be an excellent addition to your dog’s diet due to its rich nutrient profile and numerous health benefits. Always consult with your veterinarian before introducing any new food into your pet’s diet to ensure it aligns with their specific health needs.

Potential Risks and Allergies Associated with Feeding Shrimp to Dogs

Feeding shrimp to dogs can be a delightful treat, but it’s essential to be aware of the potential risks and allergies that may arise. Shrimp allergies in dogs are not uncommon, and they can manifest through various symptoms such as itching, swelling, gastrointestinal upset, and even more severe reactions like anaphylaxis. Understanding these risks is crucial for pet owners who wish to introduce seafood into their dog’s diet.

One of the primary concerns with feeding shrimp to dogs is the risk of seafood allergies in pets. Just like humans, dogs can develop allergic reactions to certain proteins found in seafood. If your dog has never consumed shrimp before, it’s advisable to start with a small amount and monitor for any adverse reactions.

Additionally, there are potential dangers of shrimp beyond allergies. Shrimp can sometimes contain harmful bacteria or parasites if not cooked properly. Raw or undercooked shrimp pose significant health risks such as food poisoning or parasitic infections. Therefore, it’s imperative always to cook shrimp thoroughly before serving it to your dog.

Moreover, the high cholesterol content in shrimp could also be problematic for some dogs, particularly those with pre-existing health conditions like pancreatitis or obesity. Moderation is key; while occasional shrimp treats might be safe for many dogs, overindulgence could lead to health issues.

While feeding shrimp to your dog might seem harmless and even beneficial due to its nutritional value, it’s important first to consider the risks of feeding shrimp to dogs. Always consult with your veterinarian before introducing new foods into your pet’s diet and observe closely for any signs of allergic reactions or other health problems.

How to Safely Prepare Shrimp for Your Dog

When it comes to safely cooking shrimp for your dog, there are several important steps you should follow. First and foremost, always avoid raw shrimp for pets. Raw shrimp can carry harmful bacteria and parasites that could pose serious health risks to your canine companion. Instead, opt for thoroughly cooked shrimp.

Begin by cleaning the shrimp under cold running water to remove any potential contaminants. Next, peel off the shell and devein the shrimp to ensure it’s free from any digestive tract residue that might be harmful to your dog.

Cooking methods such as boiling or steaming are ideal because they preserve the nutritional value of the shrimp without adding unnecessary fats or oils. Make sure not to add any seasoning, as many spices and additives can be toxic to dogs. Once cooked, allow the shrimp to cool completely before offering it to your pet.

For a dog-friendly recipe, consider mixing chopped cooked shrimp with their regular food or incorporating it into homemade treats. This way, you can ensure that your canine friend enjoys a safe and tasty meal that is both nutritious and delicious.

By following these guidelines on safely cooking shrimp for dogs, you can provide a healthy treat while ensuring their well-being is never compromised.

Serving Size and Frequency

When it comes to feeding your dog shrimp, understanding the appropriate portion sizes and frequency is crucial for maintaining their health. Shrimp can be a nutritious treat for dogs, rich in protein and low in fat, but moderation is key.

Appropriate Portion Sizes of Shrimp for Dogs

The portion size of shrimp you can give your dog largely depends on their size and overall diet. For small dogs, one or two shrimps may suffice as an occasional treat. Medium-sized dogs might handle three to four shrimps, while larger breeds could enjoy up to five or six. It’s important to remove the shell, head, and tail before serving shrimp to avoid any choking hazards.

How Often Can My Dog Have Seafood Treats?

While shrimp can be a delightful snack for your canine companion, it should not become a staple in their diet. Seafood treats should be offered sparingly—once or twice a week at most. Overfeeding seafood can lead to imbalances in your dog’s diet and potential allergic reactions.

Moderation in Feeding Pets Seafood Snacks

As with any treat, moderation is essential when feeding your pet seafood snacks like shrimp. Excessive consumption of shrimp could lead to digestive issues such as diarrhea or vomiting due to its high cholesterol content. Always introduce new foods gradually into your pet’s diet and monitor them for any adverse reactions.

By adhering to these guidelines on serving size and frequency, you can safely incorporate shrimp into your dog’s diet as an occasional delight without compromising their health.

Safe Seafood Options Other Than Shrimp for Dogs

When considering shrimp alternatives for your canine companion, it’s essential to explore other safe seafood options that can be included in their diet. Fish alternatives to shrimp offer a variety of nutrients and health benefits that can enhance your dog’s overall well-being.

One excellent option is salmon. Rich in omega-3 fatty acids, salmon supports a healthy coat and skin while promoting joint health. It’s crucial to cook the salmon thoroughly and remove any bones before serving it to your dog.

Another viable choice is whitefish, such as cod or haddock. These types of fish are lean sources of protein and are generally low in fat, making them ideal for dogs with sensitive stomachs or those on weight management plans.

Sardines are also a fantastic alternative. Packed with essential vitamins like B12 and D, as well as omega-3 fatty acids, sardines can boost your dog’s immune system and support cardiovascular health. Opt for fresh sardines or those canned in water without added salt.

Lastly, consider incorporating mackerel into your dog’s diet. Mackerel provides a good balance of protein and healthy fats while being rich in antioxidants that help fight inflammation.

By exploring these fish alternatives to shrimp for canines, you can offer healthy marine treats that contribute positively to your dog’s diet without compromising their safety or nutritional needs. Always consult with your veterinarian before introducing new foods into your pet’s diet to ensure they are appropriate for their specific health requirements.

Should You Include Shrimp in Your Dog’s Diet?

When considering whether to include shrimp in your dog’s diet, it’s essential to weigh the benefits against the potential risks. Shrimp can be a healthy addition to your dog’s meals, providing valuable nutrients such as protein, vitamin B12, and omega-3 fatty acids. These nutrients support overall health, including muscle development, energy levels, and skin and coat condition.

However, it’s crucial to prepare shrimp properly before offering it to your dog. Always cook the shrimp thoroughly and remove any shells or tails to prevent choking hazards and digestive issues. Additionally, avoid seasoning or adding ingredients like garlic or onions that can be harmful to dogs.

While shrimp can be a nutritious treat for many dogs, it’s essential to introduce it gradually into their diet and monitor for any signs of allergies or adverse reactions. If you notice symptoms such as itching, swelling, vomiting, or diarrhea after feeding your dog shrimp, discontinue use immediately and consult with your veterinarian.

In summary, when prepared correctly and given in moderation, shrimp can be a beneficial supplement to your dog’s diet. As always with dietary changes or new treats for pets, consulting with a veterinarian is recommended to ensure it aligns with your dog’s specific health needs.

read more