close

Food & Beverage

Food & Beverage

How Long to Cook Lasagna (A Guide to Perfect Pasta Layers)

How Long To Cook Lasagna A Guide To Perfect Pasta Layers

When preparing lasagna, cooking times can vary depending on the type of recipe and ingredients used. For traditional lasagna with pre-boiled noodles, baking typically takes 45-60 minutes at 375°F (190°C). No-boil lasagna, which uses specially designed noodles, usually requires 45-55 minutes in the oven at the same temperature.

Vegetarian lasagna often cooks faster due to its lighter ingredients, generally needing 35-45 minutes at 375°F (190°C). On the other hand, meat lasagna may require slightly longer cooking times, ranging from 50-65 minutes, to ensure the meat is thoroughly cooked.

Regardless of the type, it’s essential to cover the lasagna with foil for the first 25-30 minutes of baking to prevent the top from burning. Always check for doneness by ensuring the internal temperature reaches 165°F (74°C) and the cheese is golden and bubbly. Let the lasagna rest for 10-15 minutes before serving to allow the layers to set.

The Basics of Lasagna Preparation

Lasagna, a beloved Italian dish, is a masterpiece of layers and flavors. To create this culinary delight, understanding the basics of lasagna preparation is essential. Begin by gathering quality ingredients: lasagna noodles, your choice of sauce (typically tomato-based), cheese, and optional fillings like ground meat or vegetables.

The art of layering lasagna is crucial to its success. Start with a thin layer of sauce at the bottom of your baking dish to prevent sticking. Then, place a layer of lasagna noodles, followed by sauce, cheese, and any additional fillings. Repeat this process, creating multiple layers until you reach the top of your dish.

When assembling lasagna, pay attention to the consistency of each layer. Ensure that sauce and cheese are evenly distributed to avoid dry spots. Some prefer to pre-cook their lasagna noodles, while others opt for no-boil varieties. Whichever you choose, make sure the noodles are completely covered by sauce to ensure proper cooking.

Patience is key when preparing lasagna. Allow time for the flavors to meld and the layers to set before serving. With practice and attention to detail, you’ll master the art of creating a perfectly balanced and delicious lasagna.

Factors Affecting Lasagna Cooking Time

Factors Affecting Lasagna Cooking Time

Several factors influence the cooking time of lasagna, making it essential to consider these variables for a perfectly baked dish. Oven temperature plays a crucial role, with higher temperatures generally resulting in shorter cooking times. However, it’s important to balance this with the risk of burning the top layer.

The size and thickness of the lasagna also significantly impact cooking duration. Larger, deeper dishes will naturally require more time to heat through to the center. Similarly, the density of ingredients affects cooking time; lasagnas with heavier, more moisture-rich fillings may need extended baking periods.

The material of the baking dish is another important consideration. Glass and ceramic dishes tend to heat more slowly but retain heat longer, while metal pans conduct heat more quickly. This can affect both the initial cooking time and how the lasagna continues to cook once removed from the oven.

By taking these factors into account, home cooks can better estimate and adjust their lasagna cooking times, ensuring a delicious and properly cooked meal every time.

Step-by-Step Guide to Cooking Lasagna

Begin by preheating your oven to 375°F (190°C) to ensure it’s at the right temperature when you’re ready to bake. While the oven is heating, assemble your lasagna layers in a deep baking dish, alternating between pasta sheets, sauce, and cheese. Once assembled, cover the lasagna with aluminum foil to prevent the top from burning and to keep moisture in during cooking.

The baking time for a typical lasagna is around 25 minutes covered, followed by an additional 25 minutes uncovered. This allows the cheese to melt and brown nicely on top. Always check that the internal temperature reaches 165°F (74°C) to ensure it’s fully cooked.

After removing the lasagna from the oven, it’s crucial to allow for a resting period of about 15 minutes. This resting time lets the layers settle and makes it easier to cut and serve without falling apart. During this time, the flavors will also continue to meld, resulting in a more delicious final product.

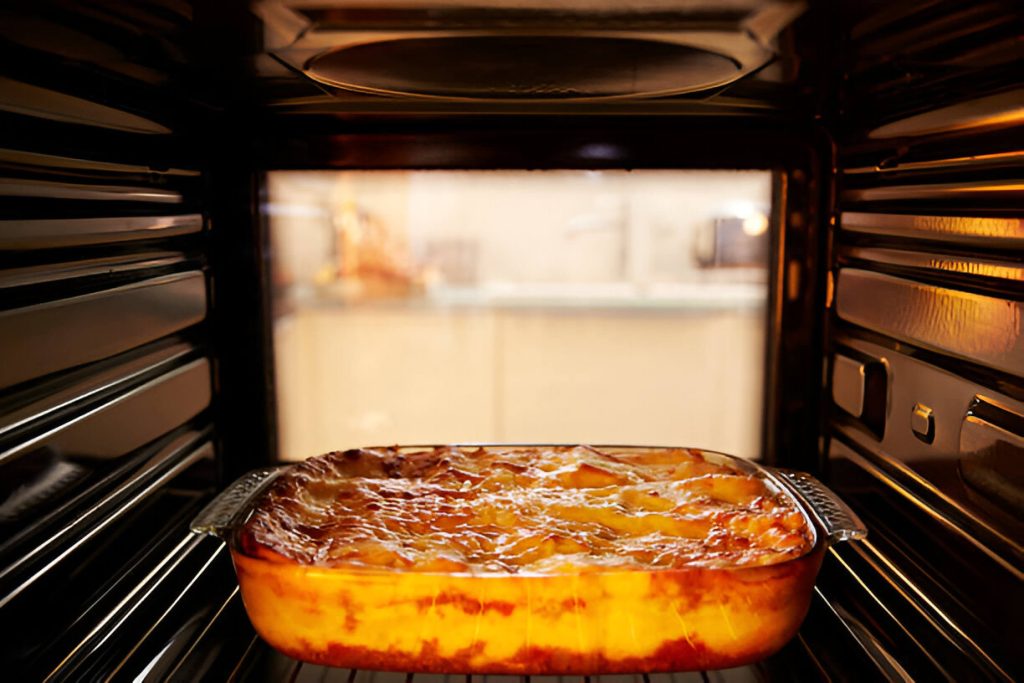
Signs of a Perfectly Cooked Lasagna

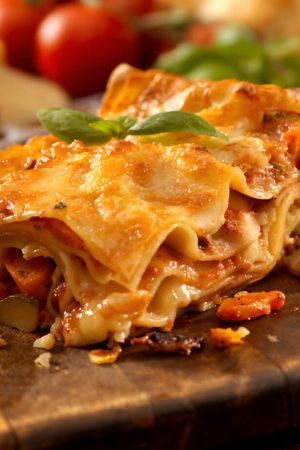
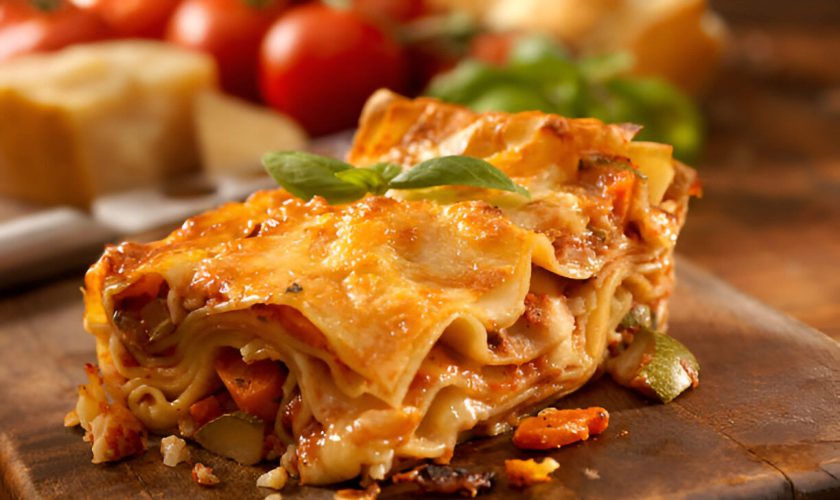
When it comes to achieving lasagna perfection, several key indicators can help you determine if your dish is ready to be served. First, look for a golden brown top layer, which signifies that the cheese has melted and caramelized beautifully. The edges of the lasagna should be bubbly, indicating that the sauce and cheese have reached the ideal temperature throughout the dish.

For a more precise measurement, use a food thermometer to check the internal temperature. A perfectly cooked lasagna should reach 165°F (74°C) at its center, ensuring that all ingredients are thoroughly heated and any potential bacteria have been eliminated.

Lastly, perform a texture check by inserting a knife or fork into the center of the lasagna. It should slide in easily, meeting little resistance from the pasta layers. When you remove the utensil, the layers should hold their shape without collapsing, signifying that the lasagna has set properly.

Common Mistakes to Avoid When Cooking Lasagna

When preparing lasagna, several pitfalls can compromise the dish’s quality. One common error is overcooking, which can lead to a dry, unappetizing result. Conversely, undercooking can leave the pasta too firm and the flavors underdeveloped. Achieving the right balance is crucial for a perfect lasagna.

Another frequent mistake is creating a soggy lasagna. This often occurs when excess moisture isn’t properly managed, such as not draining the ricotta or using overly watery sauce. To avoid this, consider straining your ricotta and cooking down your sauce for a thicker consistency.

Dry lasagna, on the other hand, can result from using too little sauce or overbaking. Ensure you have enough sauce to coat each layer generously, and monitor your baking time closely. Remember, lasagna continues to cook slightly after removing it from the oven.

Tips for Reheating and Storing Lasagna

Properly reheating and storing lasagna can help maintain its delicious flavor and texture. When reheating, consider using an oven for best results. Preheat to 375°F (190°C), cover the lasagna with foil, and heat for about 25-30 minutes. Alternatively, microwave individual portions for 2-3 minutes, stirring halfway through.

For storage, refrigerate leftover lasagna in an airtight container for up to 3-5 days. If freezing, wrap the lasagna tightly in plastic wrap and aluminum foil, or use a freezer-safe container. Frozen lasagna can last up to 3 months.

When freezing lasagna, consider portioning it into individual servings for easier reheating. To thaw frozen lasagna, transfer it to the refrigerator overnight before reheating. This ensures even warming and helps preserve the dish’s texture.

Remember to always check that reheated lasagna reaches an internal temperature of 165°F (74°C) to ensure food safety. By following these tips, you can enjoy your leftover lasagna as if it were freshly made.

read more
Food & Beverage

How Long to Cook Chicken Breast in Oven at 350°F for Juicy Results

How Long To Cook Chicken Breast In Oven At 350°f For Juicy Results

When baking chicken breasts at 350°F, cooking times can vary depending on several factors. In general, boneless, skinless chicken breasts typically take about 20-30 minutes to cook. However, bone-in chicken breasts may take 35-45 minutes.

However, cooking chicken breasts at 350°F requires the right method. This guide covers factors that affect cooking time, common mistakes, and techniques for getting delicious, flavorful results. Whether you’re a beginner or a seasoned pro, you’ll learn how to perfect your chicken breast preparation and expand your recipe repertoire.

Factors Affecting Cooking Time for Chicken Breast at 350°F

Several factors influence the cooking time for chicken breast at 350°F, ensuring a perfectly cooked, juicy result. Chicken breast thickness is a primary determinant; thicker cuts require more time to cook through than thinner ones. The presence of bones also affects cooking duration, with bone-in chicken breasts generally taking longer than boneless varieties.

The initial state of the chicken is crucial; fresh chicken breasts cook faster than frozen ones, which may need additional time to thaw and reach the desired internal temperature. Oven accuracy plays a significant role, as variations in actual temperature can impact cooking times. It’s advisable to use an oven thermometer to ensure your oven maintains the intended 350°F.

Lastly, the cooking vessel you choose can affect heat distribution and cooking time. For instance, a glass baking dish may require a different cooking duration compared to a metal pan. By considering these factors and using a meat thermometer to check for doneness, you can achieve perfectly cooked chicken breasts every time.

Step-by-Step Guide to Cooking Chicken Breast at 350°F

Step By Step Guide To Cooking Chicken Breast At 350°f

Preparing delicious chicken breast at 350°F is a straightforward process that yields tender and flavorful results. Begin by preheating your oven and gathering your ingredients. Trim any excess fat from the chicken breasts and pat them dry with paper towels. For optimal flavor, season generously with salt, pepper, and your preferred herbs or spices.

Place the seasoned chicken breasts in a baking dish, ensuring they don’t overlap. For added moisture, you can brush them lightly with olive oil or melted butter. When the oven reaches 350°F, insert the baking dish and set a timer based on the thickness of your chicken breasts:

– 25-30 minutes for thin-cut breasts

– 35-40 minutes for medium-thickness breasts

– 45-50 minutes for thick-cut breasts

To ensure food safety, use a meat thermometer to check that the internal temperature of the thickest part of the breast reaches 165°F.

Tips and Tricks to Achieve Juicy Results

Cooking chicken breast in the oven at 350°F can yield deliciously juicy results with the right techniques. Start by brining your chicken breasts for at least 30 minutes to enhance moisture retention. This simple step can make a significant difference in the final texture of your dish.

Marinades are another excellent way to infuse flavor and keep the meat moist. Consider using oil-based marinades with herbs and spices for optimal results. Allow the chicken to marinate for at least 2 hours or overnight for maximum flavor penetration.

During cooking, basting methods can help maintain moisture. Periodically brush the chicken with its own juices or a flavorful liquid to prevent drying out. This technique not only adds flavor but also creates a beautiful, golden exterior.

One often overlooked step is the resting period after cooking. Allow your chicken breasts to rest for 5-10 minutes before cutting. This crucial step allows the juices to redistribute throughout the meat, ensuring each bite is succulent and flavorful.

By implementing these tips and tricks, you’ll master the art of cooking juicy chicken breasts in the oven at 350°F, elevating your culinary skills and impressing your dinner guests.

Common Mistakes to Avoid When Cooking Chicken Breast in the oven at 350°F

When cooking chicken breast in the oven at 350°F, several common mistakes can impact the final result. Overcooking is a frequent issue, leading to dry and tough meat. Conversely, undercooking poses health risks due to potential bacterial growth. Improper seasoning can result in bland or overpowering flavors, detracting from the chicken’s natural taste.

Many cooks neglect to perform regular temperature checks, which are crucial for ensuring the chicken reaches the safe internal temperature of 165°F. Using a meat thermometer is essential for accuracy. Another oversight is skipping the resting time after cooking. Allowing the chicken to rest for 5-10 minutes helps redistribute juices, resulting in a more tender and flavorful dish.

To avoid these pitfalls, always monitor cooking time closely, season appropriately, use a meat thermometer, and remember to let the chicken rest before serving. By being mindful of these common mistakes, you can consistently prepare juicy, flavorful chicken breasts in the oven.

Variations and Recipes for 350°F Oven-Baked Chicken Breast

Oven-baked chicken breast at 350°F is a versatile dish that can be prepared in numerous delicious ways. Here are some popular variations to try:

1. Herb-crusted chicken: Coat the chicken breast with a mixture of breadcrumbs, Parmesan cheese, and dried herbs like thyme, rosemary, and oregano for a crispy, flavorful crust.

2. Lemon garlic chicken: Marinate the chicken in lemon juice, minced garlic, olive oil, and herbs before baking for a zesty, aromatic dish.

3. Stuffed chicken breast: Create a pocket in the chicken breast and fill it with spinach and feta cheese or sun-dried tomatoes and mozzarella for an impressive meal.

4. BBQ chicken: Brush the chicken with your favorite barbecue sauce before and during baking for a sweet and tangy flavor profile.

5. Mediterranean chicken: Top the chicken with a mixture of diced tomatoes, olives, feta cheese, and oregano for a taste of the Mediterranean.

Remember to adjust cooking times based on the thickness of your chicken breast and any additional ingredients. Always ensure the internal temperature reaches 165°F (74°C) for food safety.

read more
Food & Beverage

How is Vinegar Made? A Guide to the Vinegar Production Process

How Is Vinegar Made A Guide To The Vinegar Production Process

Vinegar is a versatile kitchen staple known for its tangy flavor and numerous uses, from cooking to cleaning. This guide explores vinegar production, covering traditional and modern methods, the science of fermentation, different types of vinegars, and tips for making your own at home.

The Basics of Vinegar and Its Uses

Vinegar is a versatile and widely used liquid that has been a staple in households and industries for centuries. But what exactly is vinegar? At its core, vinegar is a solution of acetic acid and water, produced through the fermentation of ethanol by acetic acid bacteria. This simple yet potent concoction offers a myriad of applications across various domains.

One of the primary uses of vinegar is in cooking. It acts as a flavor enhancer, preservative, and tenderizing agent. Different types of vinegar, such as apple cider vinegar, balsamic vinegar, white vinegar, and rice vinegar, bring unique flavors to dishes ranging from salads to marinades.

Beyond culinary uses, the benefits of vinegar extend into cleaning and personal care. Its acidic nature makes it an effective natural cleaner capable of cutting through grease, removing stains, and disinfecting surfaces. Additionally, some people use diluted apple cider vinegar as a skin toner or hair rinse due to its purported health benefits.

The Science Behind Vinegar (Fermentation and Acetic Acid Bacteria)

The Science Behind Vinegar Fermentation And Acetic Acid Bacteria

Vinegar, a staple in kitchens worldwide, owes its unique properties to a fascinating scientific process. At the heart of vinegar production is the fermentation process, which transforms ethanol into acetic acid through the action of acetic acid bacteria. This transformation is not only a marvel of chemistry but also an age-old technique that has been refined over centuries.

The fermentation process begins with a source of ethanol, typically derived from alcoholic beverages like wine or cider. When exposed to oxygen, acetic acid bacteria (AAB) such as Acetobacter and Gluconobacter species come into play. These microorganisms oxidize the ethanol (C2H5OH) into acetic acid (CH3COOH), the primary component responsible for vinegar’s distinct sour taste and pungent aroma.

The chemistry of vinegar involves several steps: initially, AAB convert ethanol into acetaldehyde (CH3CHO) through enzymatic reactions. Subsequently, acetaldehyde is further oxidized to produce acetic acid. This entire biochemical pathway not only highlights the efficiency of these bacteria but also underscores their critical role in producing high-quality vinegar.

This process sheds light on why different vinegars possess varying flavors and strengths; factors such as the starting material, bacterial strains used, and environmental conditions during fermentation all contribute to the final product’s unique characteristics. Thus, appreciating the science behind vinegar enriches our culinary experiences and deepens our respect for this versatile ingredient’s complex origins.

The Traditional Method (How Vinegar was Made Historically)

Traditional vinegar production has a rich history dating back thousands of years. The process of historical vinegar making relied on natural fermentation methods that were both time-consuming and labor-intensive, yet yielded a product revered for its flavor and versatility.

In ancient times, vinegar was typically produced from wine or other alcoholic beverages. The process began with the exposure of these liquids to air, allowing naturally occurring acetic acid bacteria to convert the ethanol into acetic acid through a slow fermentation process. This old-fashioned fermentation method often took several months to complete, as it depended heavily on ambient conditions and the presence of wild bacteria.

Artisans would carefully monitor the fermentation stages, sometimes adding substances like wood shavings or straw to increase surface area and facilitate bacterial growth. These traditional techniques ensured that each batch had its unique character and taste profile, influenced by factors such as the type of alcohol used, local microbial flora, and environmental conditions.

Despite modern advancements in vinegar production technology, many enthusiasts still appreciate the depth of flavor achieved through these historical methods. Traditional vinegar production not only highlights the ingenuity of early food preservation techniques but also underscores the enduring appeal of artisanal craftsmanship in our culinary heritage.

The Modern Method (How Industrial Vinegar Production Works Today)

Industrial vinegar production has come a long way from traditional artisanal methods, thanks to advancements in modern fermentation techniques. Today, large-scale vinegar manufacturing is characterized by efficiency, consistency, and quality control.

In modern industrial vinegar production, the process typically begins with the selection of high-quality raw materials such as ethanol or wine. These substrates are then introduced into large fermentation tanks where they undergo a controlled fermentation process. This is facilitated by acetic acid bacteria, which convert ethanol into acetic acid—the key component of vinegar.

One of the most significant advancements in this field is the use of submerged fermentation techniques. Unlike traditional surface fermentation methods that require large surface areas and longer timeframes, submerged fermentation allows for greater bacterial contact with the substrate in a liquid medium. This not only accelerates the production process but also ensures a more consistent product.

Temperature and pH levels are meticulously monitored throughout the fermentation period to optimize bacterial activity and ensure product quality. Once the desired acidity level is achieved, the vinegar undergoes filtration and pasteurization to remove any impurities and extend shelf life.

Large-scale vinegar manufacturing facilities often employ automated systems to maintain precision at every stage of production. From raw material handling to bottling and labeling, automation ensures that each batch meets stringent quality standards while minimizing human error.

Through these advanced methods, industrial vinegar production today can meet global demand efficiently while maintaining high standards of quality and safety.

Exploring Different Types of Vinegars and Their Production Processes

Vinegar is a versatile ingredient found in kitchens worldwide, and its diverse varieties offer unique flavors and benefits. Understanding the production processes behind these vinegars can enhance appreciation for their distinct characteristics.

Balsamic Vinegar Production

Originating from Italy, balsamic vinegar is known for its rich, complex flavor. The production process begins with pressing Trebbiano or Lambrusco grapes to obtain grape must. This must is then cooked down to a thick syrup and aged in wooden barrels for a minimum of 12 years. The aging process allows the vinegar to develop its signature deep color and sweet-tart taste.

Apple Cider Vinegar Making Process

Apple cider vinegar starts with fermenting apple juice into hard cider. This is achieved by adding yeast to convert the sugars into alcohol. The second fermentation involves adding acetic acid bacteria, which converts the alcohol into acetic acid, giving apple cider vinegar its distinctive tangy flavor and health benefits.

Rice Wine Vinegar Creation

Popular in Asian cuisine, rice wine vinegar is made from fermented rice or rice wine. The process involves steaming rice and fermenting it with koji mold spores to break down starches into sugars. Yeast is then added to convert these sugars into alcohol, followed by acetic acid bacteria that transform the alcohol into vinegar. This results in a mild, slightly sweet flavor profile ideal for sushi and salad dressings.

Malt Vinegar Processing

Malt vinegar originates from England and is made from malted barley grains that are brewed into ale. The ale undergoes fermentation by acetic acid bacteria to produce malt vinegar. Known for its robust flavor with hints of caramel sweetness, malt vinegar pairs well with fish and chips as well as pickling vegetables.

Each type of vinegar has a unique production process contributing to its distinct taste and culinary uses. By exploring these methods (balsamic’s lengthy aging, apple cider’s dual fermentation, rice wine’s mold initiation, and malt’s brewing origins) we gain insight into how diverse vinegars enrich our cooking experiences.

DIY at Home (How to Make Your Own Vinegar from Scratch)

Making your own vinegar at home is a fascinating and rewarding project that allows you to explore the art of fermentation. The homemade vinegar recipe is straightforward and requires only a few ingredients and some patience. Here’s a step-by-step guide on how to embark on this DIY fermentation process.

Ingredients and Supplies

To get started, you will need the following home brewing supplies for vinegar making:

– A glass or ceramic container (avoid metal as it can react with the acid)

– Cheesecloth or a clean kitchen towel

– Rubber bands

– A wooden spoon

– Apple cider, wine, or beer (unpasteurized works best)

– Vinegar mother (a symbiotic culture of bacteria and yeast)

Step-by-Step Process

1. Preparation: Begin by sterilizing your container and utensils with hot water to ensure there are no unwanted bacteria.

2. Adding the Base: Pour your chosen base (apple cider, wine, or beer) into the container. Fill it about three-quarters full to leave room for fermentation gases.

3. Introducing the Mother: Add the vinegar mother to the liquid. This culture will kickstart the fermentation process by converting alcohol into acetic acid.

4. Covering: Securely cover the container with cheesecloth or a clean kitchen towel using rubber bands. This allows air in while keeping contaminants out.

5. Fermentation Period: Place your container in a dark, warm place where it can sit undisturbed for several weeks to months. The ideal temperature range is between 60°F and 80°F (15°C – 27°C).

6. Monitoring: Check periodically for any off smells or mold growth on top of the liquid; if you notice any, discard and start over as contamination has occurred.

7. Testing for Readiness: After about four weeks, begin tasting your vinegar using a clean spoon each time until it reaches your desired acidity level.

8. Bottling: Once satisfied with its taste, strain out any solids using cheesecloth before transferring your homemade vinegar into sterilized bottles for storage.

By following these steps in this homemade vinegar recipe, you’ll create deliciously tangy vinegar perfect for cooking, salad dressings, or even pickling vegetables! Not only does this DIY project provide a sense of accomplishment but also offers endless culinary possibilities right from your own kitchen.

read more
CoffeeFood & Beverage

Different Types of Coffee From Espresso to Cold Brew

Different Types Of Coffee From Espresso To Cold Brew

Coffee is more than a morning ritual; it’s a journey through diverse flavors, cultures, and brewing techniques. Understanding Arabica vs Robusta beans and methods like French Press and Cold Brew enhances the experience. Styles like Italian espresso and Turkish coffee reveal cultural differences. Whether specialty blends or espresso drinks like lattes and macchiatos, coffee offers endless discovery.

The Different Types of Coffee Beans

When it comes to coffee, the type of bean you choose can significantly impact the flavor, aroma, and overall experience of your brew. Understanding the different types of coffee beans is essential for any coffee enthusiast looking to elevate their morning cup. Let’s explore the four main types: Arabica, Robusta, Liberica, and Excelsa.

Arabica

Arabica beans are perhaps the most well-known and widely consumed type of coffee bean. Grown primarily in high-altitude regions with ample rainfall, these beans are celebrated for their smooth flavor and complex aroma. Arabica beans tend to have a sweeter taste with hints of fruit or sugar, making them a favorite among specialty coffee shops.

Robusta

Robusta beans are known for their strong, bold flavors and higher caffeine content compared to Arabica beans. They thrive in lower altitudes and are more resistant to pests and diseases. The taste profile of Robusta is often described as earthy or woody with a slightly bitter edge. These characteristics make them ideal for espresso blends where a robust flavor is desired.

Liberica

Liberica beans offer a unique flavor profile that sets them apart from Arabica and Robusta. Grown mainly in West Africa and Southeast Asia, Liberica has a distinctive floral aroma with fruity undertones. The taste can be somewhat smoky or woody, providing a rich experience that appeals to adventurous coffee drinkers seeking something different.

Excelsa

Excelsa beans are actually a variety within the Liberica family but stand out due to their unique attributes. Predominantly grown in Southeast Asia, Excelsa contributes tartness and fruity notes when blended with other coffees. Its complex profile includes both light roasts’ brightness and dark roasts’ depth, making it versatile for various brewing methods.

Understanding these different types of coffee beans can enhance your appreciation for this beloved beverage. Whether you prefer the smooth sweetness of Arabica or the bold intensity of Robusta, there’s a world of flavors waiting to be explored in each cup you brew.

Diving into Various Coffee Brewing Methods

Diving Into Various Coffee Brewing Methods

Exploring the world of coffee brewing methods opens up a rich tapestry of flavors and experiences. Each method brings out unique characteristics in the coffee, offering a distinct taste journey for enthusiasts and casual drinkers alike.

Espresso is perhaps the most well-known brewing method, delivering a concentrated shot of rich, bold coffee. Made by forcing hot water through finely-ground coffee under high pressure, espresso forms the base for many popular drinks like lattes and cappuccinos.

The French Press is another beloved method, known for its simplicity and full-bodied flavor. Coarse coffee grounds are steeped in hot water before being separated by pressing down a metal or plastic plunger. This technique allows essential oils and fine particles to remain in the brew, resulting in a robust and aromatic cup.

Pour-over brewing offers precision and control over the brewing process. By pouring hot water over ground coffee slowly and evenly through a filter, this method highlights subtle flavors and aromas that might be missed with other techniques. Popular pour-over devices include the Chemex and Hario V60.

Cold Brew has gained popularity for its smooth, mellow profile. Coffee grounds are steeped in cold water for an extended period, typically 12 to 24 hours, resulting in a less acidic but richly flavored beverage that can be enjoyed over ice or mixed with milk.

Finally, Aeropress combines elements of both immersion and pressure brewing methods to produce a clean yet robust cup of coffee quickly. Its versatility allows users to experiment with different grind sizes, water temperatures, and brew times to tailor their perfect cup.

Each brewing method offers its own unique experience, inviting you to explore new dimensions of flavor with every sip.

Coffee Around The Globe

Coffee is a universal beverage enjoyed by millions around the world, yet the way it is prepared and consumed varies greatly from one region to another. Understanding these international coffee types not only broadens our palate but also offers a glimpse into diverse cultural traditions.

Turkish coffee, for instance, is a unique experience in itself. Made by boiling finely ground coffee beans with water and sugar in a special pot called a cezve, Turkish coffee is known for its strong flavor and thick consistency. It’s typically served in small cups where the grounds are allowed to settle at the bottom.

Italian espresso stands as another iconic style of coffee. This concentrated form of coffee is brewed by forcing hot water through finely-ground coffee beans under high pressure. Known for its rich flavor and creamy consistency, an Italian espresso forms the base for many other popular drinks like cappuccinos and lattes.

Vietnamese coffee offers yet another distinct take on this beloved beverage. Often brewed using a drip filter called a phin, Vietnamese coffee can be enjoyed hot or iced. What sets it apart is the use of sweetened condensed milk, which adds a rich sweetness that balances out the robust flavor of the dark-roasted beans.

Greek frappe provides an entirely different approach to enjoying coffee. This frothy iced drink is made from instant coffee, sugar, water, and sometimes milk or evaporated milk. Shaken vigorously until it forms a thick foam, Greek frappe is especially refreshing during hot summer months.

The Art of Espresso Drinks

Espresso drinks have long been a staple of coffee culture, offering a rich and versatile base for various delightful concoctions. Understanding the differences between these beverages can enhance your appreciation and enjoyment. Let’s explore some popular espresso drinks: from lattes to macchiatos and beyond.

A latte is one of the most well-known espresso drinks, consisting of a shot or two of espresso mixed with steamed milk and topped with a small amount of froth. The balance between milk and coffee creates a smooth, creamy beverage that is perfect for those who prefer a milder coffee flavor.

In contrast, the cappuccino offers a more robust coffee experience. It features equal parts of espresso, steamed milk, and froth. The thicker layer of froth provides an airy texture that complements the strong espresso taste beautifully.

The macchiato, meaning “stained” or “spotted” in Italian, is another favorite among coffee aficionados. This drink typically consists of an espresso shot “stained” with just a dash of steamed milk or foam. The result is an intense flavor profile that highlights the richness of the espresso.

Then there’s the mocha, which combines chocolate syrup with an espresso shot and steamed milk, often topped with whipped cream. This indulgent treat merges the worlds of chocolate and coffee into one decadent beverage.

Lastly, we have the flat white, which originated in Australia and New Zealand but has since gained global popularity. A flat white is similar to a latte but uses microfoam finely textured steamed milk creating a velvety consistency without much froth on top.

Understanding these distinctions not only helps you make informed choices at your local café but also allows you to experiment with different flavors at home. Whether you prefer the creamy texture of a latte or the boldness of a macchiato, there’s an espresso drink out there to suit every palate.

Savoring Specialty Coffees

When it comes to savoring specialty coffees, the world of gourmet and artisan blends offers a rich tapestry of flavors and aromas that can transform your daily coffee ritual into an extraordinary experience. Specialty coffee types are crafted with meticulous attention to detail, from the selection of high-quality beans to the precise roasting techniques that bring out their unique characteristics.

Single-origin coffee is a standout in this category, sourced from a specific region or even a single farm. This type of coffee allows you to taste the distinct flavors and profiles that are unique to its place of origin, whether it’s the fruity notes of Ethiopian beans or the chocolatey undertones found in Colombian varieties.

Flavored coffees and infused blends add another layer of complexity and enjoyment. These coffees are often enhanced with natural flavors like vanilla, hazelnut, or caramel, providing a delightful twist on traditional brews. Infused blends may also incorporate ingredients such as spices or herbs, creating innovative flavor combinations that cater to diverse palates.

Exploring these specialty coffee types not only broadens your appreciation for this beloved beverage but also supports sustainable practices and fair trade initiatives often associated with gourmet and artisan producers. Whether you’re a seasoned connoisseur or just beginning your journey into specialty coffees, there’s always something new and exciting to discover in every cup.

Embrace Your Passion for Coffee by Experimenting with New Types and Flavors Today!

Coffee enthusiasts know that the world of coffee is vast and ever-evolving. From the rich, bold flavors of a dark roast to the nuanced notes in a single-origin brew, there is always something new to discover. Embracing your passion for coffee means more than just enjoying your daily cup; it involves exploring different types and flavors to enhance your experience.

One way to start experimenting is by trying various brewing methods. Whether it’s a classic French press, an elegant pour-over, or a high-tech espresso machine, each method brings out unique characteristics in the coffee beans. Additionally, consider sampling beans from different regions around the world. Ethiopian coffees often boast fruity and floral notes, while Colombian beans are known for their balanced acidity and nutty undertones.

Don’t hesitate to explore flavored coffees as well. Vanilla, caramel, and hazelnut are popular choices that can add an extra dimension to your morning ritual. For those who prefer less traditional options, there are even savory blends infused with spices like cinnamon or cardamom.

Embracing your passion for coffee through experimentation can lead to delightful discoveries and a deeper appreciation for this beloved beverage. So why not start today? Try something new and let your taste buds guide you on an exciting journey through the diverse world of coffee.

read more
CoffeeFood & Beverage

How to Brew the Perfect Americano Coffee at Home

How To Brew The Perfect Americano Coffee At Home

Brewing the perfect Americano at home is simple. Combining robust espresso with hot water creates a rich, mild beverage. This guide covers essential ingredients, equipment, brewing steps, and troubleshooting tips to elevate your Americano coffee.

What is an Americano Coffee?

An Americano coffee, also known as an espresso Americano, is a popular coffee type that offers a unique and distinct flavor profile. The drink is made by diluting a shot of espresso with hot water, resulting in a beverage that has the strength and robust flavors of an espresso but with a smoother, less intense taste.

The origins of the Americano coffee are often traced back to World War II when American soldiers stationed in Europe found traditional Italian espresso too strong for their palates. To make it more palatable, they added hot water to the espresso, creating what we now know as an Americano.

One of the key characteristics that sets an Americano apart from other coffee types is its versatility. The ratio of espresso to water can be adjusted according to personal preference, allowing for variations in strength and flavor. This makes it an ideal choice for those who enjoy the rich taste of espresso but prefer a less concentrated beverage.

The Essential Ingredients and Equipment for Making an Americano

Making a perfect Americano requires not only the right technique but also the essential ingredients and equipment. Understanding these components can elevate your coffee-making experience and ensure you enjoy a rich, flavorful cup every time.

First and foremost, selecting the best coffee beans for an Americano is crucial. Opt for high-quality, freshly roasted beans that boast a balanced profile. Medium to dark roasts are often preferred as they provide a robust flavor that stands up well when diluted with water.

Next, an espresso machine is indispensable for making an authentic Americano. This machine allows you to extract a concentrated shot of espresso, which forms the base of your drink. Investing in a reliable espresso machine with consistent pressure and temperature control will significantly enhance your coffee quality.

Equally important is a hot water dispenser or kettle to add hot water to the espresso shot. The ideal ratio is typically one part espresso to two parts hot water, although this can be adjusted according to personal preference.

Finally, don’t overlook the importance of a good coffee grinder. Freshly ground beans are essential for achieving optimal flavor extraction. A burr grinder is recommended over blade grinders as it provides a more uniform grind size, which contributes to better-tasting espresso shots.

By combining these essential ingredients and equipment, you can master the art of making an exceptional Americano at home.

Step-by-Step Guide to Brewing the Perfect Americano at Home

Step By Step Guide To Brewing The Perfect Americano At Home

Brewing the perfect Americano at home is a rewarding experience that combines precision and simplicity. Here’s a step-by-step guide to help you master this classic coffee drink.

Step 1. Preparing the Espresso

The foundation of a great Americano lies in pulling the perfect espresso shot. Begin by grinding fresh coffee beans to a fine consistency, suitable for espresso. Use approximately 18-20 grams of coffee for a double shot. Tamp the grounds evenly in your portafilter and lock it into your espresso machine.

Step 2. Pulling the Espresso Shot

Start your espresso machine and pull a double shot, aiming for an extraction time of around 25-30 seconds. This ensures that you capture the rich flavors and aromatic oils essential for a quality espresso base.

Step 3. Adding Hot Water

Once you have your perfect espresso shot, it’s time to transform it into an Americano by adding hot water. The standard ratio is one part espresso to two parts hot water, but this can be adjusted based on personal preference. Boil fresh water and let it cool slightly before pouring; this prevents scorching the delicate flavors of the espresso.

Step 4. Combining Espresso and Water

Pour the hot water into your cup first, followed by slowly adding the freshly brewed espresso on top. This method helps preserve the crema—the golden layer of foam that sits on top of an excellent shot—resulting in a visually appealing Americano with balanced flavor.

By following these simple steps, you’ll be able to enjoy a perfectly brewed Americano right from your home kitchen, capturing all its robust yet smooth characteristics every time you make one.

Troubleshooting Common Issues in Brewing Americano Coffee

Brewing the perfect Americano can sometimes feel like a delicate balancing act. From bitterness to weakness, several factors can affect your final cup. Here are some troubleshooting tips to help you address common issues:

1. Bitter Coffee Fix: If your Americano tastes overly bitter, it could be due to over-extraction. This often happens when the espresso shot is pulled for too long or the grind size is too fine. Try adjusting your grind coarser and ensure you’re pulling shots within the recommended time frame (usually 25-30 seconds).

2. Weak Americano Solutions: A weak Americano usually results from under-extraction or using too much water in proportion to the espresso shot. Make sure you’re using fresh, high-quality beans and an appropriate grind size for a balanced extraction. Additionally, experiment with reducing the amount of added hot water until you find a strength that suits your taste.

3. Crema Problems in Espresso: The crema is an essential component of a good espresso shot, contributing both flavor and texture to your Americano. If you’re experiencing issues with crema formation, it might be due to stale coffee beans or incorrect tamping pressure during preparation. Always use freshly roasted beans and apply consistent pressure when tamping.

By addressing these common problems with targeted solutions, you can significantly improve the quality of your Americano coffee and enjoy a more satisfying brew every time.

Expert Tips for Enhancing Your Homemade Americano Experience

For coffee enthusiasts looking to elevate their homemade Americano experience, a few expert tips can significantly enhance the flavor and enjoyment of this classic beverage. Here are some strategies for improving the taste of your Americano and adding exciting flavor enhancements to your coffee drinks.

1. Quality Beans Matter: Start with high-quality, freshly roasted coffee beans. The foundation of any great Americano is the espresso, so investing in premium beans will ensure a richer and more complex flavor profile.

2. Proper Grinding: Use a burr grinder to achieve a consistent grind size suitable for espresso. A uniform grind will help extract the optimal flavors from your beans, resulting in a smoother and more balanced Americano.

3. Water Quality: The water you use can greatly affect the taste of your coffee. Filtered water free from impurities will highlight the natural flavors of the espresso without introducing any unwanted tastes.

4. Temperature Control: For an ideal Americano, it’s crucial to maintain proper water temperature when brewing your espresso and diluting it with hot water. Aim for water around 200°F (93°C) for brewing and slightly cooler for dilution to avoid scalding or bitter notes.

5. Flavor Enhancements: Experiment with subtle additions like a dash of cinnamon, nutmeg, or cocoa powder to add depth without overpowering the natural taste of your coffee drink. For those who enjoy sweetness, consider using natural sweeteners like honey or agave syrup instead of refined sugar.

6. Serving Suggestions: Serve your Americano in pre-warmed cups to maintain its temperature longer and enhance its aroma upon serving. Pairing it with complementary snacks such as biscotti or dark chocolate can also elevate your overall experience.

By focusing on these elements, you’ll be well on your way to crafting an exceptional homemade Americano that rivals even those from your favorite café.

The Health Benefits of Drinking Americano Coffee

Drinking an Americano coffee, a popular low-calorie coffee option, offers numerous health benefits that go beyond its rich and robust flavor. One of the primary benefits of drinking black coffee, such as an Americano, is its potential to boost mental alertness and concentration. The caffeine content in an Americano can help improve cognitive function by stimulating the central nervous system, making it a great choice for those needing a mental pick-me-up.

Moreover, the health benefits of americanos extend to weight management. Since an Americano is typically made without added sugars or creams, it remains a low-calorie beverage that can fit seamlessly into most diet plans. This makes it an excellent option for individuals looking to reduce their calorie intake while still enjoying their daily cup of coffee.

Additionally, drinking black coffee has been linked to various long-term health advantages. For instance, regular consumption has been associated with a lower risk of certain diseases such as Parkinson’s and Alzheimer’s due to its high antioxidant content. These antioxidants help combat oxidative stress and inflammation in the body.

Elevate Your Morning Routine with the Perfect Homemade Americano Coffee

Incorporating a homemade Americano coffee into your morning routine can transform the start of your day. With its rich flavor and simplicity, this classic espresso-based drink offers a perfect balance of strength and smoothness. By mastering the art of making an Americano at home, you not only save time and money but also gain control over every aspect of your brew—from the quality of beans to the water temperature.

To create your perfect Americano, begin with freshly ground high-quality coffee beans. Use an espresso machine or a stovetop espresso maker to brew a robust shot of espresso. Then, dilute it with hot water to achieve your desired strength. The traditional ratio is one part espresso to two parts water, but feel free to adjust according to taste.

Experimenting with different types of beans and roast levels can further enhance your experience, allowing you to discover new flavors and aromas that suit your palate. Additionally, consider investing in a good grinder and maintaining consistent brewing practices for optimal results.

By taking these steps, you can elevate not just your morning routine but also your appreciation for coffee as an art form. So next time you’re craving that perfect cup, skip the café line and enjoy crafting a delicious homemade Americano right in the comfort of your own kitchen.

read more
Food & Beverage

How Long Does Cooked Chicken Last in the Fridge? A Guide to Safe Storage and Consumption

How Long Does Cooked Chicken Last In The Fridge A Guide To Safe Storage And Consumption

Proper food storage is essential for maintaining health and preventing waste, especially when it comes to perishable items like cooked chicken. This guide explores the best practices for storing cooked chicken, including refrigeration techniques, signs of spoilage, and safe reheating methods. By following these guidelines, you can ensure your leftover chicken remains safe to eat and retains its quality for several days after cooking.

How Long Does Cooked Chicken Last in the Fridge

Properly storing cooked chicken is essential for maintaining its quality and ensuring food safety. When refrigerated correctly, cooked chicken can last for 3 to 4 days in the fridge. To maximize its shelf life, store the chicken in airtight containers or wrap it tightly in plastic wrap or aluminum foil. It’s crucial to refrigerate cooked chicken within two hours of preparation, or within one hour if the ambient temperature is above 90°F (32°C).

Factors Affecting the Longevity of Refrigerated Cooked Chicken

The longevity of refrigerated cooked chicken depends on several key factors. Storage temperature is crucial; maintaining a consistent temperature below 40°F (4°C) significantly slows bacterial growth. The type of container used also plays a role, with airtight containers helping to prevent moisture loss and contamination.

The cooking method can impact shelf life as well. Chicken that has been thoroughly cooked to an internal temperature of 165°F (74°C) will generally last longer than undercooked meat. Additionally, the way the chicken was prepared – whether it was seasoned, marinated, or mixed with other ingredients – can affect its longevity.

Cross-contamination risks should not be overlooked. Storing cooked chicken separately from raw meats and using clean utensils when handling can prevent the introduction of harmful bacteria. By considering these factors and following proper food safety guidelines, you can maximize the shelf life of your refrigerated cooked chicken and ensure it remains safe for consumption.

Proper Storage Techniques for Maximizing Cooked Chicken Freshness

Proper storage techniques are crucial for maintaining the freshness and safety of cooked chicken. Start by allowing the chicken to cool to room temperature, but don’t leave it out for more than two hours to prevent bacterial growth. Once cooled, divide the chicken into portion-sized amounts to facilitate easier reheating and reduce waste.

Airtight containers are essential for storing cooked chicken in the refrigerator. These containers prevent cross-contamination and keep the chicken moist. Glass or BPA-free plastic containers with tight-fitting lids are ideal choices. Alternatively, you can wrap the chicken tightly in aluminum foil or plastic wrap before placing it in a container for added protection.

Refrigerator organization plays a key role in maintaining chicken freshness. Store the containers on the middle or upper shelves, where temperatures are most consistent. Avoid placing them near the door, as frequent opening and closing can lead to temperature fluctuations.

For optimal freshness, use cooling methods that quickly bring down the chicken’s temperature. If you have large quantities, spread the chicken in a single layer on a baking sheet and refrigerate until cool before transferring to containers. This method helps prevent the center from remaining warm, which can promote bacterial growth.

How to Tell if Your Cooked Chicken Has Gone Bad

How To Tell If Your Cooked Chicken Has Gone Bad

Knowing how to identify spoiled cooked chicken is crucial for food safety. Several key indicators can help you determine if your chicken has gone bad:

Odor: Fresh cooked chicken should have a mild, pleasant aroma. If you detect any sour, rancid, or ammonia-like smells, it’s a clear sign of spoilage.

Discoloration: Cooked chicken should maintain a white or brown color, depending on the cooking method. If you notice any gray, green, or moldy spots, it’s time to discard the chicken.

Texture changes: Spoiled chicken often develops a slimy or sticky texture. If the meat feels unusually soft, slimy, or tacky to the touch, it’s no longer safe to eat.

Mold growth: Visible mold on cooked chicken is a definite sign of spoilage. Never consume chicken with any type of mold present.

It’s important to note that consuming spoiled chicken can lead to food poisoning. Symptoms may include nausea, vomiting, diarrhea, and fever. If you experience these symptoms after eating chicken, seek medical attention promptly.

Safe Reheating Practices for Leftover Cooked Chicken

When it comes to reheating leftover cooked chicken, safety should be your top priority. To ensure your chicken is safe to eat, always heat it to an internal temperature of 165°F (74°C). This can be achieved through various methods, each with its own advantages.

Microwave reheating is the quickest option. Place the chicken in a microwave-safe dish, cover it with a damp paper towel to retain moisture, and heat in short intervals, stirring occasionally for even heating. For oven reheating, preheat to 350°F (175°C), place the chicken in an oven-safe dish, cover with foil, and heat for about 20-25 minutes, depending on the quantity.

Stovetop methods can also be effective. For a moist result, try simmering the chicken in a small amount of broth or water. Alternatively, you can sauté it in a pan with a bit of oil for a crispy exterior.

Regardless of the method you choose, always use a food thermometer to verify that the chicken has reached the safe internal temperature. Insert the thermometer into the thickest part of the meat, avoiding bones or fat. By following these safe reheating practices, you can enjoy your leftover chicken without compromising on taste or safety.

Freezing Cooked Chicken (Extended Storage Options)

Freezing cooked chicken is an excellent way to extend its shelf life and ensure you always have a protein-rich meal option on hand. When properly stored, frozen cooked chicken can maintain its quality for up to four months. To maximize freshness, wrap the chicken tightly in freezer-safe plastic wrap or aluminum foil, then place it in a freezer bag, removing as much air as possible before sealing.

When it comes to thawing, there are several safe methods to choose from. The refrigerator method is the slowest but safest, allowing the chicken to thaw gradually over 24-48 hours. For quicker results, you can use the cold water method, submerging the sealed chicken in cold water and changing it every 30 minutes. Microwave thawing is the fastest option but requires immediate cooking afterward to prevent bacterial growth.

To maintain the quality of your frozen chicken, it’s crucial to prevent freezer burn. This can be achieved by minimizing air exposure through proper packaging and maintaining a consistent freezer temperature of 0°F (-18°C) or below. Labeling your packages with the date of freezing can help you keep track of storage times and ensure you use the oldest items first.

Health Risks Associated with Consuming Spoiled Chicken

Consuming spoiled chicken can lead to serious health risks, primarily due to the growth of harmful bacteria. As chicken begins to spoil, it becomes a breeding ground for various pathogens, including salmonella and listeria. These bacteria can cause severe foodborne illnesses, resulting in symptoms such as nausea, vomiting, diarrhea, and fever.

Salmonella, one of the most common culprits in chicken-related food poisoning, can lead to salmonellosis. This infection can be particularly dangerous for young children, the elderly, and those with weakened immune systems. Listeria, another potential threat, can cause listeriosis, which is especially risky for pregnant women and can lead to serious complications.

To minimize these health risks, it’s crucial to follow proper food safety precautions. Always store chicken at the correct temperature, cook it thoroughly, and consume it within the recommended timeframe. Be vigilant for signs of spoilage, such as changes in color, texture, or odor. When in doubt, it’s always safer to discard chicken that may have gone bad rather than risk potential foodborne illnesses.

read more
Food & Beverage

What is Boba Made Of? A Deep Dive into the Ingredients and Their Origins

What Is Boba Made Of A Deep Dive Into The Ingredients And Their Origins

Boba tea, or bubble tea, is popular for its unique texture and delightful flavors. Central to this drink are the chewy tapioca pearls made from cassava root. This article explores boba’s origins, ingredients, production process, types, flavors, nutritional information, and popular add-ins that enhance bubble tea. Join us to uncover everything about your favorite drink’s key components.

The Basic Ingredients of Boba (Tapioca Pearls Explained)

Boba, a beloved component of bubble tea, has gained immense popularity worldwide. But what exactly is boba made of? The primary ingredient in boba is tapioca pearls, which are small, chewy spheres that add a delightful texture to the beverage.

Tapioca pearls are made from tapioca starch, which is derived from the cassava root. This starchy tuber is native to South America but has found its way into various cuisines across the globe. To create tapioca pearls, the starch from the cassava root is extracted and processed into small balls. These balls are then boiled until they achieve their characteristic chewy consistency.

The basic ingredients for making traditional tapioca pearls include tapioca starch and water. However, additional components like sugar or caramel can be added during preparation to enhance flavor and color. Once cooked, these pearls can be soaked in sweeteners like honey or syrup to further enrich their taste before being added to bubble tea.

Understanding what goes into your bubble tea can enhance your appreciation for this delightful drink. The next time you sip on a cup of bubble tea, you’ll know that those deliciously chewy tapioca pearls come from the humble cassava root and a bit of culinary magic involving tapioca starch.

The Process of Making Tapioca Pearls (From Cassava Root to Boba)

The Process Of Making Tapioca Pearls From Cassava Root To Boba

Tapioca pearls, commonly known as boba, are a staple in bubble tea and have captivated taste buds worldwide. Understanding the process of making tapioca pearls from cassava root to boba is both fascinating and informative.

The journey begins with the cassava root, a starchy tuber native to South America. The first step in making tapioca pearls involves harvesting and peeling the cassava root. Once peeled, the roots are grated into a fine pulp. This pulp is then washed and strained to extract the starchy liquid.

Next, this liquid undergoes a drying process where it forms tapioca starch powder. This powder is crucial for creating the chewy texture that boba enthusiasts adore. The starch is mixed with hot water to form a dough-like consistency. Skilled workers knead this dough until it becomes smooth and pliable.

The dough is then rolled into long cylindrical shapes before being cut into small pieces. These pieces are hand-rolled into tiny balls, which will eventually become tapioca pearls. The size of these balls can vary depending on preference but typically ranges between 1/8 to 1/4 inch in diameter.

Once shaped, the raw tapioca pearls are boiled until they achieve their distinctive chewy texture—a process that usually takes about an hour. After boiling, they are soaked in cold water to prevent sticking and maintain their shape.

Finally, these freshly made boba pearls can be sweetened by soaking them in sugar syrup or honey before being added to your favorite bubble tea drink.

This meticulous process of transforming cassava root into delightful tapioca pearls highlights not only traditional craftsmanship but also modern culinary innovation in boba production.

Types of Boba (Exploring Different Varieties and Flavors)

Boba tea, also known as bubble tea, has taken the world by storm with its delightful textures and flavors. One of the most intriguing aspects of this beverage is the variety of boba pearls that can be added to it. Let’s explore some popular types and their unique characteristics.

Black Boba vs White Boba

The most common type of boba is black boba, which gets its color from brown sugar or caramel added during the cooking process. These pearls are known for their chewy texture and slightly sweet flavor, making them a favorite among traditional boba tea enthusiasts. On the other hand, white boba pearls are made from tapioca starch without any additional coloring or flavoring agents, resulting in a more neutral taste and a slightly firmer texture.

Flavored Boba Pearls

For those looking to add an extra burst of flavor to their drink, flavored boba pearls are an excellent choice. These pearls come infused with various flavors such as strawberry, mango, or lychee. The infusion process ensures that each bite delivers a delicious taste that complements the drink perfectly.

Popping Boba

Popping boba offers a unique twist on traditional tapioca balls. Unlike their chewy counterparts, popping boba are filled with fruit juice and burst open when bitten into, releasing a refreshing splash of flavor. Commonly found in fruity teas and desserts, popping boba come in flavors like passion fruit, blueberry, and kiwi.

Jelly Boba Varieties

Jelly boba adds another layer of texture to your drink experience. Made from ingredients like coconut or konjac root powder, these jellies can be cut into various shapes such as cubes or strips. They come in different flavors including coffee jelly for those who enjoy a hint of bitterness or aloe vera jelly for a more subtle taste.

Each type of boba brings its own unique flair to bubble tea drinks. Whether you prefer the classic chewiness of black or white pearls or enjoy experimenting with flavored varieties and popping sensations, there’s always something new to discover in every sip!

Nutritional Information (What’s Really in Your Cup of Boba Tea?)

Bubble tea, also known as boba tea, has become a popular beverage worldwide. However, understanding its nutritional profile is essential for those who enjoy this trendy drink. Let’s dive into the bubble tea nutrition facts to see what’s really in your cup.

One of the primary components of bubble tea is tapioca pearls. These chewy spheres are made from cassava starch and contribute significantly to the drink’s calorie count. On average, a serving of tapioca pearls can add around 150 calories to your beverage. It’s important to note that these calories come primarily from carbohydrates, with little nutritional value in terms of vitamins or minerals.

The base of bubble tea can vary widely (from milk teas to fruit-flavored teas) each bringing its own set of nutritional elements. Traditional milk teas often contain dairy or non-dairy creamers that add both fats and sugars into the mix. This combination can lead to a high-calorie count per serving, sometimes reaching up to 300-400 calories for a large cup.

Sugar content in bubble tea is another crucial factor to consider. Many boba teas are sweetened with syrups or additional sugar, which can significantly increase the overall sugar intake per serving. Some estimates suggest that a typical serving could contain anywhere from 30-60 grams of sugar, depending on how sweet you like it.

Despite these considerations, there are some health benefits of boba tea when consumed in moderation. The tea contains antioxidants and various compounds that may offer health benefits such as improved digestion and reduced inflammation.

While bubble tea can be an enjoyable treat with its unique flavors and textures, being aware of its nutritional content can help you make more informed choices about how often you indulge in this delightful beverage.

Beyond Tapioca (Other Popular Add-Ins for Bubble Tea)

Bubble tea, also known as boba tea, has taken the world by storm with its unique combination of flavors and textures. While tapioca pearls are the classic add-in that many people associate with bubble tea, there is an array of other delightful toppings that can elevate your drink experience.

One popular option is fruit jellies for bubble tea. These come in various flavors such as mango, lychee, and strawberry, adding a burst of fruity sweetness to your milk tea. Unlike the chewy texture of tapioca pearls, fruit jellies offer a refreshing contrast and are perfect for those who prefer a lighter bite.

Another favorite among bubble tea enthusiasts is grass jelly. This herbal jelly has a slightly bitter taste that complements the sweetness of milk tea wonderfully. Grass jelly is known for its smooth texture and cooling properties, making it an excellent choice for hot summer days.

For those looking to experiment further with their bubble tea toppings, consider adding popping boba or aloe vera cubes. Popping boba are small spheres filled with fruit juice that burst in your mouth, providing an exciting twist to each sip. Aloe vera cubes offer a subtle flavor and a crunchy texture that pairs well with both fruity and creamy teas.

Exploring these diverse bubble tea toppings can transform your usual drink into a customized treat tailored to your taste preferences. Whether you stick with traditional tapioca pearls or venture into new territory with fruit jellies and grass jelly, there’s no shortage of ways to enjoy this beloved beverage.

read more
Food & Beverage

Everything You Need to Know About Swai Fish – Benefits, Risks, and Cooking Tips

Everything You Need To Know About Swai Fish Benefits Risks And Cooking Tips

Swai fish, also known as Pangasius or iridescent shark, is a freshwater fish native to Southeast Asia. It has gained popularity in various parts of the world due to its mild flavor and affordability. This blog section will delve into everything you need to know about swai fish, from its nutritional value and health benefits to potential risks and cooking tips.

What is Swai Fish?

Swai fish, scientifically known as Pangasius hypophthalmus, is a freshwater fish native to the Mekong River in Southeast Asia. Commonly farmed in Vietnam, this species has gained popularity worldwide due to its mild flavor and versatile culinary applications.

Swai fish belongs to the Pangasiidae family and is often confused with catfish because of its similar appearance. However, it is distinct in both habitat and characteristics. The swai fish typically has a white flesh with a delicate texture that makes it suitable for various cooking methods, including grilling, frying, and baking.

There are different types of swai fish based on their size and farming practices. While some farms focus on producing larger fillets for commercial sale, others may cultivate smaller-sized swai for local markets. Understanding what swai fish is and its origins can help consumers make informed choices when selecting seafood options.

The definition of swai fish encompasses its identity as a freshwater species from Southeast Asia known for its mild taste and adaptability in recipes. Its origin from the Mekong River highlights its cultural significance in Vietnamese cuisine while also explaining why it’s become a global favorite among seafood lovers.

Nutritional Value of Swai Fish

Nutritional Value Of Swai Fish

Swai fish, a popular choice among seafood enthusiasts, offers a variety of nutritional benefits that make it a worthy addition to your diet. Known for its mild flavor and tender texture, swai fish is not only delicious but also packed with essential nutrients.

When it comes to swai fish nutrition, one of the standout features is its protein content. A 4-ounce serving of swai provides approximately 15 grams of high-quality protein, making it an excellent source for those looking to boost their protein intake without consuming too many calories. Speaking of calories in swai fish, this same serving size contains around 90-100 calories, which makes it a low-calorie option suitable for weight management and healthy eating plans.

In addition to its favorable protein-to-calorie ratio, swai fish also offers other health benefits. It is rich in omega-3 fatty acids, which are known for their heart-health properties and ability to reduce inflammation. Furthermore, swai fish contains essential vitamins and minerals such as vitamin D, vitamin B12, selenium, and phosphorus.

Overall, incorporating swai fish into your diet can provide you with valuable nutrients while keeping your calorie count in check. Whether grilled, baked or sautéed, this versatile fish can be enjoyed in numerous recipes while contributing positively to your overall health.

Health Benefits of Eating Swai Fish

Swai fish, a popular and affordable seafood option, offers a range of health benefits that make it a valuable addition to your diet. One of the primary advantages of eating swai fish is its content of omega-3 fatty acids. These essential fats play a crucial role in maintaining heart health by reducing inflammation and lowering the risk of cardiovascular diseases.

In addition to promoting heart health, swai fish is also an excellent low-fat seafood option. It provides high-quality protein without the high levels of saturated fat found in some other types of meat. This makes it an ideal choice for those looking to maintain or lose weight while still ensuring they receive adequate nutrition.

Furthermore, incorporating swai fish into your meals can contribute to overall well-being by providing essential nutrients such as vitamins B12 and D, selenium, and phosphorus. These nutrients support various bodily functions, including energy production, bone health, and immune system function.

The benefits of eating swai fish are numerous: from its heart-healthy omega-3 fatty acids to its status as a low-fat protein source packed with essential nutrients. Adding this versatile fish to your diet can be a delicious way to enhance your overall health.

Potential Risks and Concerns Associated with Swai Fish

Swai fish, a popular choice among seafood lovers for its mild flavor and affordability, is not without its potential risks and concerns. One of the primary issues associated with swai fish is the presence of contaminants often found in farmed fish. These contaminants can include harmful chemicals, antibiotics, and other pollutants that may pose health risks to consumers.

Another significant concern is the mercury levels in swai fish. While typically lower than in larger predatory fish, mercury accumulation can still be a problem depending on the farming practices and water quality where the fish are raised. Consuming high levels of mercury over time can lead to serious health issues, particularly affecting the nervous system.

Additionally, imported seafood safety concerns add another layer of risk when it comes to swai fish. Much of the swai available in markets is imported from countries with varying regulations on food safety standards. This inconsistency can lead to increased chances of contamination and poor quality control.

While swai fish remains an accessible option for many consumers, it’s crucial to be aware of these potential risks and make informed choices about seafood consumption. Opting for reputable sources and staying updated on food safety advisories can help mitigate some of these concerns.

Sustainable Practices and Sourcing for Swai Fish

The sustainability of swai farming has become a focal point for both consumers and producers aiming to promote environmentally friendly fishing practices. Swai, a type of catfish native to Southeast Asia, is farmed primarily in Vietnam under conditions that can vary widely in their environmental impact. To ensure the ethical sourcing of seafood, several measures are being implemented to improve the sustainability of swai farming.

One significant step toward sustainable swai farming involves adopting aquaculture practices that minimize water pollution and habitat destruction. Farms are increasingly using closed-loop systems that recycle water and reduce waste discharge into natural waterways. Additionally, efforts are being made to source feed responsibly by avoiding overfished species and opting for plant-based alternatives where possible.

Another critical aspect is the certification process. Certifications from organizations such as the Aquaculture Stewardship Council (ASC) help consumers identify products that meet rigorous standards for environmental responsibility and social accountability. These certifications ensure that farms operate ethically, with minimal negative impact on local ecosystems.

Moreover, transparency in sourcing is vital for promoting sustainable practices. Many companies now provide detailed information about their supply chains, allowing consumers to make informed choices about the seafood they purchase. This transparency helps build trust between producers and consumers while encouraging more responsible farming methods.

While challenges remain, strides are being made toward more sustainable and ethically sourced swai fish through improved aquaculture practices, certification processes, and enhanced supply chain transparency. By supporting these initiatives, we can contribute to a healthier planet while enjoying responsibly sourced seafood.

The Best Ways to Cook Swai Fish

Swai fish, known for its mild flavor and tender texture, is a versatile ingredient that can be prepared in various delicious ways. Whether you’re a seasoned chef or a home cook looking to try something new, here are some of the best methods and recipes for cooking swai fillets.

Grilling Swai Fillets

Grilling is an excellent way to cook swai fillets, imparting a smoky flavor that complements the fish’s natural taste. To grill swai, preheat your grill to medium-high heat and lightly oil the grates. Season the fillets with salt, pepper, and your favorite herbs or spices. Grill the fillets for about 4-5 minutes on each side until they are opaque and flake easily with a fork.

Baking Swai Fillets

Baking is another healthy option that ensures even cooking while preserving the moisture of the fish. Preheat your oven to 375°F (190°C). Place the seasoned swai fillets on a baking sheet lined with parchment paper or foil. For added flavor, you can top them with lemon slices or a garlic butter sauce. Bake for 15-20 minutes until the fish is fully cooked.

Frying Swai Fillets

For those who enjoy crispy textures, frying swai fillets can be incredibly satisfying. Heat oil in a skillet over medium-high heat. Coat the fillets in flour or breadcrumbs mixed with seasonings before placing them in hot oil. Fry each side for about 3-4 minutes until golden brown and crispy.

Cooking Tips for Tasty Seafood Dishes

1. Marinate: Marinating swai fillets before cooking can enhance their flavor significantly.

2. Temperature Control: Always ensure that your cooking temperature is appropriate; too high can dry out the fish while too low might leave it undercooked.

3. Fresh Ingredients: Use fresh herbs, spices, and citrus fruits to add vibrant flavors to your dishes.

4. Experiment: Don’t hesitate to try different seasonings and sauces—swai’s mild flavor pairs well with various ingredients.

By exploring these methods you’ll discover how versatile and delicious swai fish can be when prepared correctly.

Conclusion (Is Swai Fish a Good Choice for Your Diet?)

Swai fish, also known as Pangasius or Basa, has become a popular choice in many households due to its affordability and mild flavor. When considering whether Swai is a good addition to your diet, it’s essential to weigh both the nutritional benefits and potential concerns.

From a nutritional standpoint, Swai fish is relatively low in calories and provides a decent amount of protein. A typical serving offers around 15 grams of protein with minimal fat content, making it an appealing option for those looking to maintain or lose weight. Additionally, it contains essential nutrients such as omega-3 fatty acids, which are beneficial for heart health.

However, there are some considerations to keep in mind. The farming practices of Swai fish have raised concerns regarding environmental impact and potential contamination. It’s crucial to source Swai from reputable suppliers who adhere to strict farming standards to ensure you’re consuming a safe product.

In summary, Swai fish can be a good dietary choice if sourced responsibly. It offers valuable nutrients at an affordable price but should be consumed with awareness of its origin and farming practices. By making informed decisions about where your food comes from, you can enjoy the benefits of Swai while minimizing potential risks.

read more
Food & Beverage

Does Matcha Have Caffeine? Everything You Need to Know

Does Matcha Have Caffeine Everything You Need To Know

Matcha, a finely ground powder from green tea leaves, is popular for its flavor and health benefits. Does it contain caffeine? Yes, matcha has more caffeine than most teas. This introduction explores matcha’s caffeine levels compared to other drinks, its health advantages, and how it delivers sustained energy. Whether you’re familiar with matcha or new to it, understanding these factors helps you decide how to include it in your routine.

The Caffeine Content in Matcha Compared to Other Teas and Coffee

When comparing the caffeine content in matcha to other teas and coffee, it’s essential to understand the unique properties of each beverage. Matcha, a powdered form of green tea, contains approximately 70 milligrams of caffeine per 8-ounce serving. This amount is higher than that found in regular green tea, which typically has around 28 milligrams per 8-ounce cup.

In contrast, a standard cup of coffee contains significantly more caffeine, about 95 milligrams per 8-ounce serving. Therefore, while matcha provides a substantial energy boost due to its moderate caffeine levels, it is still less potent than coffee.

However, what sets matcha apart from other caffeinated beverages is the presence of L-theanine. This amino acid promotes relaxation without drowsiness and works synergistically with caffeine to provide a calm yet alert state. Consequently, many people find that the energy from matcha feels smoother and more sustained compared to the often jittery rush associated with coffee.

When considering caffeinated teas as a whole, black tea generally has higher caffeine content than green tea but still falls short of coffee’s levels. An average cup of black tea contains about 47 milligrams of caffeine per 8 ounces.

If you’re looking for a balanced source of energy with additional health benefits, understanding how much caffeine is in matcha compared to other options can help you make an informed choice tailored to your needs.

Health Benefits of Caffeine in Matcha Tea

Health Benefits Of Caffeine In Matcha Tea

Matcha tea, a finely ground powder of specially grown and processed green tea leaves, is renowned for its numerous health benefits. One of the most compelling aspects of matcha is its caffeine content, which offers several advantages distinct from other caffeinated beverages.

Firstly, the benefits of caffeine in matcha are delivered in a more sustained manner compared to coffee. This is due to the presence of L-theanine, an amino acid that promotes relaxation without drowsiness. The combination of caffeine and L-theanine results in a calm yet focused energy boost from matcha, avoiding the jittery spikes and crashes often associated with coffee consumption.

Moreover, matcha health benefits extend beyond just an energy lift. Matcha is rich in antioxidants, particularly catechins like EGCG (epigallocatechin gallate), which have been linked to various health improvements such as enhanced metabolism and reduced risk of chronic diseases. These antioxidants in matcha help combat oxidative stress and inflammation in the body.

In addition to these advantages, regular consumption of matcha can support cognitive function due to its unique blend of nutrients. The synergy between caffeine and other compounds found in matcha can enhance memory, attention span, and overall mental clarity.

Incorporating matcha into your daily routine not only provides a gentle yet effective energy boost but also delivers substantial health benefits through its high antioxidant content and cognitive support properties.

The Unique Way Matcha Delivers Caffeine for Sustained Energy Levels

Matcha, a finely ground powder of specially grown and processed green tea leaves, offers a unique way to deliver caffeine for sustained energy levels. Unlike the rapid jolt often associated with coffee, matcha provides a more balanced and enduring source of energy. But how does matcha work to achieve this?

The secret lies in the combination of caffeine and an amino acid called L-theanine. While caffeine in matcha is responsible for the initial boost in alertness, L-theanine plays a crucial role in moderating this effect. L-theanine promotes relaxation without drowsiness, creating a state of calm focus. This synergy results in what many describe as “slow release caffeine.” Instead of experiencing sudden spikes and crashes, you enjoy sustained energy from matcha over several hours.

This slow release mechanism makes matcha an excellent choice for those seeking consistent productivity throughout the day without the jittery side effects commonly linked to other caffeinated beverages. Whether you’re navigating through back-to-back meetings or engaging in creative projects, incorporating matcha into your routine can help maintain steady energy levels and enhance overall well-being.

How to Prepare Matcha for Optimal Energy and Health Benefits

Matcha, a finely ground powder of specially grown and processed green tea leaves, has gained popularity for its numerous health benefits and energy-boosting properties. Preparing matcha tea can be an art in itself, with traditional and modern methods offering different experiences.

To prepare matcha traditionally, start by sifting 1-2 teaspoons of matcha powder into a bowl to avoid clumps. Add a small amount of hot water (not boiling, ideally around 175°F or 80°C) and use a bamboo whisk (chasen) to mix the powder into a smooth paste. Gradually add more hot water while whisking in a zigzag motion until you achieve a frothy consistency.

For those who prefer modern methods, using an electric frother or blender can be just as effective. Simply combine the sifted matcha powder with hot water in your device and blend until smooth and frothy.

Both traditional and modern methods have their merits. The traditional approach offers a meditative experience that connects you with centuries-old Japanese tea ceremonies, while modern techniques provide convenience for those on the go. Regardless of your chosen method, preparing matcha correctly ensures you reap its full energy-boosting and health benefits.

Should You Avoid or Embrace Matcha?

For individuals with sensitivity to caffeine, the decision to consume caffeinated beverages can be fraught with uncertainty. One popular option that often comes under scrutiny is matcha, a powdered form of green tea known for its rich flavor and numerous health benefits. Understanding the nuances of caffeine sensitivity in green tea can help you make an informed choice.

Matcha contains a moderate amount of caffeine compared to other caffeinated teas and coffee. However, it also includes L-theanine, an amino acid that promotes relaxation without drowsiness. This unique combination may offer a more balanced energy boost, potentially mitigating some of the jittery effects commonly associated with caffeine consumption.

If you have sensitivity to caffeine but still wish to enjoy caffeinated teas like matcha, moderation is key. Start with smaller servings and observe how your body reacts. Additionally, consider consuming matcha earlier in the day to avoid any potential interference with your sleep patterns.

Whether you should drink caffeinated teas with sensitivity depends on your individual tolerance levels and how your body responds. Consulting a healthcare professional can provide personalized guidance tailored to your specific needs.

Is Match a Good Choice for Your Daily Caffeine Fix?

When considering whether matcha is a good choice for your daily caffeine fix, it’s essential to weigh its unique benefits and potential drawbacks. Unlike traditional coffee, matcha provides a more sustained energy boost without the jittery side effects often associated with high caffeine intake. This is primarily due to the presence of L-theanine, an amino acid that promotes relaxation and enhances focus.

Matcha also boasts a rich profile of antioxidants, particularly catechins like EGCG (epigallocatechin gallate), which have been linked to various health benefits including improved metabolism and reduced risk of chronic diseases. Additionally, the ritualistic aspect of preparing matcha can add a mindful moment to your morning routine, fostering a sense of calm and purpose.

However, matcha does contain caffeine, although in smaller amounts than coffee, so it’s important to consume it in moderation. For those who are sensitive to caffeine or who experience side effects from it, it may be advisable to start with a smaller amount.

In summary, if you’re seeking an alternative to coffee that offers both mental clarity and health benefits, matcha could indeed be an excellent addition to your daily regimen. Its balanced energy release and nutritional advantages make it a compelling choice for anyone looking to enhance their daily routine with a touch of zen-like tranquility.

read more
CoffeeFood & Beverage

Breve Coffee – The Guide to This Creamy Espresso Delight

Breve Coffee The Guide To This Creamy Espresso Delight

Breve coffee, a luxurious take on traditional espresso, offers a rich and creamy experience. Combining a shot of espresso with steamed half-and-half, it boasts a velvety texture and slightly sweet flavor. Though Italian in origin, it has been adapted to American tastes and is favored by those seeking extra decadence. This guide explores the origins, preparation methods, and unique characteristics that make breve coffee a delightful choice for any coffee lover.

What is Breve Coffee?

What Is Breve Coffee

Breve coffee, often referred to as a breve latte, is a rich and creamy espresso-based drink that has gained popularity among coffee enthusiasts. Unlike traditional lattes that use steamed milk, a breve coffee uses half-and-half—a blend of milk and cream—which results in a thicker, more luxurious texture. This indulgent combination creates a velvety mouthfeel that sets it apart from other espresso drinks.

To prepare a breve latte, baristas start by pulling a shot of espresso. They then steam the half-and-half to create a creamy froth before combining it with the espresso shot. The result is an exceptionally smooth and flavorful beverage that offers a delightful balance between the robust taste of espresso and the creamy sweetness of half-and-half.

Breve coffee’s unique composition makes it an excellent choice for those who enjoy their coffee both strong and indulgent. Its rich texture and full-bodied flavor profile make it stand out in the world of espresso drinks, offering an elevated experience for anyone seeking something beyond the ordinary cup of joe. Whether you’re new to specialty coffees or an experienced connoisseur, trying a breve latte can be an exciting way to expand your palate and discover new favorite flavors in your coffee journey.

The Origins of Breve Coffee

Breve coffee, a rich and creamy variation of the traditional latte, has an intriguing history that blends Italian espresso culture with American innovation. The origins of breve latte can be traced back to the United States, where coffee enthusiasts sought to create a more indulgent version of their beloved espresso drinks.

While traditional Italian espresso drinks like cappuccinos and lattes use steamed milk, breve coffee takes it a step further by incorporating half-and-half instead. This blend of milk and cream results in a velvety texture and richer flavor profile that sets it apart from its Italian counterparts.

The history of breve coffee is relatively recent compared to other classic beverages. It emerged as part of the broader trend in American coffee variations that aimed to enhance the sensory experience of drinking coffee. By using half-and-half, baristas created a drink that appealed to those looking for something more luxurious than the standard latte.

Today, breve lattes are enjoyed by many who appreciate their unique taste and creamy consistency. Whether you’re a fan of traditional Italian espresso drinks or curious about American coffee innovations, breve coffee offers a delightful fusion worth exploring.

How to Make a Perfect Breve Coffee at Home

Breve coffee, also known as a breve latte, is an indulgent espresso-based drink that uses half-and-half instead of regular milk. This results in a richer, creamier texture and flavor. If you’re looking to elevate your homemade coffee game, learning how to make a perfect breve coffee at home is a great place to start.

Ingredients

– Freshly brewed espresso

– Half-and-half (a mixture of equal parts whole milk and heavy cream)

– Sweetener (optional)

Equipment

– Espresso machine or stovetop espresso maker

– Milk frother or steam wand

– Coffee mug

Steps

1. Brew the Espresso:

Start by brewing a shot or two of fresh espresso using your preferred method. The quality of the espresso is crucial for making an excellent breve coffee.

2. Heat the Half-and-Half:

Pour the desired amount of half-and-half into a small saucepan and heat it on medium until it’s warm but not boiling. Alternatively, you can use the steam wand on your espresso machine.

3. Froth the Half-and-Half:

Use a milk frother or steam wand to froth the heated half-and-half until it reaches a creamy consistency with microfoam on top. The goal is to achieve a velvety texture that complements the robust flavor of the espresso.

4. Combine and Serve:

Pour the brewed espresso into your coffee mug, then gently add the frothed half-and-half over it. If you prefer your drinks sweetened, add sugar or syrup before blending everything together.

5. Enjoy Your Homemade Breve Latte:

Stir lightly if needed and savor every sip of your rich and creamy homemade breve latte.

By following this simple breve coffee recipe, you can enjoy café-quality beverages from the comfort of your own home. Whether you’re starting your day or winding down in the evening, making breve at home offers both convenience and luxury in every cup.

The Difference Between Breve and Other Espresso Drinks

When it comes to espresso drinks, the variety can be both exciting and overwhelming. Understanding the differences between popular choices like breve, latte, and cappuccino can help you make an informed decision about what to order or prepare at home. Each of these drinks has its own unique characteristics that cater to different tastes and preferences.

A breve is a rich and creamy espresso-based drink made with half-and-half instead of regular milk. This substitution results in a thicker, more luxurious texture compared to other milk-based coffees. The term “breve” itself means “short” in Italian, but don’t let that mislead you; this drink is all about indulgence.

In comparison, a latte consists of one or two shots of espresso mixed with steamed milk and topped with a small amount of milk foam. It has a smoother and lighter texture than a breve due to the use of whole or skim milk. Lattes are often flavored with syrups or spices for added variety.

On the other hand, a cappuccino strikes a balance between the richness of a breve and the lightness of a latte. It typically includes equal parts espresso, steamed milk, and milk foam. This creates layers of flavor and texture that make it distinct from its counterparts.

While all three drinks (breve, latte, and cappuccino) are delicious options for coffee lovers, they each offer something unique:

Breve: Richer and creamier due to half-and-half.

Latte: Smoother with steamed milk.

Cappuccino: Balanced layers with equal parts espresso, steamed milk, and foam.

Understanding these differences can enhance your appreciation for the various types of espresso drinks available and help you choose the perfect cup based on your taste preferences.

The Nutritional Facts and Benefits of Breve Coffee

Breve coffee, also known as a breve latte, is a rich and creamy variation of the traditional latte. Made with half-and-half instead of milk, this beverage offers a unique flavor profile and texture that many coffee enthusiasts enjoy. Understanding the nutritional facts and benefits of breve coffee can help you make informed choices about including it in your diet.

When it comes to calories in breve coffee, it’s important to note that using half-and-half significantly increases the calorie content compared to regular milk or skim milk. A typical 12-ounce breve latte contains approximately 300-400 calories, largely due to the higher fat content in half-and-half. This makes it a more indulgent option but one that should be enjoyed in moderation if you’re watching your caloric intake.

The nutritional information for a breve latte highlights its richness in fats and proteins. Half-and-half is composed of equal parts whole milk and heavy cream, which means it contains more saturated fat than other dairy options. On the positive side, this also means it provides essential fatty acids and fat-soluble vitamins like vitamin A and D.

In terms of health benefits, incorporating half-and-half into your coffee can offer some advantages when consumed responsibly. The fats in half-and-half can help you feel fuller for longer periods, potentially reducing overall calorie consumption throughout the day. Additionally, these fats are crucial for absorbing certain nutrients from other foods you consume.

While breve coffee may not be an everyday choice for those monitoring their fat intake or calorie count closely, it can certainly be enjoyed as an occasional treat that adds variety to your coffee experience. By understanding its nutritional composition and potential health benefits, you can savor each sip with confidence and appreciation.

Why You Should Try Breve Coffee?

Breve coffee is an exquisite beverage that combines the richness of espresso with the creamy texture of steamed half-and-half. This delightful drink offers a unique taste experience that stands out from traditional lattes and cappuccinos. If you’re looking for a way to elevate your coffee routine, here are compelling reasons to try breve coffee today.

First and foremost, the flavor profile of breve coffee is unparalleled. The combination of espresso’s bold intensity with the smooth, velvety consistency of half-and-half creates a harmonious balance that is both indulgent and satisfying. Unlike regular milk, half-and-half adds a luxurious creaminess without overpowering the robust notes of espresso.

Additionally, breve coffee provides a richer mouthfeel compared to other milk-based coffees. The higher fat content in half-and-half results in a thicker, more substantial texture that enhances each sip. This makes it an excellent choice for those who appreciate a fuller-bodied drink.

Another reason to consider breve coffee is its versatility. Whether you enjoy your beverages hot or iced, breve can be adapted to suit your preferences. It can also be customized with various syrups and flavorings, allowing you to create a personalized drink that caters to your taste buds.

Finally, trying breve coffee can add variety to your daily caffeine fix. Exploring different types of coffee not only broadens your palate but also makes your routine more exciting and enjoyable.

In conclusion, breve coffee offers an exceptional blend of rich flavors and creamy textures that make it worth trying today. Its unique characteristics provide an elevated drinking experience that could become your new favorite way to enjoy espresso-based beverages.

read more
1 2
Page 1 of 2