close

September 2024

Food & Beverage

How Long to Cook Lasagna (A Guide to Perfect Pasta Layers)

How Long To Cook Lasagna A Guide To Perfect Pasta Layers

When preparing lasagna, cooking times can vary depending on the type of recipe and ingredients used. For traditional lasagna with pre-boiled noodles, baking typically takes 45-60 minutes at 375°F (190°C). No-boil lasagna, which uses specially designed noodles, usually requires 45-55 minutes in the oven at the same temperature.

Vegetarian lasagna often cooks faster due to its lighter ingredients, generally needing 35-45 minutes at 375°F (190°C). On the other hand, meat lasagna may require slightly longer cooking times, ranging from 50-65 minutes, to ensure the meat is thoroughly cooked.

Regardless of the type, it’s essential to cover the lasagna with foil for the first 25-30 minutes of baking to prevent the top from burning. Always check for doneness by ensuring the internal temperature reaches 165°F (74°C) and the cheese is golden and bubbly. Let the lasagna rest for 10-15 minutes before serving to allow the layers to set.

The Basics of Lasagna Preparation

Lasagna, a beloved Italian dish, is a masterpiece of layers and flavors. To create this culinary delight, understanding the basics of lasagna preparation is essential. Begin by gathering quality ingredients: lasagna noodles, your choice of sauce (typically tomato-based), cheese, and optional fillings like ground meat or vegetables.

The art of layering lasagna is crucial to its success. Start with a thin layer of sauce at the bottom of your baking dish to prevent sticking. Then, place a layer of lasagna noodles, followed by sauce, cheese, and any additional fillings. Repeat this process, creating multiple layers until you reach the top of your dish.

When assembling lasagna, pay attention to the consistency of each layer. Ensure that sauce and cheese are evenly distributed to avoid dry spots. Some prefer to pre-cook their lasagna noodles, while others opt for no-boil varieties. Whichever you choose, make sure the noodles are completely covered by sauce to ensure proper cooking.

Patience is key when preparing lasagna. Allow time for the flavors to meld and the layers to set before serving. With practice and attention to detail, you’ll master the art of creating a perfectly balanced and delicious lasagna.

Factors Affecting Lasagna Cooking Time

Factors Affecting Lasagna Cooking Time

Several factors influence the cooking time of lasagna, making it essential to consider these variables for a perfectly baked dish. Oven temperature plays a crucial role, with higher temperatures generally resulting in shorter cooking times. However, it’s important to balance this with the risk of burning the top layer.

The size and thickness of the lasagna also significantly impact cooking duration. Larger, deeper dishes will naturally require more time to heat through to the center. Similarly, the density of ingredients affects cooking time; lasagnas with heavier, more moisture-rich fillings may need extended baking periods.

The material of the baking dish is another important consideration. Glass and ceramic dishes tend to heat more slowly but retain heat longer, while metal pans conduct heat more quickly. This can affect both the initial cooking time and how the lasagna continues to cook once removed from the oven.

By taking these factors into account, home cooks can better estimate and adjust their lasagna cooking times, ensuring a delicious and properly cooked meal every time.

Step-by-Step Guide to Cooking Lasagna

Begin by preheating your oven to 375°F (190°C) to ensure it’s at the right temperature when you’re ready to bake. While the oven is heating, assemble your lasagna layers in a deep baking dish, alternating between pasta sheets, sauce, and cheese. Once assembled, cover the lasagna with aluminum foil to prevent the top from burning and to keep moisture in during cooking.

The baking time for a typical lasagna is around 25 minutes covered, followed by an additional 25 minutes uncovered. This allows the cheese to melt and brown nicely on top. Always check that the internal temperature reaches 165°F (74°C) to ensure it’s fully cooked.

After removing the lasagna from the oven, it’s crucial to allow for a resting period of about 15 minutes. This resting time lets the layers settle and makes it easier to cut and serve without falling apart. During this time, the flavors will also continue to meld, resulting in a more delicious final product.

Signs of a Perfectly Cooked Lasagna

When it comes to achieving lasagna perfection, several key indicators can help you determine if your dish is ready to be served. First, look for a golden brown top layer, which signifies that the cheese has melted and caramelized beautifully. The edges of the lasagna should be bubbly, indicating that the sauce and cheese have reached the ideal temperature throughout the dish.

For a more precise measurement, use a food thermometer to check the internal temperature. A perfectly cooked lasagna should reach 165°F (74°C) at its center, ensuring that all ingredients are thoroughly heated and any potential bacteria have been eliminated.

Lastly, perform a texture check by inserting a knife or fork into the center of the lasagna. It should slide in easily, meeting little resistance from the pasta layers. When you remove the utensil, the layers should hold their shape without collapsing, signifying that the lasagna has set properly.

Common Mistakes to Avoid When Cooking Lasagna

When preparing lasagna, several pitfalls can compromise the dish’s quality. One common error is overcooking, which can lead to a dry, unappetizing result. Conversely, undercooking can leave the pasta too firm and the flavors underdeveloped. Achieving the right balance is crucial for a perfect lasagna.

Another frequent mistake is creating a soggy lasagna. This often occurs when excess moisture isn’t properly managed, such as not draining the ricotta or using overly watery sauce. To avoid this, consider straining your ricotta and cooking down your sauce for a thicker consistency.

Dry lasagna, on the other hand, can result from using too little sauce or overbaking. Ensure you have enough sauce to coat each layer generously, and monitor your baking time closely. Remember, lasagna continues to cook slightly after removing it from the oven.

Tips for Reheating and Storing Lasagna

Properly reheating and storing lasagna can help maintain its delicious flavor and texture. When reheating, consider using an oven for best results. Preheat to 375°F (190°C), cover the lasagna with foil, and heat for about 25-30 minutes. Alternatively, microwave individual portions for 2-3 minutes, stirring halfway through.

For storage, refrigerate leftover lasagna in an airtight container for up to 3-5 days. If freezing, wrap the lasagna tightly in plastic wrap and aluminum foil, or use a freezer-safe container. Frozen lasagna can last up to 3 months.

When freezing lasagna, consider portioning it into individual servings for easier reheating. To thaw frozen lasagna, transfer it to the refrigerator overnight before reheating. This ensures even warming and helps preserve the dish’s texture.

Remember to always check that reheated lasagna reaches an internal temperature of 165°F (74°C) to ensure food safety. By following these tips, you can enjoy your leftover lasagna as if it were freshly made.

read more
Food & Beverage

How Long to Cook Chicken Breast in Oven at 350°F for Juicy Results

How Long To Cook Chicken Breast In Oven At 350°f For Juicy Results

When baking chicken breasts at 350°F, cooking times can vary depending on several factors. In general, boneless, skinless chicken breasts typically take about 20-30 minutes to cook. However, bone-in chicken breasts may take 35-45 minutes.

However, cooking chicken breasts at 350°F requires the right method. This guide covers factors that affect cooking time, common mistakes, and techniques for getting delicious, flavorful results. Whether you’re a beginner or a seasoned pro, you’ll learn how to perfect your chicken breast preparation and expand your recipe repertoire.

Factors Affecting Cooking Time for Chicken Breast at 350°F

Several factors influence the cooking time for chicken breast at 350°F, ensuring a perfectly cooked, juicy result. Chicken breast thickness is a primary determinant; thicker cuts require more time to cook through than thinner ones. The presence of bones also affects cooking duration, with bone-in chicken breasts generally taking longer than boneless varieties.

The initial state of the chicken is crucial; fresh chicken breasts cook faster than frozen ones, which may need additional time to thaw and reach the desired internal temperature. Oven accuracy plays a significant role, as variations in actual temperature can impact cooking times. It’s advisable to use an oven thermometer to ensure your oven maintains the intended 350°F.

Lastly, the cooking vessel you choose can affect heat distribution and cooking time. For instance, a glass baking dish may require a different cooking duration compared to a metal pan. By considering these factors and using a meat thermometer to check for doneness, you can achieve perfectly cooked chicken breasts every time.

Step-by-Step Guide to Cooking Chicken Breast at 350°F

Step By Step Guide To Cooking Chicken Breast At 350°f

Preparing delicious chicken breast at 350°F is a straightforward process that yields tender and flavorful results. Begin by preheating your oven and gathering your ingredients. Trim any excess fat from the chicken breasts and pat them dry with paper towels. For optimal flavor, season generously with salt, pepper, and your preferred herbs or spices.

Place the seasoned chicken breasts in a baking dish, ensuring they don’t overlap. For added moisture, you can brush them lightly with olive oil or melted butter. When the oven reaches 350°F, insert the baking dish and set a timer based on the thickness of your chicken breasts:

– 25-30 minutes for thin-cut breasts

– 35-40 minutes for medium-thickness breasts

– 45-50 minutes for thick-cut breasts

To ensure food safety, use a meat thermometer to check that the internal temperature of the thickest part of the breast reaches 165°F.

Tips and Tricks to Achieve Juicy Results

Cooking chicken breast in the oven at 350°F can yield deliciously juicy results with the right techniques. Start by brining your chicken breasts for at least 30 minutes to enhance moisture retention. This simple step can make a significant difference in the final texture of your dish.

Marinades are another excellent way to infuse flavor and keep the meat moist. Consider using oil-based marinades with herbs and spices for optimal results. Allow the chicken to marinate for at least 2 hours or overnight for maximum flavor penetration.

During cooking, basting methods can help maintain moisture. Periodically brush the chicken with its own juices or a flavorful liquid to prevent drying out. This technique not only adds flavor but also creates a beautiful, golden exterior.

One often overlooked step is the resting period after cooking. Allow your chicken breasts to rest for 5-10 minutes before cutting. This crucial step allows the juices to redistribute throughout the meat, ensuring each bite is succulent and flavorful.

By implementing these tips and tricks, you’ll master the art of cooking juicy chicken breasts in the oven at 350°F, elevating your culinary skills and impressing your dinner guests.

Common Mistakes to Avoid When Cooking Chicken Breast in the oven at 350°F

When cooking chicken breast in the oven at 350°F, several common mistakes can impact the final result. Overcooking is a frequent issue, leading to dry and tough meat. Conversely, undercooking poses health risks due to potential bacterial growth. Improper seasoning can result in bland or overpowering flavors, detracting from the chicken’s natural taste.

Many cooks neglect to perform regular temperature checks, which are crucial for ensuring the chicken reaches the safe internal temperature of 165°F. Using a meat thermometer is essential for accuracy. Another oversight is skipping the resting time after cooking. Allowing the chicken to rest for 5-10 minutes helps redistribute juices, resulting in a more tender and flavorful dish.

To avoid these pitfalls, always monitor cooking time closely, season appropriately, use a meat thermometer, and remember to let the chicken rest before serving. By being mindful of these common mistakes, you can consistently prepare juicy, flavorful chicken breasts in the oven.

Variations and Recipes for 350°F Oven-Baked Chicken Breast

Oven-baked chicken breast at 350°F is a versatile dish that can be prepared in numerous delicious ways. Here are some popular variations to try:

1. Herb-crusted chicken: Coat the chicken breast with a mixture of breadcrumbs, Parmesan cheese, and dried herbs like thyme, rosemary, and oregano for a crispy, flavorful crust.

2. Lemon garlic chicken: Marinate the chicken in lemon juice, minced garlic, olive oil, and herbs before baking for a zesty, aromatic dish.

3. Stuffed chicken breast: Create a pocket in the chicken breast and fill it with spinach and feta cheese or sun-dried tomatoes and mozzarella for an impressive meal.

4. BBQ chicken: Brush the chicken with your favorite barbecue sauce before and during baking for a sweet and tangy flavor profile.

5. Mediterranean chicken: Top the chicken with a mixture of diced tomatoes, olives, feta cheese, and oregano for a taste of the Mediterranean.

Remember to adjust cooking times based on the thickness of your chicken breast and any additional ingredients. Always ensure the internal temperature reaches 165°F (74°C) for food safety.

read more
DestinationsTravel & Leisure

5 Things to Do in Salt Lake City (A Must-Visit Guide)

Things To Do In Salt Lake City A Must Visit Guide

Salt Lake City, between the Wasatch Mountains and the Great Salt Lake, offers natural beauty, rich history, and vibrant culture. Outdoor enthusiasts can explore scenic canyons while history buffs enjoy iconic landmarks. This guide highlights the top five attractions, from breathtaking hikes and historical sites to interactive museums and premier shopping. Discover why Salt Lake City should top your travel list!

1. Explore the Natural Beauty of Big Cottonwood Canyon

Nestled in the heart of Utah, Big Cottonwood Canyon is a natural gem offering a plethora of outdoor activities for nature enthusiasts and adventure seekers alike. This scenic canyon, located just a short drive from Salt Lake City, boasts breathtaking landscapes and an array of recreational opportunities.

One of the most popular activities in Big Cottonwood Canyon is hiking. With numerous trails catering to all skill levels, it’s a haven for both novice hikers and seasoned trekkers. Trails such as the Lake Blanche Trail offer stunning views of alpine lakes and rugged mountain peaks, making it a must-visit for those looking to experience the best hiking in Salt Lake City.

Beyond hiking, Big Cottonwood Canyon provides ample opportunities for other outdoor activities. Whether you’re interested in rock climbing on its granite cliffs or exploring the area on mountain bikes, there’s something here for everyone. During winter months, the canyon transforms into a snowy wonderland perfect for skiing and snowshoeing.

For those who prefer a more leisurely pace, simply strolling along one of the many nature trails can be incredibly rewarding. These paths wind through lush forests and alongside babbling brooks, offering serene spots to relax and take in the natural beauty.

Big Cottonwood Canyon is an essential destination for anyone looking to explore outdoor activities in Salt Lake City. From challenging hikes to peaceful nature walks, this canyon offers an unforgettable experience amid some of Utah’s most stunning landscapes.

2. Experience History and Culture at Temple Square

Experience History And Culture At Temple Square

Temple Square stands as a beacon of history and culture in the heart of Salt Lake City. This iconic destination offers visitors an opportunity to immerse themselves in the rich heritage and vibrant cultural tapestry that defines the area. As one of the most notable historical sites in Salt Lake City, Temple Square is home to a variety of significant landmarks and attractions.

The centerpiece of Temple Square is undoubtedly the Salt Lake Temple, an architectural marvel that has become synonymous with the city’s skyline. Surrounding this magnificent structure are several other noteworthy buildings, including the Tabernacle, renowned for its exceptional acoustics and home to The Tabernacle Choir at Temple Square.

Visitors to Temple Square can also explore numerous exhibits at the Church History Museum, which provides insightful perspectives on the region’s past. The Family History Library offers resources for those interested in genealogy, making it a unique cultural attraction for anyone looking to trace their ancestry.

In addition to its historical and cultural significance, Temple Square hosts various events throughout the year, from concerts to seasonal festivals, ensuring there is always something engaging happening on its grounds. Whether you’re a history enthusiast or simply looking for an enriching experience while visiting Salt Lake City, exploring Temple Square promises a journey through time and tradition that leaves a lasting impression.

3. Discover Science and Fun at The Leonardo Museum

If you’re seeking an engaging and educational family activity in Salt Lake City, look no further than The Leonardo Museum. This unique institution stands out among museums in Salt Lake City for its innovative approach to learning and exploration. Combining art, science, and technology, The Leonardo offers a variety of interactive exhibits designed to captivate visitors of all ages.

One of the main attractions at The Leonardo Museum is its hands-on exhibits that encourage visitors to immerse themselves in the learning process. Whether it’s exploring the mechanics behind everyday objects or delving into complex scientific concepts through interactive displays, there’s something for everyone to enjoy. These exhibits are not only informative but also incredibly fun, making them perfect for family outings.

In addition to its permanent collections, The Leonardo frequently hosts traveling exhibits that bring new and exciting topics into focus. From space exploration to human anatomy, these rotating exhibitions ensure that there’s always something fresh to discover with each visit.

For families looking for enriching activities in Salt Lake City, The Leonardo Museum provides an ideal blend of education and entertainment. It’s a place where curiosity thrives, and learning becomes an adventure making it a must-visit destination on your next trip to the city.

4. Enjoy Retail Therapy and Dining Options at City Creek Center

City Creek Center is a premier destination for those looking to indulge in some retail therapy and enjoy a variety of dining options. Located in the heart of Salt Lake City, this shopping center offers an impressive array of stores and eateries, making it one of the best places to shop in Salt Lake City.

When it comes to shopping, City Creek Center boasts an extensive selection of high-end retailers and popular brands. From luxury boutiques to well-known department stores, shoppers can find everything they need under one roof. Whether you’re on the hunt for the latest fashion trends, unique home decor items, or cutting-edge electronics, city creek center shopping has something for everyone.

After a day of shopping, visitors can refuel at one of the many dining establishments located within the center. Dining in Salt Lake City is elevated by the diverse food options available at City Creek Center. From casual eateries offering quick bites to upscale restaurants serving gourmet meals, there’s something to satisfy every palate. If you’re searching for “food options near me,” you’ll be pleased with the variety and quality found here.

City Creek Center stands out as a top destination for both shopping and dining in Salt Lake City. With its vast selection of stores and diverse culinary offerings, it’s no wonder that locals and tourists alike consider it one of the best places to shop in Salt Lake City.

5. Connect with Nature at the Tracy Aviary & Botanical Gardens

Nestled in the heart of Salt Lake City, the Tracy Aviary & Botanical Gardens offers a serene escape for nature enthusiasts and families alike. This unique destination combines the wonders of bird watching with the beauty of meticulously curated botanical gardens, making it one of Utah’s hidden gems.

Bird watching in Salt Lake City reaches new heights at Tracy Aviary. Home to over 400 birds from around the world, visitors can observe a diverse array of species in carefully designed habitats that mimic their natural environments. Whether you’re an avid bird watcher or a curious beginner, the aviary provides ample opportunities to learn about avian life and conservation efforts.

The botanical gardens at Tracy Aviary are equally captivating. Spread across eight acres, these gardens showcase a stunning variety of plants and flowers native to Utah and beyond. Wander through themed sections that highlight different ecosystems and plant types, offering both educational insights and visual delights.

For families seeking engaging activities, Tracy Aviary & Botanical Gardens is an ideal choice. Interactive exhibits, guided tours, and special events ensure that visitors of all ages can connect with nature in meaningful ways. The combination of lush greenery and vibrant wildlife creates an immersive experience that educates as much as it entertains.

A visit to Tracy Aviary & Botanical Gardens promises not just a day out but an enriching journey into the natural world making it a must-see destination for anyone exploring Salt Lake City.

read more
DestinationsTravel & Leisure

5 Things to Do in Pigeon Forge- Guide to Fun and Adventure

Things To Do In Pigeon Forge Guide To Fun And Adventure

Nestled in the Smoky Mountains, Pigeon Forge offers fun and adventure for all ages. This guide highlights five must-do activities, including thrilling rides at Dollywood, breathtaking hikes in the Great Smoky Mountains National Park, captivating dinner shows, and educational museum visits. Whether you’re after family-friendly entertainment or unique shopping and dining spots, this guide ensures you make the most of your visit to Pigeon Forge.

1. Explore Dollywood (The Heart of Pigeon Forge Entertainment)

Nestled in the scenic foothills of the Great Smoky Mountains, Dollywood theme park stands as a premier destination for family-friendly activities and entertainment in Pigeon Forge, Tennessee. Founded by legendary country music star Dolly Parton, this amusement park offers a unique blend of thrilling rides, captivating shows, and rich cultural experiences.

Dollywood is renowned for its impressive array of roller coasters that cater to thrill-seekers of all ages. From the adrenaline-pumping twists and turns of the Lightning Rod to the family-friendly FireChaser Express, there’s something for everyone. Beyond the rides, visitors can immerse themselves in live musical performances that celebrate Appalachian traditions and Dolly Parton’s illustrious career.

One of the standout attractions at Dollywood is its dedication to showcasing Southern culture and craftsmanship. Guests can explore authentic craftsman demonstrations, sample traditional Southern cuisine, and enjoy seasonal festivals that add an extra layer of excitement to their visit.

As one of the top amusement parks in Tennessee, Dollywood continues to draw millions of visitors each year with its blend of exhilarating attractions and heartfelt tributes to Dolly Parton’s legacy. Whether you’re seeking high-flying adventures or a taste of Southern hospitality, Dollywood promises an unforgettable experience for all who enter its gates.

2. Discover the Wonders of the Great Smoky Mountains National Park

Nestled on the border between North Carolina and Tennessee, the Great Smoky Mountains National Park is a treasure trove of natural beauty and outdoor adventures. As one of the most visited national parks in Tennessee, it offers a diverse range of activities that attract millions of visitors each year.

One of the park’s main attractions is its extensive network of hiking trails. With over 800 miles of trails, hikers can explore everything from easy walks to challenging backcountry routes. Popular trails like Alum Cave Bluffs and Chimney Tops offer breathtaking scenic views that are well worth the effort.

For those interested in wildlife spotting, the Great Smoky Mountains provide ample opportunities to see a variety of animals in their natural habitat. From black bears to white-tailed deer and over 200 species of birds, there’s always something new to discover.

Whether you’re an avid hiker or simply someone looking for a peaceful retreat into nature, the Great Smoky Mountains National Park has something for everyone. Its combination of stunning landscapes, rich biodiversity, and numerous recreational activities make it a must-visit destination for outdoor enthusiasts.

3. Enjoy Dinner and a Show at Local Theaters and Dinner Shows

Enjoy Dinner And A Show At Local Theaters And Dinner Shows

For a memorable evening in Pigeon Forge, consider combining a delicious meal with top-notch entertainment at one of the area’s renowned dinner shows. Pigeon Forge dinner shows offer a unique experience where you can enjoy delectable cuisine while being captivated by live performances. These venues are perfect for families, couples, and groups looking to add some excitement to their night out.

One of the standout features of these dinner shows is their family-friendly nature. You can expect to find a variety of acts that cater to all ages, ensuring everyone in your group has a fantastic time. From thrilling acrobatics and mesmerizing magic tricks to engaging comedy acts and heartwarming musical performances, there’s something for everyone.

Comedy acts are a staple at many Pigeon Forge dinner shows, providing plenty of laughs and light-hearted fun. These performances often feature talented comedians who know how to engage the audience with their wit and humor. It’s an excellent way to unwind and share some good-natured laughter with your loved ones.

Music performances also play a significant role in the entertainment lineup at these venues. Whether you’re into country tunes, rock ‘n’ roll classics, or soulful ballads, you’ll find an array of musical genres represented on stage. Talented singers and musicians bring these songs to life, creating an immersive experience that complements your dining perfectly.

4. Visit the Titanic Museum Attraction for a Historical Experience

The Titanic Museum Pigeon Forge stands out as one of the most captivating historical museums in Tennessee, offering visitors a chance to delve deep into the tragic yet fascinating story of the RMS Titanic. This museum is not just a static display of artifacts; it features interactive exhibits that bring history to life, making it an educational attraction suitable for all ages.

Upon entering, guests are given a boarding pass with the name of an actual passenger or crew member who was aboard the ill-fated ship. This personal touch adds an emotional layer to your visit as you explore over 400 pre-discovery artifacts and meticulously recreated rooms from the Titanic itself. The museum also boasts an impressive array of interactive exhibits, including a simulated iceberg and lifeboat drills, which provide hands-on learning experiences about early 20th-century maritime travel.

Educational attractions like this are invaluable for those looking to understand more about our past through immersive storytelling and detailed displays. Whether you’re a history buff or simply curious about this iconic event, the Titanic Museum Pigeon Forge offers a rich, enlightening experience that transports you back to 1912.

5. Have Fun at The Island in Pigeon Forge (Shopping & Entertainment Hub)

When visiting Pigeon Forge, one destination that should not be missed is The Island. This vibrant shopping and entertainment complex offers a wide range of activities for visitors of all ages. From thrilling Ferris wheel rides to unique dining experiences, The Island has something for everyone.

One of the main attractions at The Island is the Great Smoky Mountain Wheel. Standing at 200 feet tall, this Ferris wheel provides breathtaking views of the surrounding area and is a must-try for any visitor. After taking in the sights from above, guests can explore over 40 retail shops that offer everything from souvenirs to specialty items.

Dining at The Island is another highlight, with a variety of restaurants and eateries to choose from. Whether you’re in the mood for Southern cuisine or international flavors, you’ll find plenty of options to satisfy your taste buds.

In addition to shopping and dining, The Island also features live entertainment and events throughout the year. From musical performances to seasonal festivals, there’s always something happening that adds to the lively atmosphere.

In summary, Pigeon Forge is an ideal destination for creating lasting memories with family and friends. Start planning your unforgettable trip today and discover all that this enchanting town has to offer!

read more
Internet BusinessSecurity

How to Deal with Blackmail on Snapchat

How To Deal With Blackmail On Snapchat

In the digital age, social media platforms like Snapchat are integral to daily life but also pose risks like blackmail. This guide covers Snapchat blackmail, offering immediate steps for victims, such as using Snapchat’s reporting features, contacting authorities, safeguarding privacy, and managing mental health. It also highlights legal resources and stresses the importance of online safety education to prevent incidents. Empower yourself with knowledge to handle digital extortion.

What is Snapchat Blackmail?

What Is Snapchat Blackmail

Snapchat blackmail, a form of social media blackmail, is an alarming trend in online extortion. It involves malicious individuals exploiting the ephemeral nature of Snapchat to coerce users into complying with their demands. These digital blackmail threats typically begin when a victim unknowingly shares private or sensitive information with someone who then threatens to reveal it unless specific conditions are met.

The primary tactic used in Snapchat blackmail is leveraging the temporary nature of snaps and messages. Perpetrators often take screenshots or recordings of compromising content without the victim’s knowledge. They then use this content as leverage, demanding money, further explicit material, or other favors under threat of public exposure.

Immediate Steps to Take if You Are Being Blackmailed

If you find yourself being blackmailed, it is crucial to take immediate and effective steps to protect yourself. Here’s a guide on what actions you should consider:

1. Documenting Evidence of Blackmail: The first step is to gather and preserve evidence of the blackmail. Take screenshots or recordings of any threatening messages, images, or videos. This documentation will be vital when reporting the incident to authorities or seeking legal action.

2. Reporting Blackmail on Snapchat: If the blackmail is occurring on Snapchat, use the in-app tools to report the issue directly to Snapchat support for safety concerns. Go to the profile of the person who is blackmailing you, tap on their name, select ‘Report,’ and follow the prompts to detail your situation.

3. Contacting Authorities for Blackmail: It is essential to inform local law enforcement about the blackmail as soon as possible. Provide them with all documented evidence and any additional information that might help in their investigation. Law enforcement agencies are equipped with resources and expertise that can assist in handling such situations effectively.

4. Seeking Professional Support: In addition to contacting authorities, consider reaching out for professional support from legal advisors or victim support groups who specialize in dealing with blackmail cases. They can offer guidance tailored specifically to your situation.

By taking these immediate steps, you can better protect yourself and work towards resolving this distressing situation efficiently.

How to Report a Blackmailer on Snapchat

In the age of social media, encountering malicious behavior such as blackmail can be distressing. Snapchat, like many other platforms, offers features to help users report inappropriate or harmful behavior. Here’s a step-by-step guide on how to report a blackmailer on Snapchat:

1. Identify the Offending User: Locate the user who is attempting to blackmail you. This could be through direct messages or any form of communication within the app.

2. Access the Snapchat Report Feature: Open the chat with the offending user and tap on their profile icon at the top of your screen.

3. Reporting a User on Snapchat: Once you’re in their profile, tap on the three-dot menu in the upper right corner and select “Report.” Follow the prompts to specify that you are reporting for harassment or threats, which includes blackmail.

4. Blocking and Reporting on Social Media: After reporting, it’s crucial to block the user to prevent further contact. You can do this by going back into their profile, tapping on the three-dot menu again, and selecting “Block.”

5. Cybercrime Reporting Steps: Beyond reporting within Snapchat, consider taking additional steps if you feel threatened or if sensitive information is involved. Document all interactions with screenshots and report them to your local law enforcement or cybercrime authorities.

By utilizing these steps effectively, you can ensure that your experience with social media remains safe and enjoyable while also contributing to making these platforms secure for everyone.

Protecting Your Privacy

In today’s digital age, protecting your privacy online is more important than ever. Blackmail can occur when personal information falls into the wrong hands, making it crucial to adopt preventative measures. Here are some steps you can take to safeguard your privacy and secure your accounts.

First and foremost, review and adjust the privacy settings on Snapchat. This platform offers various controls that allow you to decide who can view your content and contact you. Make sure only trusted friends have access to your snaps and stories by selecting the appropriate privacy options.

Securing your account from hackers is another essential step. Use strong, unique passwords for each of your accounts and enable two-factor authentication wherever possible. This adds an extra layer of security by requiring a second form of verification before granting access.

Protecting personal information online involves being cautious about what you share on social media platforms. Avoid posting sensitive details such as your home address, phone number, or financial information. Additionally, be wary of accepting friend requests or messages from unknown individuals as they could be potential threats.

Lastly, practice safe social media habits by regularly monitoring your accounts for any suspicious activity. If you notice anything unusual, such as unauthorized logins or changes in settings, take immediate action by updating your security measures and reporting the issue to the platform’s support team.

Mental Health Considerations

Coping with the stress of being blackmailed can be an overwhelming experience, impacting one’s mental health significantly. It’s crucial to address this issue with effective strategies and support systems in place.

Firstly, mental health support for victims of blackmail is essential. Victims often feel isolated and helpless, making it vital to seek professional counseling. A counselor or therapist can provide a safe space to express emotions and develop coping mechanisms tailored to individual needs.

Stress management techniques during crisis situations are another critical aspect. Practices such as mindfulness meditation, deep-breathing exercises, and physical activities like yoga can help manage acute stress levels. These techniques not only offer immediate relief but also contribute to long-term resilience.

Lastly, seeking counseling for online harassment victims should be prioritized. Online harassment can exacerbate feelings of vulnerability and fear, making professional guidance indispensable. Counseling provides structured support that helps victims rebuild their sense of security and regain control over their lives.

Addressing the mental health considerations when dealing with blackmail involves a combination of professional support and personal stress management strategies. By taking these proactive steps, victims can navigate through this challenging time more effectively while safeguarding their mental well-being.

Legal Actions and Resources Available for Victims of Online Blackmail

Online blackmail, a form of cybercrime, can have devastating effects on victims. Understanding the legal help available is crucial for those affected. Various anti-blackmail laws and regulations are in place to protect individuals from digital extortion.

Victims should first report the incident to local law enforcement authorities who specialize in cybercrime. Many jurisdictions have dedicated cybercrime units that can offer immediate assistance and begin an investigation. Additionally, numerous organizations provide legal resources for digital extortion victims, such as hotlines and support services.

Legal help for cybercrime victims often involves working with attorneys who specialize in internet law. These professionals can guide victims through the process of gathering evidence, filing reports, and pursuing legal action against perpetrators. Familiarity with anti-blackmail laws and regulations is essential for effectively addressing these crimes.

While online blackmail is a serious issue, there are robust legal frameworks and resources designed to support victims. By seeking out specialized legal help and utilizing available resources, victims can take significant steps towards justice and recovery.

Avoiding Future Incidents

In today’s digital age, understanding and promoting online safety is crucial to avoiding future incidents. One of the primary concerns is the dangers of oversharing online. Personal information shared on social media platforms can be exploited by malicious actors, leading to identity theft, cyberbullying, or even physical harm. It’s essential to educate teens about internet safety, as they are often the most active users of social media and other online services.

Promoting cyber awareness within your community can significantly reduce risks associated with online activities. Start by discussing best practices for maintaining privacy settings on social networks and emphasizing the importance of thinking before posting any personal information. Additionally, teaching teens about recognizing phishing scams and understanding secure website indicators can further enhance their online safety.

Community resources for internet safety education are invaluable in this endeavor. Many organizations offer workshops, seminars, and informational materials designed to help individuals understand the complexities of staying safe online. By leveraging these resources, you can ensure that both you and your community are well-equipped to navigate the digital world securely.

Ultimately, fostering a culture of cyber awareness through continuous education and vigilance is key to preventing future incidents related to online activities.

read more
Home & FamilyPest

Box Elder Bugs- Identification, Behavior, and Control Methods

Box Elder Bugs Identification Behavior And Control Methods

Box elder bugs, identifiable by their black and red markings, are common nuisances in households and gardens. This guide covers their identification, life cycle, habitats, and behavior. Understanding their impact is crucial for effective management. We’ll explore various control methods, including eco-friendly solutions for sustainable pest management. Learn everything you need to know to keep box elder bugs at bay.

What are Box Elder Bugs?

Box elder bugs, scientifically known as Boisea trivittata, are a common sight in North America, especially around box elder trees after which they are named. These insects can be identified by their distinct physical characteristics. Adult box elder bugs typically measure about half an inch in length and have a dark brown or black coloration with striking red or orange markings along their thorax and wings. Their elongated, oval-shaped bodies and six legs make them easily recognizable.

When it comes to box elder bug identification, it’s important to note that these bugs also possess prominent red eyes and two antennae. The nymphs, or immature stages of the bugs, are smaller in size but display bright red bodies which darken as they mature.

Understanding what box elder bugs look like is crucial for homeowners who may find these insects congregating on the sunny sides of buildings during cooler months. While generally harmless to humans and pets, their presence can be a nuisance due to their tendency to invade homes in large numbers seeking warmth. Recognizing these characteristics will help you manage and control any potential infestations effectively.

The Life Cycle of Box Elder Bugs

The Life Cycle Of Box Elder Bugs

The life cycle of box elder bugs is a fascinating process that consists of several distinct stages. Understanding these stages can help in managing and controlling their populations. The box elder bug life cycle begins with the egg stage. Female box elder bugs lay their eggs in crevices of tree bark, typically on box elder trees, maple trees, or ash trees. These eggs are reddish-brown and hatch within a few days to weeks, depending on environmental conditions.

Once hatched, the nymph stage begins. Nymphs are small and bright red with black markings and go through several molts as they grow. Each molt brings them closer to their adult form, gradually developing wings and darkening in color.

The final stage is adulthood. Adult box elder bugs are about half an inch long with distinctive black bodies marked by red lines along the thorax and wings. At this stage, they become more mobile and seek out food sources such as seeds from box elders or other trees.

As for longevity, how long do box elder bugs live? Typically, their lifespan ranges from a few months to a year depending on environmental factors like temperature and food availability.

Understanding the stages of the box elder bug life cycle can be crucial for effective pest management strategies. By targeting specific stages like eggs or nymphs, it’s possible to reduce their numbers before they reach adulthood and reproduce further.

Common Habitats and Behavior of Box Elder Bugs

Box elder bugs are commonly found in regions where box elder trees, maple trees, and ash trees are prevalent. These insects thrive in areas with a moderate climate, making them widespread across the United States. The primary box elder bug habitat includes tree bark, leaves, and seeds of their preferred host plants. During the warmer months, they can often be seen congregating on the sunny sides of trees and buildings.

As for their behavior patterns, box elder bugs exhibit distinct seasonal habits. In spring and summer, they feed on the sap from leaves, flowers, and developing seeds of host trees. This feeding does not typically cause significant damage to healthy trees but can be a nuisance when populations are high. As temperatures drop in autumn, these bugs seek shelter to overwinter. They often find refuge in cracks and crevices of buildings or under loose bark.

Understanding where box elder bugs live and their behavior patterns is crucial for managing their presence around homes and gardens. By identifying potential habitats and seasonal behaviors, homeowners can take proactive measures to prevent infestations before they become problematic.

The Impact of Box Elder Bugs on Homes and Gardens

Box elder bugs, often found in large numbers, can become a significant nuisance for homeowners and gardeners alike. These insects are typically attracted to box elder trees, but they do not limit themselves to these alone; they also target maple and ash trees. The presence of box elder bugs in the house usually spikes during the fall when they seek warm places to overwinter.

In gardens, box elder bugs are considered pests primarily because of their feeding habits. They feed on the leaves, flowers, and seed pods of various plants. Although their feeding does not typically kill plants, it can cause noticeable damage such as leaf discoloration and deformities which can affect the overall aesthetic appeal of your garden.

When it comes to homes, while box elder bugs do not cause structural damage or pose health risks to humans or pets, their sheer numbers can be overwhelming. They tend to congregate in sunny areas on exterior walls before finding ways into homes through cracks and crevices. Once inside, they can be difficult to remove and may leave behind stains from their excrement on curtains and walls.

Understanding how these garden pests operate is crucial for effective management. Sealing entry points around your home and maintaining a clean garden by removing debris can significantly reduce their numbers. For severe infestations, professional pest control services may be necessary to manage the damage caused by box elder bugs effectively.

Effective Methods to Control and Prevent Box Elder Bug Infestations

Box elder bugs can be a nuisance, especially during the fall when they seek shelter inside homes to escape the cold. Understanding effective methods to control and prevent these pests is crucial for maintaining a bug-free environment.

One of the primary pest control methods for box elders involves sealing entry points. Inspect your home for cracks, gaps, and holes around windows, doors, and foundations. Use caulk or weatherstripping to seal these potential entryways. This preventive measure not only helps keep box elder bugs out but also improves overall energy efficiency.

Another effective strategy is to reduce their habitat by managing vegetation around your home. Box elder bugs are attracted to box elder trees and other seed-bearing plants. Consider removing female box elder trees from your property or at least trimming back branches that are close to your house.

For those wondering how to get rid of box elders bugs once they’ve entered the home, vacuuming is a practical solution. Use a vacuum cleaner with a hose attachment to suck up any visible bugs. Dispose of the vacuum bag immediately to prevent them from escaping back into your living space.

Insecticides can also be used as a last resort but should be applied with caution. Focus on exterior applications around windowsills, door frames, and other entry points where box elder bugs congregate.

By combining these preventive measures with timely interventions, you can effectively control and prevent box elder bug infestations in your home.

Naturally Deterring Box Elder Bugs

Box elder bugs, though relatively harmless, can become quite the nuisance when they invade homes and gardens in large numbers. Fortunately, there are several natural pest control methods for box elders that are both effective and eco-friendly. By adopting these organic solutions for pest management, you can maintain a healthy environment while keeping these pests at bay.

One of the most straightforward eco-friendly ways to deter pests like box elder bugs is to seal entry points around your home. Check for gaps around windows, doors, and foundations where these insects might enter. Using caulk or weather stripping can effectively block their access.

Another natural method involves using essential oils known for their insect-repelling properties. Spraying a mixture of water and essential oils such as tea tree oil or lavender around potential entry points can discourage box elder bugs from entering your space.

Maintaining a clean yard is also crucial in natural pest control for box elders. Regularly remove debris such as fallen leaves and branches where these bugs might congregate. Additionally, planting certain types of flowers like marigolds or chrysanthemums can naturally repel box elder bugs due to their strong scents.

Finally, consider introducing natural predators into your garden. Birds and beneficial insects like ladybugs feed on box elder bugs and help keep their population under control without the need for chemical interventions.

By utilizing these eco-friendly solutions, you not only manage the presence of box elder bugs but also contribute to a healthier ecosystem overall.

read more
FashionJewelry

How to Measure Ring Size (Guide for Perfect Fitting Jewelry)

How To Measure Ring Size Guide For Perfect Fitting Jewelry

When it comes to purchasing a ring, knowing your ring size is crucial for several reasons. The importance of ring size cannot be overstated, as it ensures that you achieve the perfect ring fit. An accurate ring size measurement is essential not only for comfort but also for the longevity and security of your jewelry.

Firstly, a well-fitted ring feels comfortable and secure on your finger. If a ring is too tight, it can cause discomfort and even restrict blood flow. Conversely, if it’s too loose, there’s a risk of losing the precious piece altogether. Therefore, having an accurate measurement helps in avoiding these issues.

Secondly, an accurately sized ring looks more aesthetically pleasing. A perfect fit ensures that the gemstone or design stays centered and doesn’t spin around your finger. This stability enhances the overall appearance of the jewelry.

Lastly, proper jewelry fitting can affect the durability of your piece. Rings that are either too tight or too loose are more likely to suffer from wear and tear over time. Ensuring that you have an accurate ring size measurement means that your rings will last longer and maintain their original beauty.

In summary, understanding the importance of knowing your ring size cannot be emphasized enough when aiming for comfort, security, aesthetic appeal, and durability in your jewelry pieces.

Methods to Measure Your Ring Size at Home

Choosing the perfect ring requires knowing your exact ring size, but what if you can’t make it to a jeweler? Fortunately, there are several methods to measure your ring size at home accurately. Here are three popular DIY techniques:

1. String Method: One of the simplest ways to measure your ring size at home is by using a piece of string. Wrap the string around the base of your finger, ensuring it is snug but not too tight. Mark where the string overlaps with a pen, then lay it flat and measure its length in millimeters using a ruler. Compare this measurement with a standard ring size chart to find your corresponding size.

2. Paper Strip Method: Similar to the string method, this technique involves cutting a thin strip of paper about 100mm long and 10mm wide. Wrap it around your finger and mark where it overlaps with itself. Lay the paper flat and measure its length in millimeters from one end to the marked point. Use this measurement against a ring sizing chart for an accurate result.

3. Ruler and Paper Method: This method requires you to have an existing well-fitting ring on hand. Place the ring on top of a ruler and measure its internal diameter in millimeters from edge to edge at its widest point. Cross-reference this diameter with an online ring sizing chart to determine your correct size.

These DIY methods for measuring your ring size at home are convenient and reliable solutions when professional sizing isn’t accessible. Always double-check measurements for accuracy before making any purchase decisions.

Using a Ring Sizer Tool for Accurate Measurement

Using A Ring Sizer Tool For Accurate Measurement

When it comes to finding the perfect ring, ensuring a precise fit is crucial. A ring sizer tool is an invaluable asset in achieving accurate measurements, whether you’re shopping for an engagement ring or simply updating your jewelry collection. Here’s how to use a ring sizer tool effectively and why professional ring measurement tools are recommended.

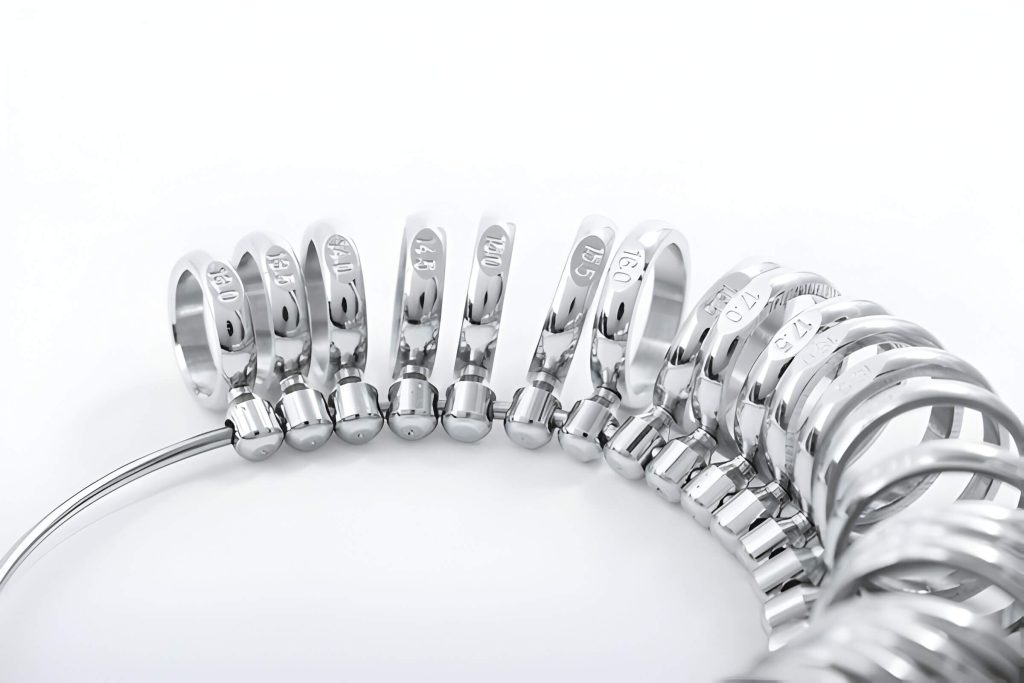
First, understand that there are various types of ring sizer tools available, including plastic strips, metal rings on a keyring, and adjustable mandrels. Each type serves the same purpose but may offer different levels of precision. For the most accurate results, professional jewelers often rely on metal gauge rings or digital sizing tools.

To use a basic plastic or metal ring sizer tool at home:

  1. Choose the type of sizer you have (strip or keyring).
  2. Slide your finger into each size until you find one that fits comfortably without being too tight.
  3. Ensure there is slight resistance when removing the sizer; this indicates a snug fit.
  4. Note down the size indicated on the tool.

For those seeking even greater accuracy, visiting a jeweler who uses professional ring measurement tools can be beneficial. These tools provide precise readings by accommodating various finger shapes and sizes more accurately than home kits.

In summary, using a ring sizer tool is straightforward but requires attention to detail for best results. Whether opting for an at-home kit or seeking professional assistance, accurate measurements ensure comfort and security in your chosen piece of jewelry.

The Role of Temperature and Time of Day in Measuring Ring Size

When it comes to measuring ring size, both temperature and time of day play crucial roles in ensuring accurate results. The temperature effect on finger size is significant; fingers tend to swell in warmer conditions and shrink when it’s cold. This fluctuation can lead to inaccurate measurements if not accounted for properly.

The best time to measure ring size is during the middle of the day, when your body temperature is relatively stable. Early mornings may yield smaller measurements due to cooler temperatures and reduced blood flow, while late evenings might show larger sizes because of daily activities causing finger swelling.

To avoid inaccurate measurements, it’s essential to consider these factors. Measure your ring size at a consistent time of day and in a comfortable room temperature setting. By doing so, you’ll ensure that the ring fits perfectly under normal conditions, avoiding any discomfort or need for resizing later on.

Consulting a Professional Jeweler for Exact Measurements

When it comes to ensuring the perfect fit for your jewelry, consulting a professional jeweler is paramount. Professional jeweler advice can make all the difference in achieving precise measurements for your treasured pieces. Whether you’re purchasing a new ring or resizing an existing one, visiting a jewelry store for accurate measurements is essential.

Expert ring sizing tips from seasoned jewelers can help you avoid common pitfalls associated with incorrect sizing. They utilize reliable measurement methods that take into account various factors such as finger size fluctuations due to temperature and time of day. By leveraging their expertise, you ensure that your jewelry fits comfortably and securely.

Moreover, professional jewelers have access to specialized tools and equipment that provide more exact measurements than DIY methods. This precision is crucial not only for comfort but also for the longevity and integrity of your jewelry. Trusting a knowledgeable jeweler ensures that your valuable pieces are measured with the utmost care and accuracy, giving you peace of mind and satisfaction with every wear.

Troubleshooting Common Issues When Measuring Ring Size

When it comes to measuring ring size, accuracy is paramount to ensure a comfortable and secure fit. However, common mistakes can often lead to incorrect measurements. Here are some troubleshooting tips for addressing these issues:

1. Using Improper Tools: One of the most frequent mistakes is using non-standard tools like strings or paper strips. These materials can stretch or compress, leading to inaccurate readings. Instead, use a proper ring sizer or visit a jeweler for precise measurement.

2. Measuring at the Wrong Time of Day: Finger sizes can fluctuate due to temperature changes and physical activity. Measuring your finger when it’s too cold or too hot can result in an incorrect size. Aim to measure your finger at room temperature and preferably at the end of the day when your fingers are likely at their largest.

3. Ignoring Knuckle Size: If you have larger knuckles, you might find that a ring that fits over them is too loose on the finger itself. In such cases, consider opting for half sizes or rings with adjustable bands.

4. Not Accounting for Ring Width: Wider rings tend to fit more snugly than narrow ones due to increased surface area contact with the skin. When measuring for a wider band, it might be necessary to go up by half a size to ensure comfort.

5. Rechecking Measurements: Always double-check your measurements before making any purchase decisions. A slight error in reading could lead to discomfort and potential resizing costs later on.

By being aware of these common mistakes in measuring ring size and knowing how to fix wrong measurements, you can ensure a correct fit every time you shop for rings.

read more
Home & FamilyPets

Hookworms in Dogs (Causes, Signs, Treatment, and Prevention)

Hookworms In Dogs Causes Signs Treatment And Prevention

Hookworms are a serious parasitic threat to dogs, causing significant health issues if untreated. Understanding the causes, signs, treatment options, and prevention of hookworm infections is crucial for dog owners. This guide covers how these parasites infect dogs, symptoms to watch for, effective treatments, and preventive steps. Regular veterinary check-ups and proper hygiene ensure your dog’s healthier life.

Introduction to Hookworms in Dogs

Hookworms in dogs are a significant concern for pet owners and veterinarians alike. These parasitic worms, known scientifically as Ancylostoma caninum, reside in the intestines of infected dogs and can lead to severe health issues if left untreated. Canine hookworm infection is particularly prevalent in warm, humid environments where the larvae thrive.

The lifecycle of hookworms begins when the larvae penetrate a dog’s skin or are ingested through contaminated food or water. Once inside the host, they travel to the intestines, attach themselves to the intestinal lining, and feed on blood. This feeding behavior can cause anemia, weight loss, diarrhea, and lethargy in affected dogs.

Detecting hookworms early is crucial for effective treatment. Common symptoms include pale gums due to anemia, bloody stools, and general weakness. A veterinarian will typically diagnose hookworm infection through a fecal examination that identifies eggs present in the stool.

Treatment involves deworming medications that eliminate adult worms from the intestines. Preventative measures include regular veterinary check-ups and maintaining good hygiene practices to reduce exposure to contaminated environments.

Understanding hookworms in dogs is essential for ensuring your pet’s health and well-being. By staying informed about these parasitic worms and taking proactive steps towards prevention and treatment, you can help protect your furry friend from this common canine parasite.

Causes of Hookworm Infections in Dogs

Hookworm infections in dogs are a common concern for pet owners, and understanding the causes of these infections is crucial for prevention and treatment. The primary cause of hookworm infection in dogs is the ingestion or direct contact with hookworm larvae. These microscopic larvae can be found in contaminated soil and water, making outdoor environments a potential risk.

Dogs often get hookworms through various transmission routes. One common way is through ingestion when they lick or eat contaminated soil, feces, or water. Another significant transmission method is through skin penetration; hookworm larvae can burrow into a dog’s skin, typically through the paws or belly when they come into contact with infested ground.

Additionally, puppies are particularly vulnerable as they can acquire hookworms from their mother during nursing if she has an active infection. Understanding these transmission pathways helps pet owners take preventive measures such as maintaining clean living environments and regular veterinary check-ups to keep their furry friends safe from hookworm infections.

Recognizing the Signs and Symptoms of Hookworm Infections in Dogs

Hookworm infections are a common parasitic issue that can affect dogs of all ages. Being vigilant about the health of your pet is crucial, as early detection and treatment can significantly improve outcomes. Understanding the signs of hookworms in dogs is essential for any responsible pet owner.

One of the primary symptoms of canine hookworms is anemia, which occurs due to the blood-sucking nature of these parasites. You might notice your dog appearing lethargic or weak, which are telltale signs that something may be amiss. Pale gums are another indicator that your dog may be suffering from anemia caused by a hookworm infection.

Gastrointestinal distress is also a common symptom associated with hookworm infections. Look out for signs such as diarrhea, which may sometimes contain blood, and vomiting. These symptoms suggest that your dog’s digestive system is being compromised by parasitic activity.

In addition to these more obvious symptoms, weight loss and poor coat condition can also signal a hookworm infection. If you observe your dog losing weight despite maintaining its regular diet or if its coat appears dull and unhealthy, it’s advisable to consult your veterinarian for an evaluation.

Identifying parasitic infections in dogs early on can make a significant difference in their health and well-being. Regular veterinary check-ups and prompt attention to any unusual symptoms can help ensure your furry friend stays healthy and happy.

Treatment Options for Hookworm Infections in Dogs

Treatment Options For Hookworm Infections In Dogs

Hookworm infections in dogs can be a serious health concern, but fortunately, there are several effective treatment options available. Treating hookworms in dogs typically involves a multi-faceted approach that includes deworming treatments, medications, and ongoing veterinary care.

The first step in addressing hookworm infections is usually a deworming treatment for dogs. Dewormers are medications specifically designed to eliminate intestinal parasites. Commonly used dewormers include pyrantel pamoate, fenbendazole, and milbemycin oxime. These medications work by paralyzing or killing the worms so they can be expelled from the dog’s body through the digestive system.

In addition to deworming treatments, your veterinarian may prescribe specific medication for dog parasites to address any secondary issues caused by the infection. This could include antibiotics if there is an associated bacterial infection or iron supplements if the dog is suffering from anemia due to blood loss caused by the hookworms.

Veterinary treatment for dog worms also involves regular follow-up visits to ensure that the infection has been fully eradicated and that there are no lingering effects on your dog’s health. Your vet may recommend periodic fecal examinations to monitor for any signs of reinfection and adjust treatment plans as necessary.

Overall, prompt and thorough veterinary care is crucial when dealing with hookworm infections in dogs. By following your veterinarian’s recommendations and ensuring your pet receives appropriate deworming treatments and medications, you can effectively manage and prevent these parasitic infections.

Preventive Measures to Protect Your Dog from Hookworms

Preventing hookworm infections in dogs is crucial for maintaining your pet’s health and well-being. These parasitic worms can cause severe anemia, weight loss, and other health issues if not addressed promptly. Here are some essential dog parasite prevention tips to help keep your canine companion safe from hookworms.

Firstly, regular veterinary check-ups are vital. Your veterinarian can perform routine fecal examinations to detect any signs of hookworm infections early on. Early detection allows for prompt treatment, reducing the risk of severe complications.

Secondly, maintaining good hygiene practices is essential in preventing parasitic infections in pets. Ensure that your dog’s living area is clean and free from fecal matter. Regularly clean up after your dog during walks and dispose of waste properly to minimize the risk of contamination.

Another critical preventive measure is administering a veterinarian-recommended deworming schedule. Deworming medications effectively eliminate existing parasites and prevent future infestations. Consult with your vet to determine the most appropriate deworming regimen for your dog based on their age, lifestyle, and overall health.

Additionally, practicing proper canine hygiene plays a significant role in preventing hookworm infections. Regularly bathe your dog using a gentle shampoo to remove any potential parasites from their coat. Also, ensure that their bedding is clean and washed frequently.

Lastly, be mindful of where you take your dog for walks or playtime. Avoid areas known for high contamination levels or those frequented by stray animals that may carry parasites.

By following these preventive measures diligently, you can significantly reduce the risk of hookworm infections in dogs and ensure a healthier life for your furry friend.

The Importance of Regular Veterinary Check-ups for Your Dog’s Health

Regular veterinary check-ups are crucial for maintaining your dog’s overall health and well-being. These routine visits play a significant role in preventative care for pets, ensuring that any potential health issues are identified and addressed early on. By scheduling regular vet visits for dogs, pet owners can stay ahead of common ailments and provide comprehensive pet health care.

One of the primary benefits of routine vet check-ups is the early detection of diseases. Many conditions, such as dental disease, obesity, and heart problems, can develop slowly over time without obvious symptoms. Regular examinations allow veterinarians to perform thorough assessments and catch these issues before they become severe.

Additionally, preventative care for pets during these visits often includes vaccinations, parasite control, and nutritional advice tailored to your dog’s specific needs. This proactive approach helps in maintaining a strong immune system and preventing illnesses that could otherwise be costly or challenging to treat.

Moreover, routine vet check-ups foster a strong relationship between you, your dog, and the veterinarian. This trust is essential when it comes to managing chronic conditions or emergencies that may arise in the future. By prioritizing regular veterinary appointments, you ensure that your dog receives the best possible care throughout their life.

Conclusion (Keep Your Dog Safe from Hookworms with Proper Care and Preventive Practices)

Ensuring your dog remains free from hookworms requires a combination of vigilance, proper care, and preventive measures. Regular veterinary check-ups are crucial for early detection and treatment of hookworm infections. Administering prescribed deworming medications as recommended by your vet can significantly reduce the risk of infestation.

Maintaining good hygiene is another essential preventive practice. Clean up after your dog promptly to minimize the chances of hookworms spreading in the environment. Additionally, ensure that your dog’s living area is kept clean and free from fecal contamination.

Feeding your dog a balanced diet helps boost their immune system, making them less susceptible to infections. Also, avoid letting your dog roam in areas known to be contaminated with feces from other animals.

By adhering to these practices, you can protect your furry friend from the dangers of hookworms and ensure they lead a healthy, happy life.

read more
Home & FamilyPets

Can Dogs Eat Raw Chicken? Everything You Need to Know

Can Dogs Eat Raw Chicken Everything You Need To Know

As raw diets for dogs gain popularity, many pet owners wonder about the safety and benefits of feeding raw chicken. This guide covers the nutritional advantages and potential health risks, with insights from veterinary experts and tips on safe handling. Explore the pros, cons, expert opinions, and alternative dietary choices to make an informed decision for your dog’s nutrition.

Nutritional Benefits of Feeding Your Dog Raw Chicken

Feeding your dog raw chicken can offer a variety of nutritional benefits that contribute to overall canine health. One of the primary advantages is the high protein content found in raw chicken. Protein is essential for muscle development, repair, and maintaining a healthy coat and skin. Raw chicken also contains important nutrients such as vitamins B6 and B12, niacin, phosphorus, and selenium, all of which play crucial roles in supporting your dog’s metabolic functions and immune system.

The benefits of raw meat for dogs extend beyond just protein. Raw chicken provides natural sources of fats that are vital for energy production and nutrient absorption. Additionally, the bones in raw chicken can be beneficial for dental health by helping to keep teeth clean and gums strong through natural chewing processes.

Incorporating raw chicken into your dog’s diet can also enhance their overall digestive health. The enzymes present in raw meat aid in digestion and promote better nutrient absorption compared to some processed dog foods. However, it’s important to ensure that the raw chicken is fresh and handled properly to avoid any potential risks associated with bacterial contamination.

Overall, integrating raw chicken into your dog’s diet can significantly improve their nutrition by providing essential proteins, vitamins, minerals, and healthy fats necessary for optimal canine nutrition. Always consult with a veterinarian before making any significant changes to your pet’s diet to ensure it meets their specific needs.

Potential Risks and Safety Concerns of Feeding Dogs Raw Chicken

Potential Risks And Safety Concerns Of Feeding Dogs Raw Chicken

Feeding dogs raw chicken has become a trend among some pet owners, but it’s important to be aware of the potential risks and safety concerns associated with this practice. One of the primary dangers is bacterial infections from raw chicken. Raw meat can harbor harmful bacteria such as Salmonella and Campylobacter, which can lead to serious health issues in dogs.

The risks of salmonella in dogs are particularly concerning. Ingesting contaminated raw chicken can result in gastrointestinal distress, including symptoms like vomiting, diarrhea, and lethargy. In severe cases, it may even lead to more serious conditions such as septicemia or systemic infections that require immediate veterinary attention.

Safety concerns with raw meat for pets extend beyond just bacterial infections. Handling and storing raw chicken improperly can increase the likelihood of contamination not only for your pet but also for household surfaces and humans in the home. It’s crucial to practice strict hygiene measures if you choose to feed your dog a raw diet.

While feeding dogs raw chicken might seem like a natural choice, it’s essential to weigh these potential risks carefully. Consulting with a veterinarian before making any significant changes to your pet’s diet is always recommended to ensure their health and safety.

Tips and Guidelines to Safely Feed Your Dog Raw Chicken

Feeding your dog raw chicken can be a nutritious option, but it’s crucial to follow specific guidelines to ensure safety and hygiene. Proper handling of raw meat for dogs is essential to prevent any potential health risks for both your pet and household members.

Firstly, always source high-quality raw chicken from reputable suppliers. Freshness is key, so check the expiration date and avoid any meat that looks discolored or has an off smell. When preparing raw chicken for pets, use separate utensils and cutting boards dedicated solely to their food. This minimizes the risk of cross-contamination with human food.

Hygiene tips for feeding dogs raw food include thoroughly washing your hands before and after handling the meat. Clean all surfaces that come into contact with the raw chicken with hot, soapy water or a disinfectant. Store any unused portions in airtight containers in the refrigerator or freezer to maintain freshness.

By following these tips on safe handling of raw meat for dogs, you can confidently provide a balanced diet while keeping your pet healthy and happy.

What Do Experts Say About Dogs Eating Raw Chicken?

When it comes to feeding dogs raw chicken, veterinary opinions are notably varied. Many experts in the field of dog nutrition express concerns about the potential risks associated with raw diets. One of the primary issues highlighted by vets is the risk of bacterial contamination, such as Salmonella and E. coli, which can pose significant health threats not only to dogs but also to their owners.

On the other hand, some veterinarians advocate for raw diets under strict guidelines and proper handling procedures. They argue that a well-balanced raw diet can offer nutritional benefits that mimic a dog’s natural ancestral diet. Proponents suggest that raw food can lead to shinier coats, healthier skin, improved dental health, increased energy levels, and smaller stools.

However, it’s essential for pet owners to consult with their veterinarians before making any significant changes to their dog’s diet. Vet advice on feeding dogs raw food typically includes ensuring that meals are balanced and complete with all necessary nutrients. Moreover, experts recommend sourcing high-quality meat and practicing safe food handling techniques to minimize health risks.

While there are both proponents and opponents within veterinary circles regarding feeding dogs raw chicken or other raw foods, it is crucial for pet owners to seek professional guidance tailored to their specific pets’ needs before embarking on a raw diet regimen.

Exploring Other Dietary Options for Your Dog

When it comes to feeding your dog, the debate between cooked chicken and raw chicken is a common one among pet owners. While raw chicken is often touted for its natural enzymes and nutrients, it carries risks such as bacterial contamination. On the other hand, cooked chicken eliminates these risks but may lose some nutritional value during the cooking process. Given these considerations, exploring alternative proteins can be beneficial for ensuring a balanced diet for your canine companion.

Alternative proteins like turkey, beef, lamb, and fish can provide essential nutrients while diversifying your dog’s diet. These options can be found in both commercial dog foods and homemade dog meal recipes. Commercial dog foods often offer well-balanced formulations that cater to various dietary needs and preferences, making it easier to ensure your pet receives all necessary nutrients.

For those who prefer a more hands-on approach, homemade dog meal recipes allow you to control every ingredient that goes into your dog’s bowl. This method enables you to tailor meals specifically to your dog’s health requirements and taste preferences. Ingredients such as sweet potatoes, brown rice, carrots, and green beans can be combined with different protein sources to create nutritious meals.

Whether you choose cooked chicken or explore alternative proteins like turkey or fish, the key is maintaining a balanced diet that meets all of your dog’s nutritional needs. Consulting with a veterinarian can provide personalized guidance tailored to your pet’s specific health conditions and dietary requirements.

Weighing the Pros and Cons – Is a Raw Chicken Diet Right for Your Dog?

When considering a raw chicken diet for your dog, it’s essential to weigh both the benefits and potential risks. On the one hand, proponents argue that raw chicken can provide a more natural and biologically appropriate diet. This type of feeding can lead to improved coat condition, higher energy levels, and better dental health due to the mechanical action of chewing raw bones.

However, there are significant concerns to consider. Raw chicken poses a risk of bacterial contamination, such as Salmonella or E. coli, which can affect both your pet and household members. Additionally, an unbalanced raw diet may lead to nutritional deficiencies or imbalances over time if not properly managed.

Deciding whether a raw chicken diet is right for your dog requires careful consideration of these factors. Consulting with a veterinarian who understands canine nutrition is crucial in making an informed decision that prioritizes your dog’s health and well-being.

read more
Food & Beverage

How is Vinegar Made? A Guide to the Vinegar Production Process

How Is Vinegar Made A Guide To The Vinegar Production Process

Vinegar is a versatile kitchen staple known for its tangy flavor and numerous uses, from cooking to cleaning. This guide explores vinegar production, covering traditional and modern methods, the science of fermentation, different types of vinegars, and tips for making your own at home.

The Basics of Vinegar and Its Uses

Vinegar is a versatile and widely used liquid that has been a staple in households and industries for centuries. But what exactly is vinegar? At its core, vinegar is a solution of acetic acid and water, produced through the fermentation of ethanol by acetic acid bacteria. This simple yet potent concoction offers a myriad of applications across various domains.

One of the primary uses of vinegar is in cooking. It acts as a flavor enhancer, preservative, and tenderizing agent. Different types of vinegar, such as apple cider vinegar, balsamic vinegar, white vinegar, and rice vinegar, bring unique flavors to dishes ranging from salads to marinades.

Beyond culinary uses, the benefits of vinegar extend into cleaning and personal care. Its acidic nature makes it an effective natural cleaner capable of cutting through grease, removing stains, and disinfecting surfaces. Additionally, some people use diluted apple cider vinegar as a skin toner or hair rinse due to its purported health benefits.

The Science Behind Vinegar (Fermentation and Acetic Acid Bacteria)

The Science Behind Vinegar Fermentation And Acetic Acid Bacteria

Vinegar, a staple in kitchens worldwide, owes its unique properties to a fascinating scientific process. At the heart of vinegar production is the fermentation process, which transforms ethanol into acetic acid through the action of acetic acid bacteria. This transformation is not only a marvel of chemistry but also an age-old technique that has been refined over centuries.

The fermentation process begins with a source of ethanol, typically derived from alcoholic beverages like wine or cider. When exposed to oxygen, acetic acid bacteria (AAB) such as Acetobacter and Gluconobacter species come into play. These microorganisms oxidize the ethanol (C2H5OH) into acetic acid (CH3COOH), the primary component responsible for vinegar’s distinct sour taste and pungent aroma.

The chemistry of vinegar involves several steps: initially, AAB convert ethanol into acetaldehyde (CH3CHO) through enzymatic reactions. Subsequently, acetaldehyde is further oxidized to produce acetic acid. This entire biochemical pathway not only highlights the efficiency of these bacteria but also underscores their critical role in producing high-quality vinegar.

This process sheds light on why different vinegars possess varying flavors and strengths; factors such as the starting material, bacterial strains used, and environmental conditions during fermentation all contribute to the final product’s unique characteristics. Thus, appreciating the science behind vinegar enriches our culinary experiences and deepens our respect for this versatile ingredient’s complex origins.

The Traditional Method (How Vinegar was Made Historically)

Traditional vinegar production has a rich history dating back thousands of years. The process of historical vinegar making relied on natural fermentation methods that were both time-consuming and labor-intensive, yet yielded a product revered for its flavor and versatility.

In ancient times, vinegar was typically produced from wine or other alcoholic beverages. The process began with the exposure of these liquids to air, allowing naturally occurring acetic acid bacteria to convert the ethanol into acetic acid through a slow fermentation process. This old-fashioned fermentation method often took several months to complete, as it depended heavily on ambient conditions and the presence of wild bacteria.

Artisans would carefully monitor the fermentation stages, sometimes adding substances like wood shavings or straw to increase surface area and facilitate bacterial growth. These traditional techniques ensured that each batch had its unique character and taste profile, influenced by factors such as the type of alcohol used, local microbial flora, and environmental conditions.

Despite modern advancements in vinegar production technology, many enthusiasts still appreciate the depth of flavor achieved through these historical methods. Traditional vinegar production not only highlights the ingenuity of early food preservation techniques but also underscores the enduring appeal of artisanal craftsmanship in our culinary heritage.

The Modern Method (How Industrial Vinegar Production Works Today)

Industrial vinegar production has come a long way from traditional artisanal methods, thanks to advancements in modern fermentation techniques. Today, large-scale vinegar manufacturing is characterized by efficiency, consistency, and quality control.

In modern industrial vinegar production, the process typically begins with the selection of high-quality raw materials such as ethanol or wine. These substrates are then introduced into large fermentation tanks where they undergo a controlled fermentation process. This is facilitated by acetic acid bacteria, which convert ethanol into acetic acid—the key component of vinegar.

One of the most significant advancements in this field is the use of submerged fermentation techniques. Unlike traditional surface fermentation methods that require large surface areas and longer timeframes, submerged fermentation allows for greater bacterial contact with the substrate in a liquid medium. This not only accelerates the production process but also ensures a more consistent product.

Temperature and pH levels are meticulously monitored throughout the fermentation period to optimize bacterial activity and ensure product quality. Once the desired acidity level is achieved, the vinegar undergoes filtration and pasteurization to remove any impurities and extend shelf life.

Large-scale vinegar manufacturing facilities often employ automated systems to maintain precision at every stage of production. From raw material handling to bottling and labeling, automation ensures that each batch meets stringent quality standards while minimizing human error.

Through these advanced methods, industrial vinegar production today can meet global demand efficiently while maintaining high standards of quality and safety.

Exploring Different Types of Vinegars and Their Production Processes

Vinegar is a versatile ingredient found in kitchens worldwide, and its diverse varieties offer unique flavors and benefits. Understanding the production processes behind these vinegars can enhance appreciation for their distinct characteristics.

Balsamic Vinegar Production

Originating from Italy, balsamic vinegar is known for its rich, complex flavor. The production process begins with pressing Trebbiano or Lambrusco grapes to obtain grape must. This must is then cooked down to a thick syrup and aged in wooden barrels for a minimum of 12 years. The aging process allows the vinegar to develop its signature deep color and sweet-tart taste.

Apple Cider Vinegar Making Process

Apple cider vinegar starts with fermenting apple juice into hard cider. This is achieved by adding yeast to convert the sugars into alcohol. The second fermentation involves adding acetic acid bacteria, which converts the alcohol into acetic acid, giving apple cider vinegar its distinctive tangy flavor and health benefits.

Rice Wine Vinegar Creation

Popular in Asian cuisine, rice wine vinegar is made from fermented rice or rice wine. The process involves steaming rice and fermenting it with koji mold spores to break down starches into sugars. Yeast is then added to convert these sugars into alcohol, followed by acetic acid bacteria that transform the alcohol into vinegar. This results in a mild, slightly sweet flavor profile ideal for sushi and salad dressings.

Malt Vinegar Processing

Malt vinegar originates from England and is made from malted barley grains that are brewed into ale. The ale undergoes fermentation by acetic acid bacteria to produce malt vinegar. Known for its robust flavor with hints of caramel sweetness, malt vinegar pairs well with fish and chips as well as pickling vegetables.

Each type of vinegar has a unique production process contributing to its distinct taste and culinary uses. By exploring these methods (balsamic’s lengthy aging, apple cider’s dual fermentation, rice wine’s mold initiation, and malt’s brewing origins) we gain insight into how diverse vinegars enrich our cooking experiences.

DIY at Home (How to Make Your Own Vinegar from Scratch)

Making your own vinegar at home is a fascinating and rewarding project that allows you to explore the art of fermentation. The homemade vinegar recipe is straightforward and requires only a few ingredients and some patience. Here’s a step-by-step guide on how to embark on this DIY fermentation process.

Ingredients and Supplies

To get started, you will need the following home brewing supplies for vinegar making:

– A glass or ceramic container (avoid metal as it can react with the acid)

– Cheesecloth or a clean kitchen towel

– Rubber bands

– A wooden spoon

– Apple cider, wine, or beer (unpasteurized works best)

– Vinegar mother (a symbiotic culture of bacteria and yeast)

Step-by-Step Process

1. Preparation: Begin by sterilizing your container and utensils with hot water to ensure there are no unwanted bacteria.

2. Adding the Base: Pour your chosen base (apple cider, wine, or beer) into the container. Fill it about three-quarters full to leave room for fermentation gases.

3. Introducing the Mother: Add the vinegar mother to the liquid. This culture will kickstart the fermentation process by converting alcohol into acetic acid.

4. Covering: Securely cover the container with cheesecloth or a clean kitchen towel using rubber bands. This allows air in while keeping contaminants out.

5. Fermentation Period: Place your container in a dark, warm place where it can sit undisturbed for several weeks to months. The ideal temperature range is between 60°F and 80°F (15°C – 27°C).

6. Monitoring: Check periodically for any off smells or mold growth on top of the liquid; if you notice any, discard and start over as contamination has occurred.

7. Testing for Readiness: After about four weeks, begin tasting your vinegar using a clean spoon each time until it reaches your desired acidity level.

8. Bottling: Once satisfied with its taste, strain out any solids using cheesecloth before transferring your homemade vinegar into sterilized bottles for storage.

By following these steps in this homemade vinegar recipe, you’ll create deliciously tangy vinegar perfect for cooking, salad dressings, or even pickling vegetables! Not only does this DIY project provide a sense of accomplishment but also offers endless culinary possibilities right from your own kitchen.

read more
1 2 3 5
Page 1 of 5